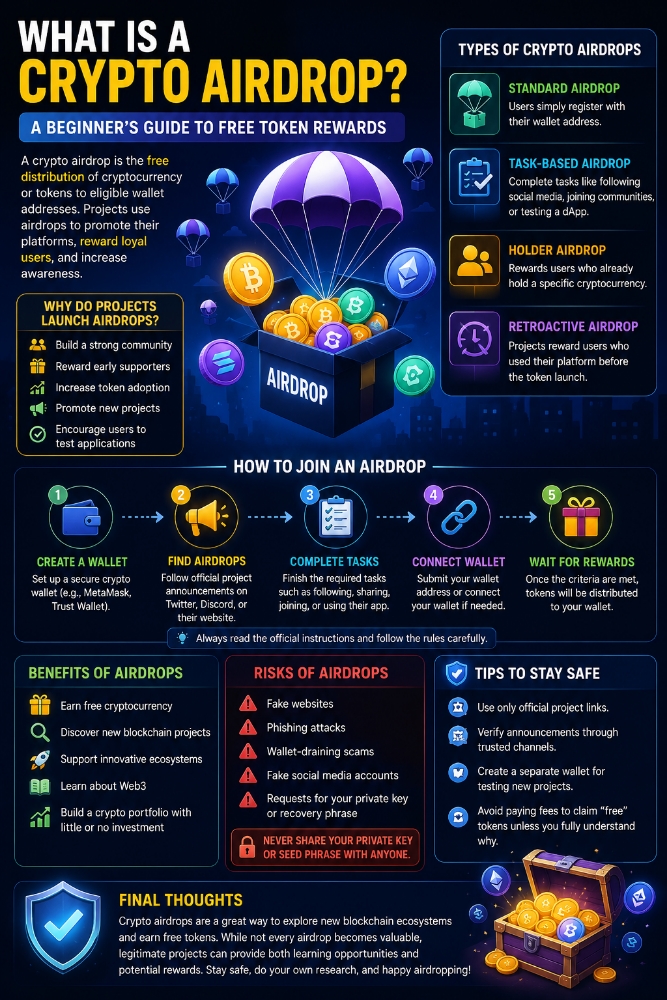
How to Create Your Own Web3 Token (Beginner Guide)

How to Create Your Own Web3 Token (Beginner Guide)
Creating your own Web3 token may sound complicated, but with blockchain technology it has become much easier. Many developers and startups are launching their own tokens to power communities, reward users, and build decentralized ecosystems.
Most Web3 tokens are created on blockchain networks such as Ethereum, which supports smart contracts. These smart contracts automatically manage how tokens are created, transferred, and used.
1. Choose a Blockchain
First, decide which blockchain you want to build on. Popular choices include Ethereum, Binance Smart Chain, or Polygon. Each network has different transaction fees and speed.
2. Define Your Token’s Purpose
Before creating a token, ask yourself:
What problem will the token solve?
Will it reward users, power a platform, or support a community?
A clear purpose helps people trust and use your token.
3. Create a Smart Contract
Tokens are usually created using smart contracts written in the Solidity programming language. These contracts define the total supply, token name, symbol, and rules for transactions.
4. Test Your Token
Before launching publicly, developers test their token using tools like Remix IDE. Testing ensures the smart contract works properly and prevents costly mistakes.
5. Deploy the Token
Once the contract is ready, you deploy it to the blockchain using a crypto wallet like MetaMask. After deployment, your token becomes part of the blockchain and can be transferred or traded.
6. Build a Community
Launching a token is only the beginning. Successful Web3 projects focus on building a strong community that believes in the project’s vision.
Conclusion
Creating a Web3 token is no longer limited to large tech companies. With the right tools, knowledge, and clear purpose, anyone can build a token that powers a new digital ecosystem. The future of decentralized innovation may start with one idea and one token. 🚀