ZEALY

Getting started
Learn everything you need to get started with Zealy.
 Overview
Welcome to Zealy! Start exploring and engaging with the platform right after signing up. This guide provides an overview of key features to help you get started.
Basics
Quests
Quests are at the heart of the Zealy experience. They're opportunities to learn, earn XP, and progress. Quests vary: some are automated, while others need manual approval from community admins to grant XP.
Recurrence and Cooldowns: Set quests to recur daily, weekly, or monthly. Failed attempts may trigger a cooldown, preventing immediate retries. Note, some quests might not allow retries at all.
Leaderboard & Sprints
Earning XP places you on the leaderboard, showcasing your standing within the community. Aim for the top to win prizes in sprints—short, competitive bursts with specific start and end dates, where only certain quests count. Look out for a special 'Sprint' tab during these events.
Account settings
Manage your Zealy account
 Overview
This guide helps you navigate and manage your Zealy account settings, including profile updates, linking external accounts, and account deletion.
Getting Started
Access all your settings by clicking the ... next to your avatar at the bottom left. This leads to your settings page.
Updating Your Profile
Change your name, address, and profile picture under Profile settings. Click your avatar, choose a new image, and hit 'Update' to apply changes.
Linked Accounts
Connect external accounts like email, Discord, Twitter, TikTok, and Ethereum wallet to your Zealy profile. This helps verify task completion. Add or remove these in Linked account settings. Remember, shared accounts are not permitted, and there's a 6-month wait to relink an account to a different user.
Deleting Your Account
Permanently delete your account via Account settings by selecting "Delete my account" and confirming with your username. This action is final, resulting in the loss of all progress and XP.
Troubleshooting
Already Connected: If you receive an error stating an account is already linked, either switch to that account or unlink it from the current user.
Failing without Error: Disable VPNs or ad blockers, try a different browser or device, or contact support for unresolved issues.
Invites
Invite your friends to join the community and earn rewards.
 Overview
Inviting friends not only grows our community but also rewards you. Find your unique invite link under the community banner or in your quests.
Basics
Getting Your Invite Link: Easily locate your invite link in your quests or click on the community banner. Share this link with friends to invite them.
Notifications: Once a friend joins through your link, you'll receive a notification confirming their arrival. Note that the invitation will only be counted for the community you invited them to, not if they join another community as well.
Tracking invites
Customizing Invites: Communities set their own rules, including the XP needed for an invite to count. Often, invites are "consumable," meaning they're used up as you complete quests. For example, if you successfully invite four friends and use a quest requiring three invites, you'll have one left over. Need to complete a five-invitation quest? Just invite four more friends.
Checking Status: Curious about your invites? Click "Inspect invites" on your profile to view the status of your invites and the quests you've completed.
Community setup
Set up and configure your community on Zealy.
 Overview
Zealy is centered around communities and long-term commitment, as opposed to short-term campaigns.
Basics
Creating a Community
Visit zealy.io/create-community or click on "Create community" at the top of the landing page.
Launch
Community Settings
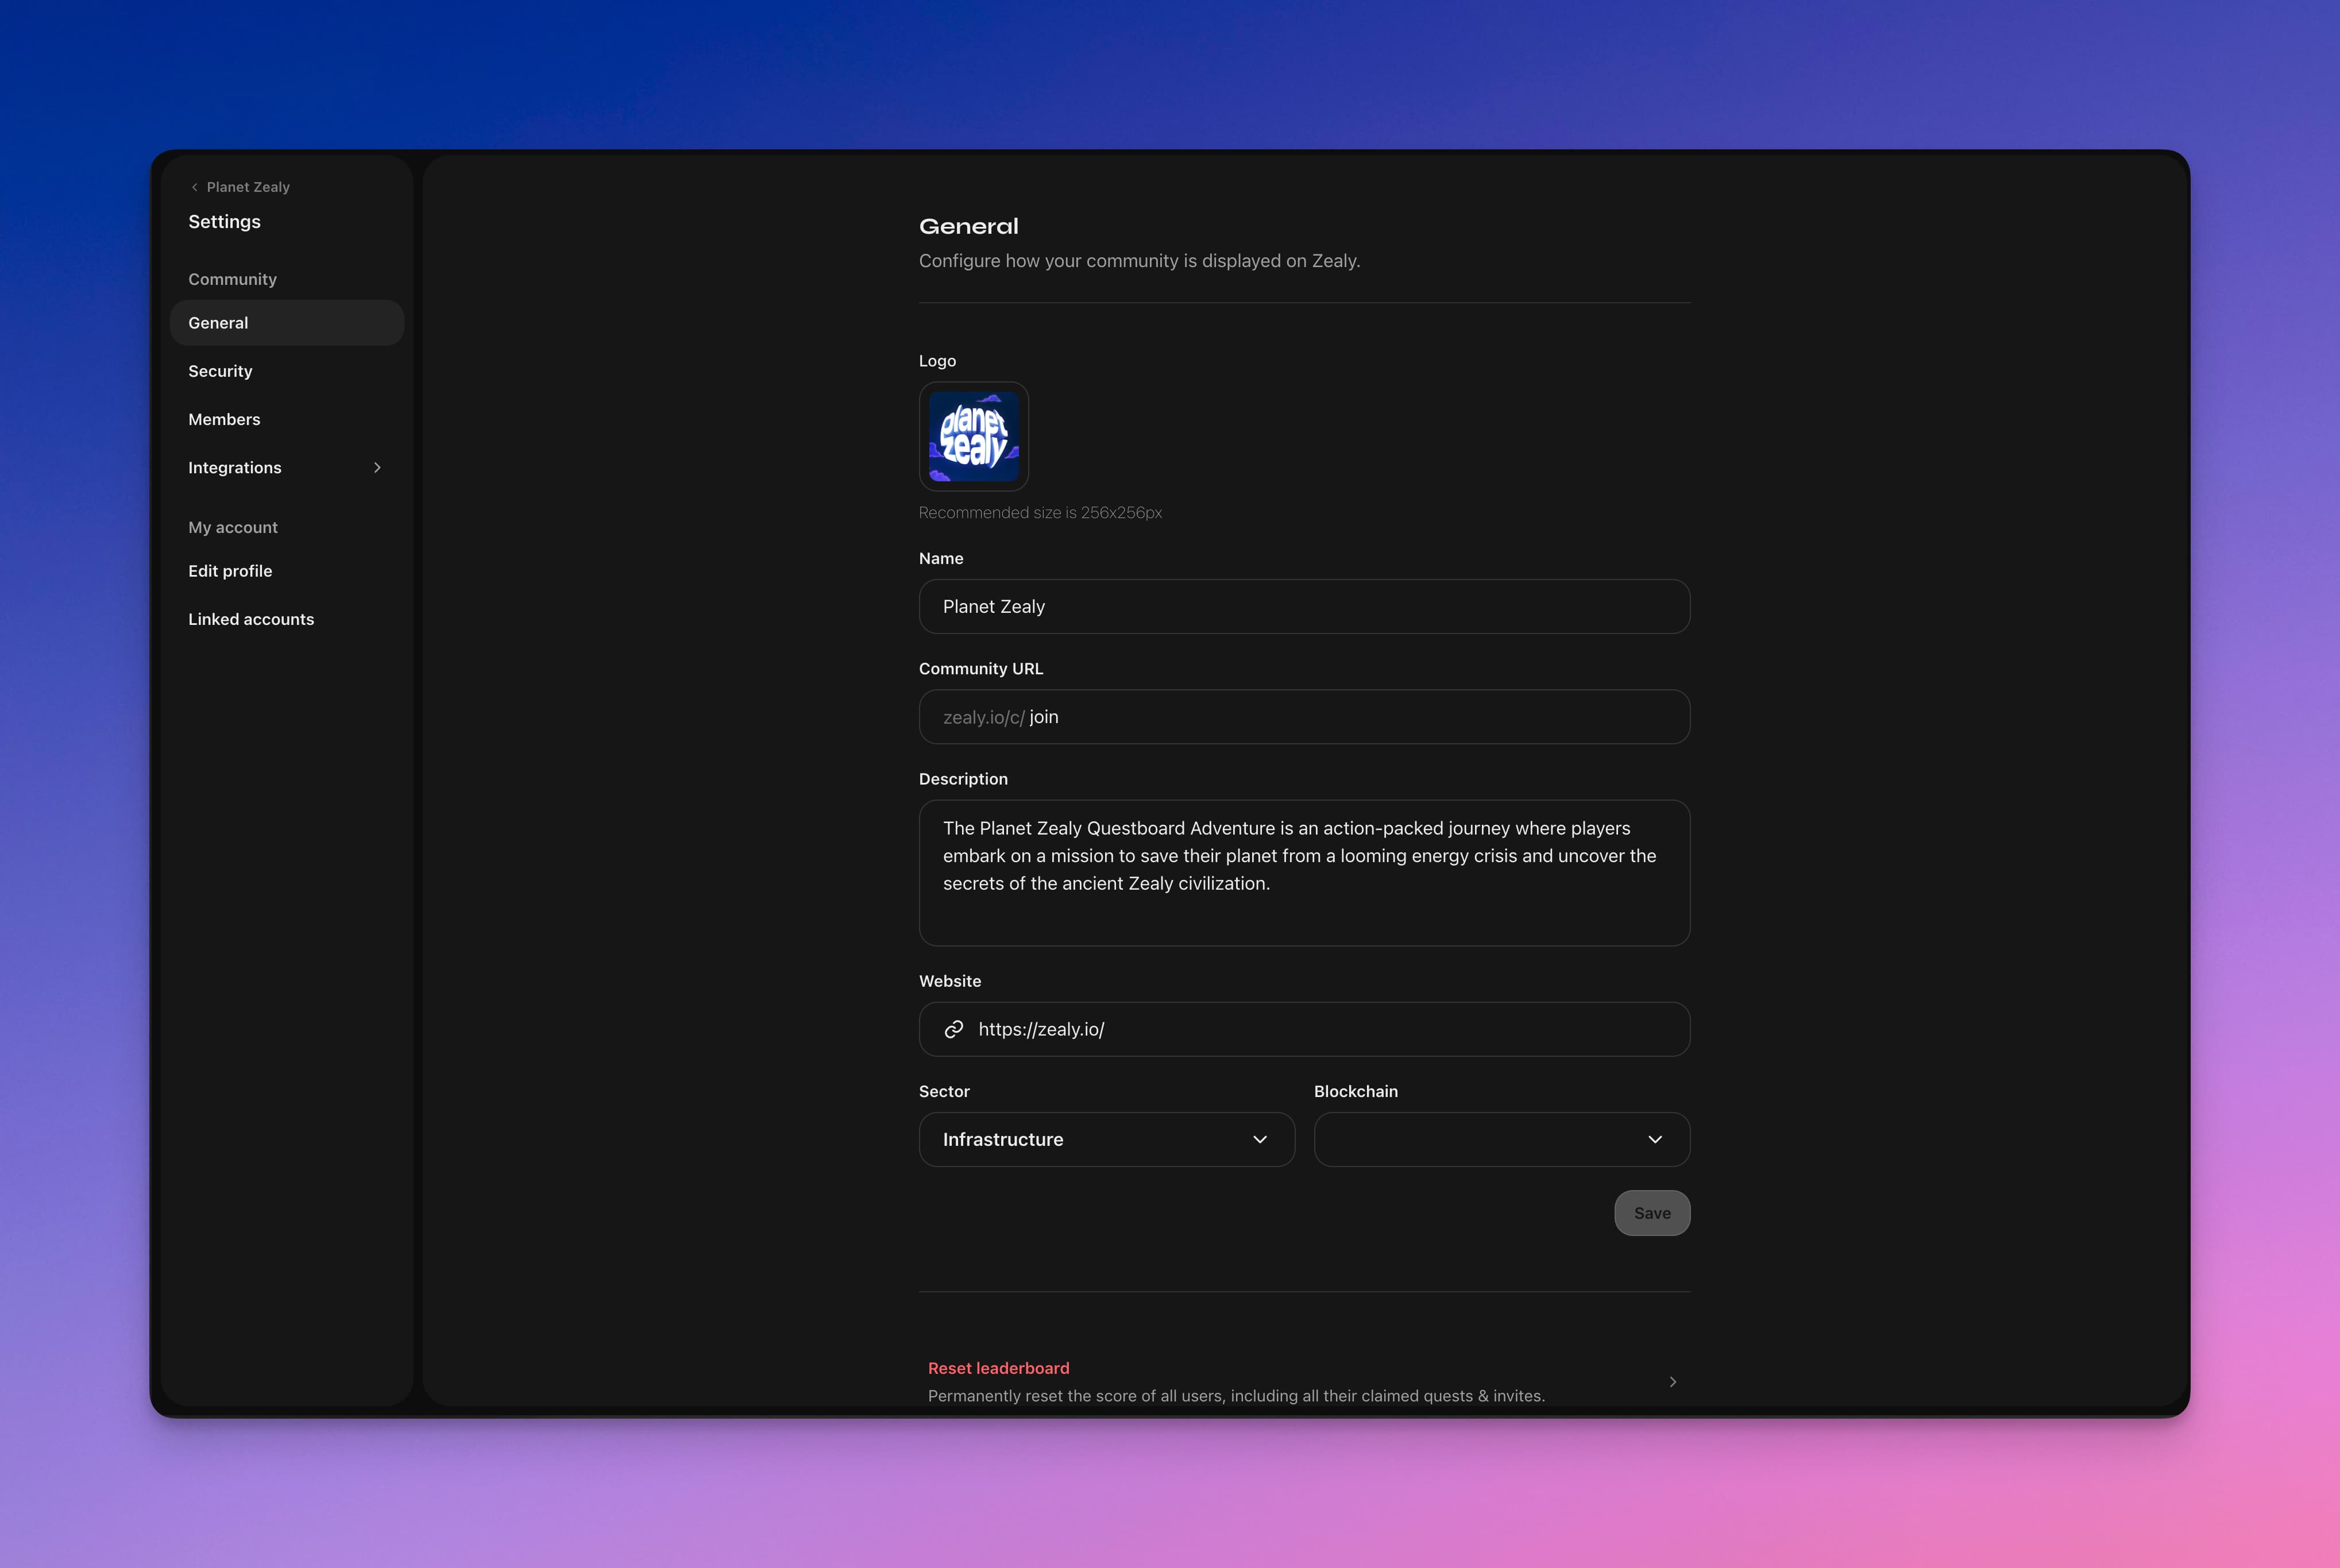
To change the settings or add more information to your community, click the button next to the community name in the sidebar. Then, navigate to community settings.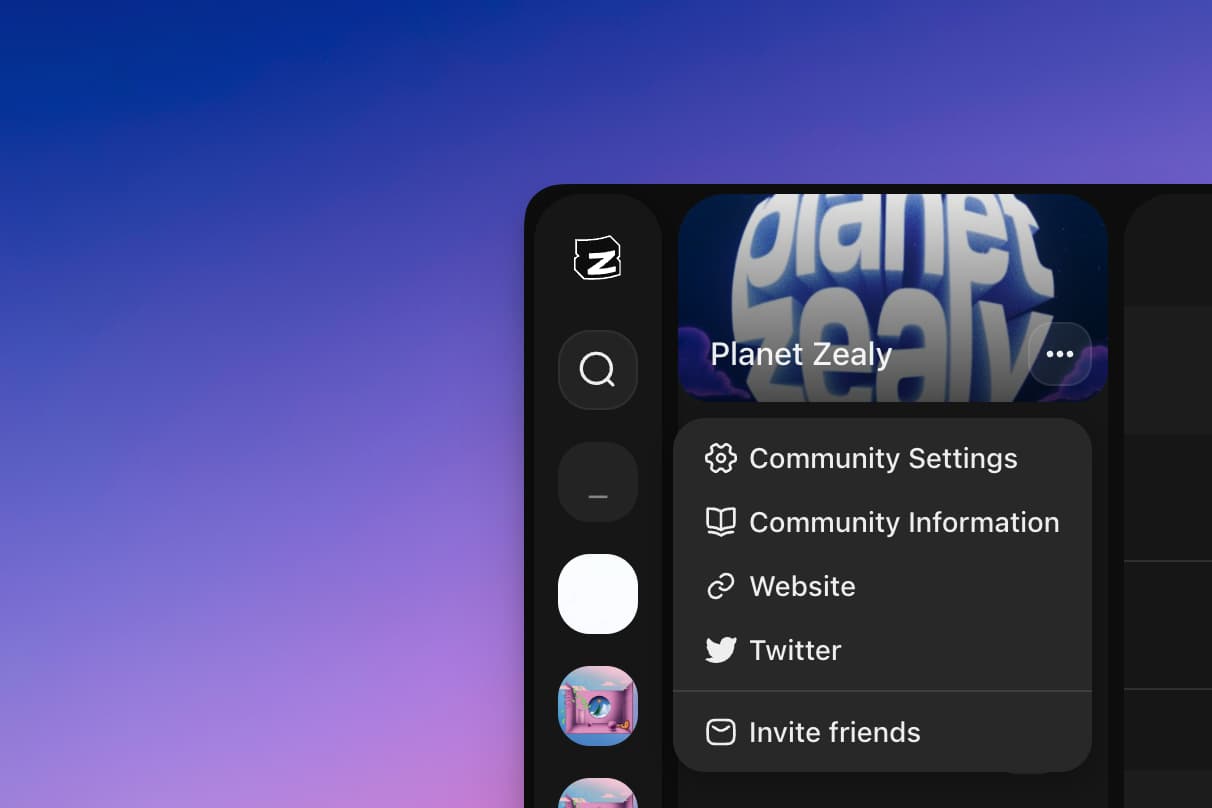 As an admin, you can:
- Update the community name, URL, and other information displayed on the landing page
- Change security settings
- Add or remove members and modify their permissions
- Switch plans
- View and update billing information
Blockchain
You can select among our supported blockchains or add a custom one as shown below.
Plans
By default, your community will be on the free plan. Admins can upgrade the community anytime under Settings > Community > Plans.
Resetting the Leaderboard
If you're an admin, you can reset the leaderboard under Settings > Community > General. This action will reset the scores of all members in your community, including all their claimed quests and invites. Please note that this action cannot be reversed.
Deleting a Community
If you're an admin, you can delete communities (which also erases claimed quests and user data) under Settings > Community > General. Please note that this action cannot be reversed.
Multiple Communities
You can create multiple communities in Zealy under one account. You will be able to view and switch between all your communities from the left community bar. Some users do this to separate their ambassador or moderator community from their main one. This can also be achieved using Discord role conditions or a similar mechanism.
Resources
Here are a few materials where you can look for cool insights.
Here are some valuable case studies:
📖 Case Study 1: https://blog.zealy.io/case-studies-michelin/
📖 Case Study 2: https://blog.zealy.io/case-studies-web3-startups/
And check these expert questboards:
🔍 Questboard 1: https://zealy.io/c/braavos/questboard
🔍 Questboard 2: https://zealy.io/c/nulink/questboard
🔍 Questboard 3: https://zealy.io/c/zetachain/questboard
Spend a few minutes on each of those resources, you’ll be able to take your community’s journey to the next level.
Manage members
Invite and manage members of your team.
 Overview
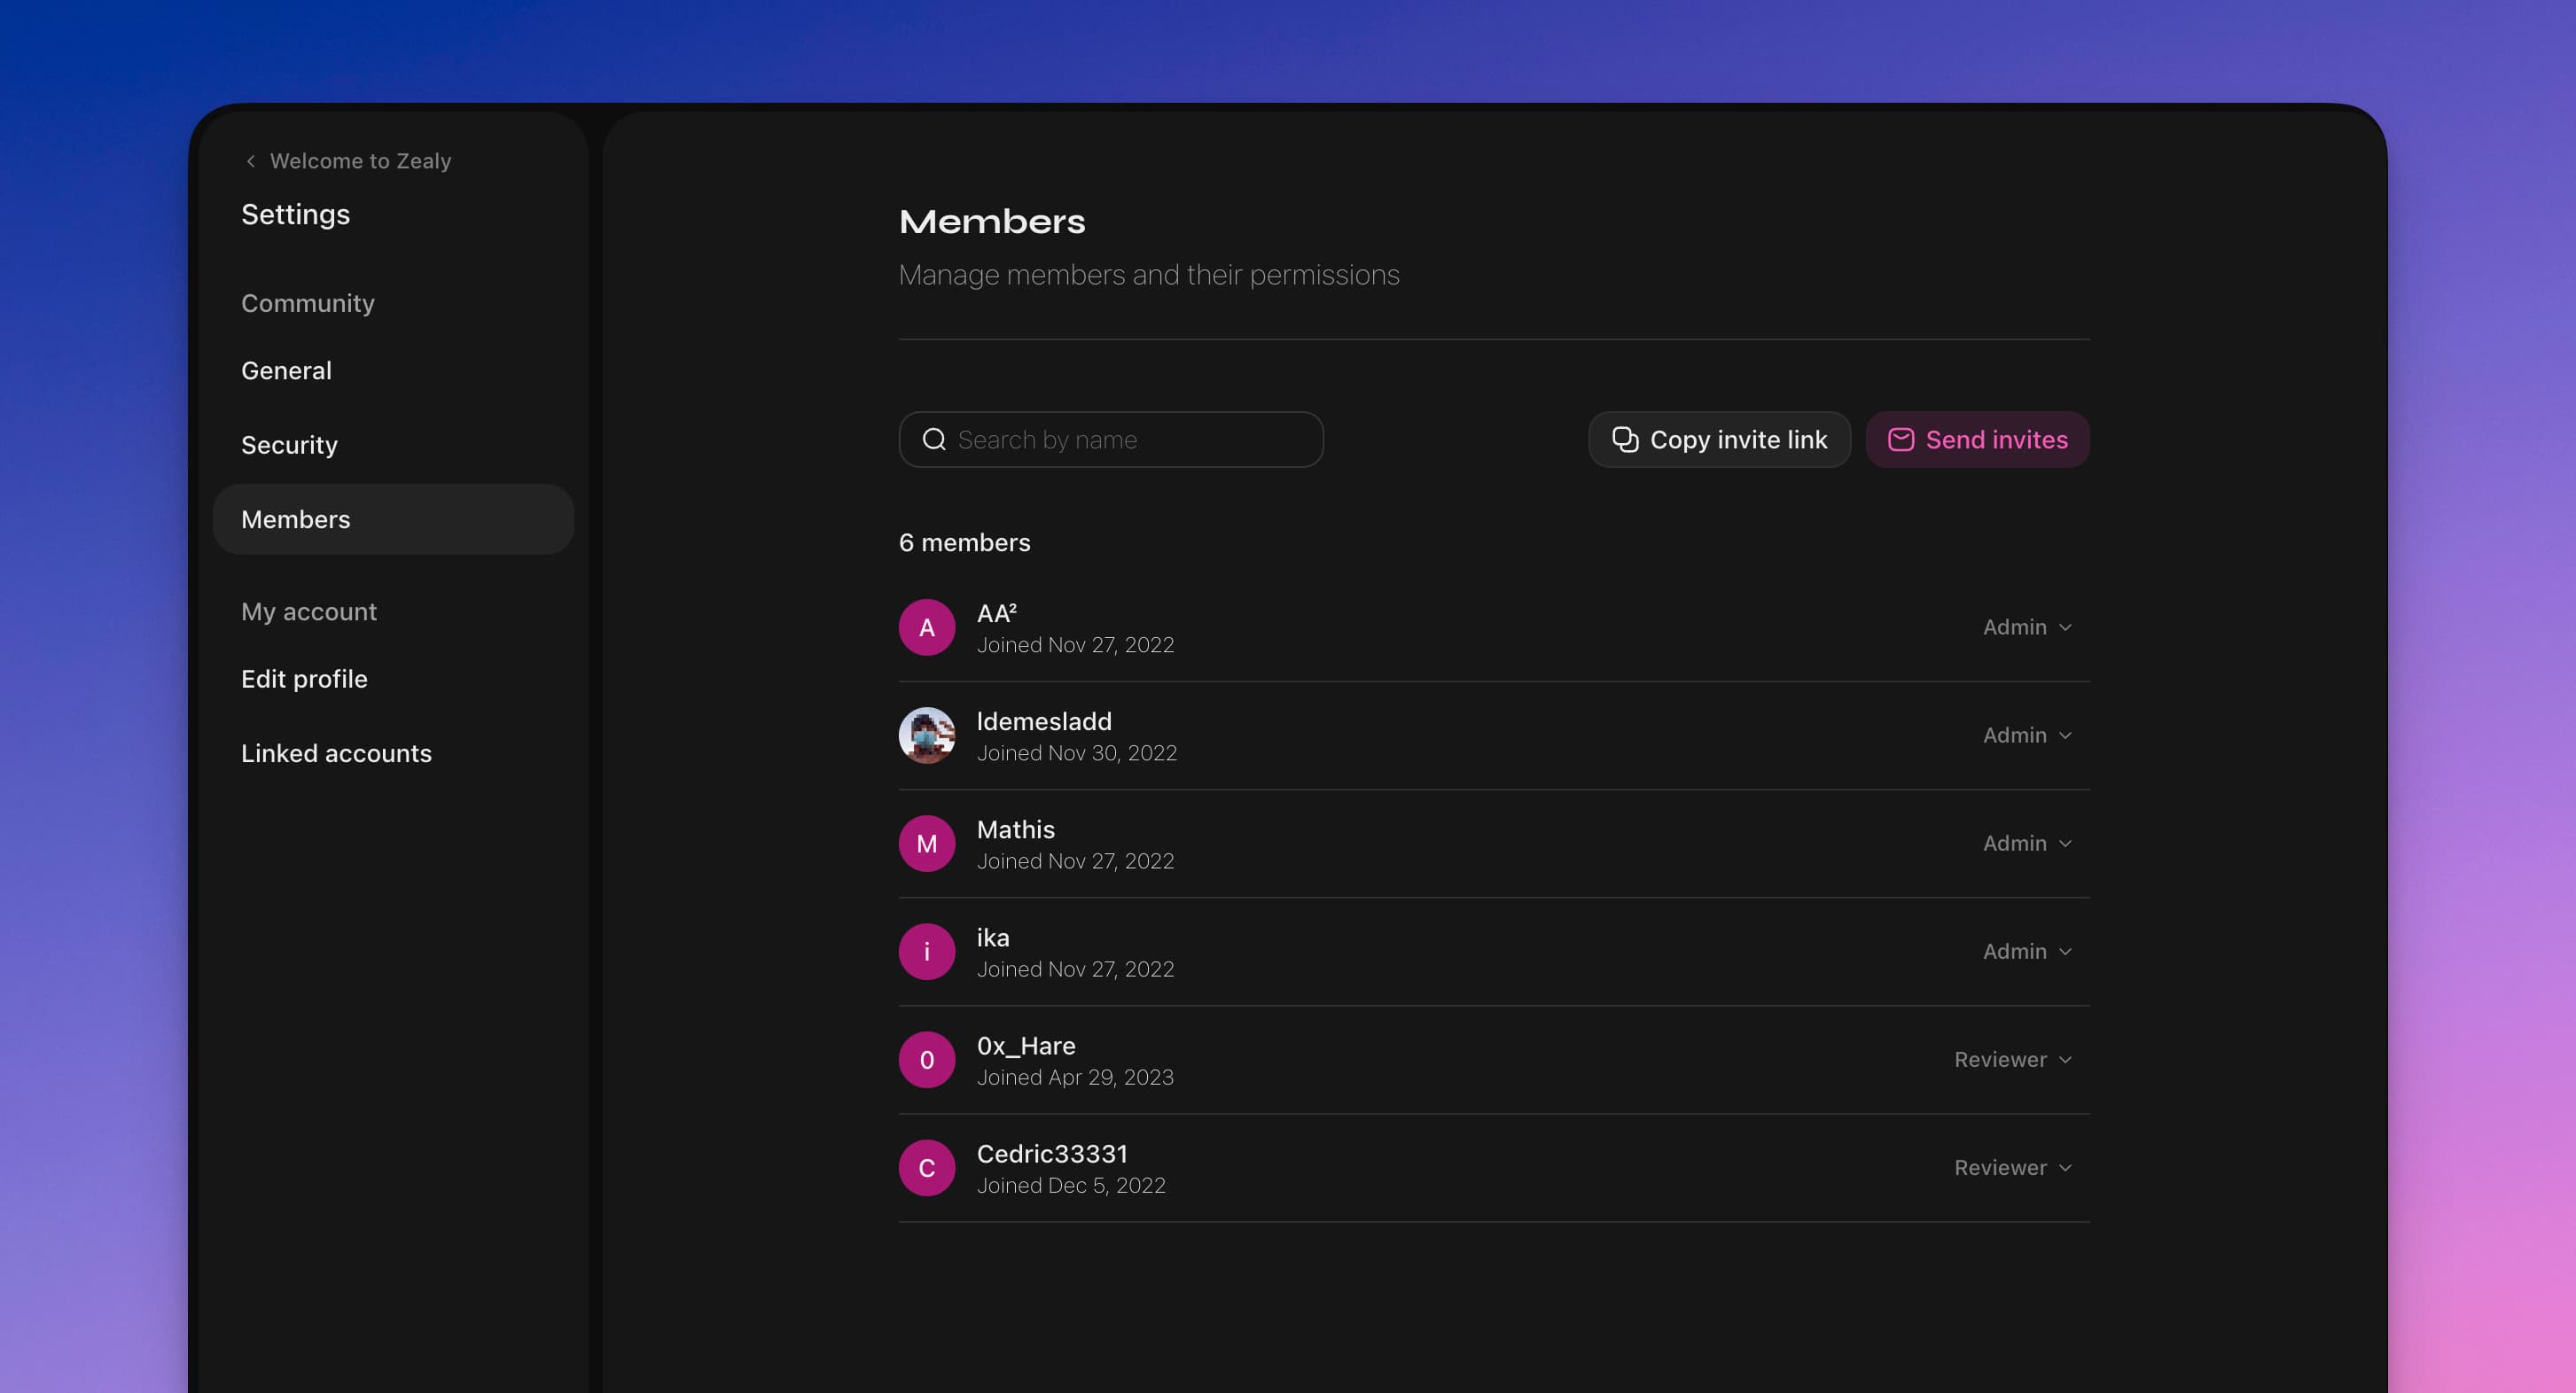
You can manually invite, suspend, and promote/demote members to admin roles from the Community members settings page.
Basics
Manage members under Settings > Community > Members. The community members page should not be confused with CRM page that is part of the premium features and allows you to filter all the members in your community by different properties.
Invite members
Go to the Settings > Community > Members to invite members to your community. You can do this either by sending an invite to their email or by sharing the invite link straight with the people you would like to invite
Private communities
For private communities, anyone joining needs to do this by invite. You can generate it either like described above, or straight from the sidebar by clicking the community menu. If you would like to make your community private, you might do this from Settings > Community > Security.
Roles
On Zealy there are 4 different levels roles with different access:
- Admin: full permission to manage community settings
- Editor: access to configure quests, sprints, members and see all pages.
- Reviewers: claim quests and review others (not themselves).
- Guests: claim quests
 Removing members
If your community is private you can remove members from the community from the CRM or the members settings by changing their role. If not, you can ban the user from their profile. All banned users can be found on by changing the filters from "All active" to "Banned" on the members settings page.
Security
Configure who can access your community and claim quests.
 Overview
Configure who can access your community and claim quests.
Basics
From the security panel you can configure if you need an invite to access the community and if you need the users to authenticate with specific methods - either to link to other services or to have additional bot protection.
Private community
Enable this if you don’t want anyone to be able to access your community. Once enabled, only people who received an invite will be able to join.
Invites
Configure how invites are calculated for the invite tasks. Configure a higher XP than 1 to validate in order to reward quality invites rather than quantity. Enabling consuming the invites will mean that if the user claims an invite task requiring 10 invites and he has 15 in total, 10 of those will be consumed meaning that he after claiming only has 5 left. With this option enabled, you can set the invite task as recurring.
The state of a user’s invites can be inspected by herself or an admin from her profile.
Quest access verification
Enable if you want to require users to connect with Discord, Twitter, or email. You can also ask that they input the blockchain address of choice. They will be requested to do this before claiming any quests.
Billing and plans
We offer a free plan and different paid plans to suit your needs.
 Plans
Plans
Free
The free plan is designed for getting started with Zealy. Communities on the free plan have access to most features, all integrations, and unlimited users.
Standard
The Standard plan is suitable for many teams, and is available on a monthly or yearly plan. If you are unsure which plan is right for you, we recommend this one.
Plus
The Plus plan is suitable for many teams, and is available on a monthly or yearly plan. It offers a lower cost per extra claimed quests than the Standard plan. With that plan you also get featured on the landing page 1 day per month.
Enterprise & Agencies
Suitable for communities with a lot of contributors or agencies managing multiple communities.
Billing
Billing frequency
You can choose between monthly billing or commit to a yearly plan for 20% discount.
Manage billing
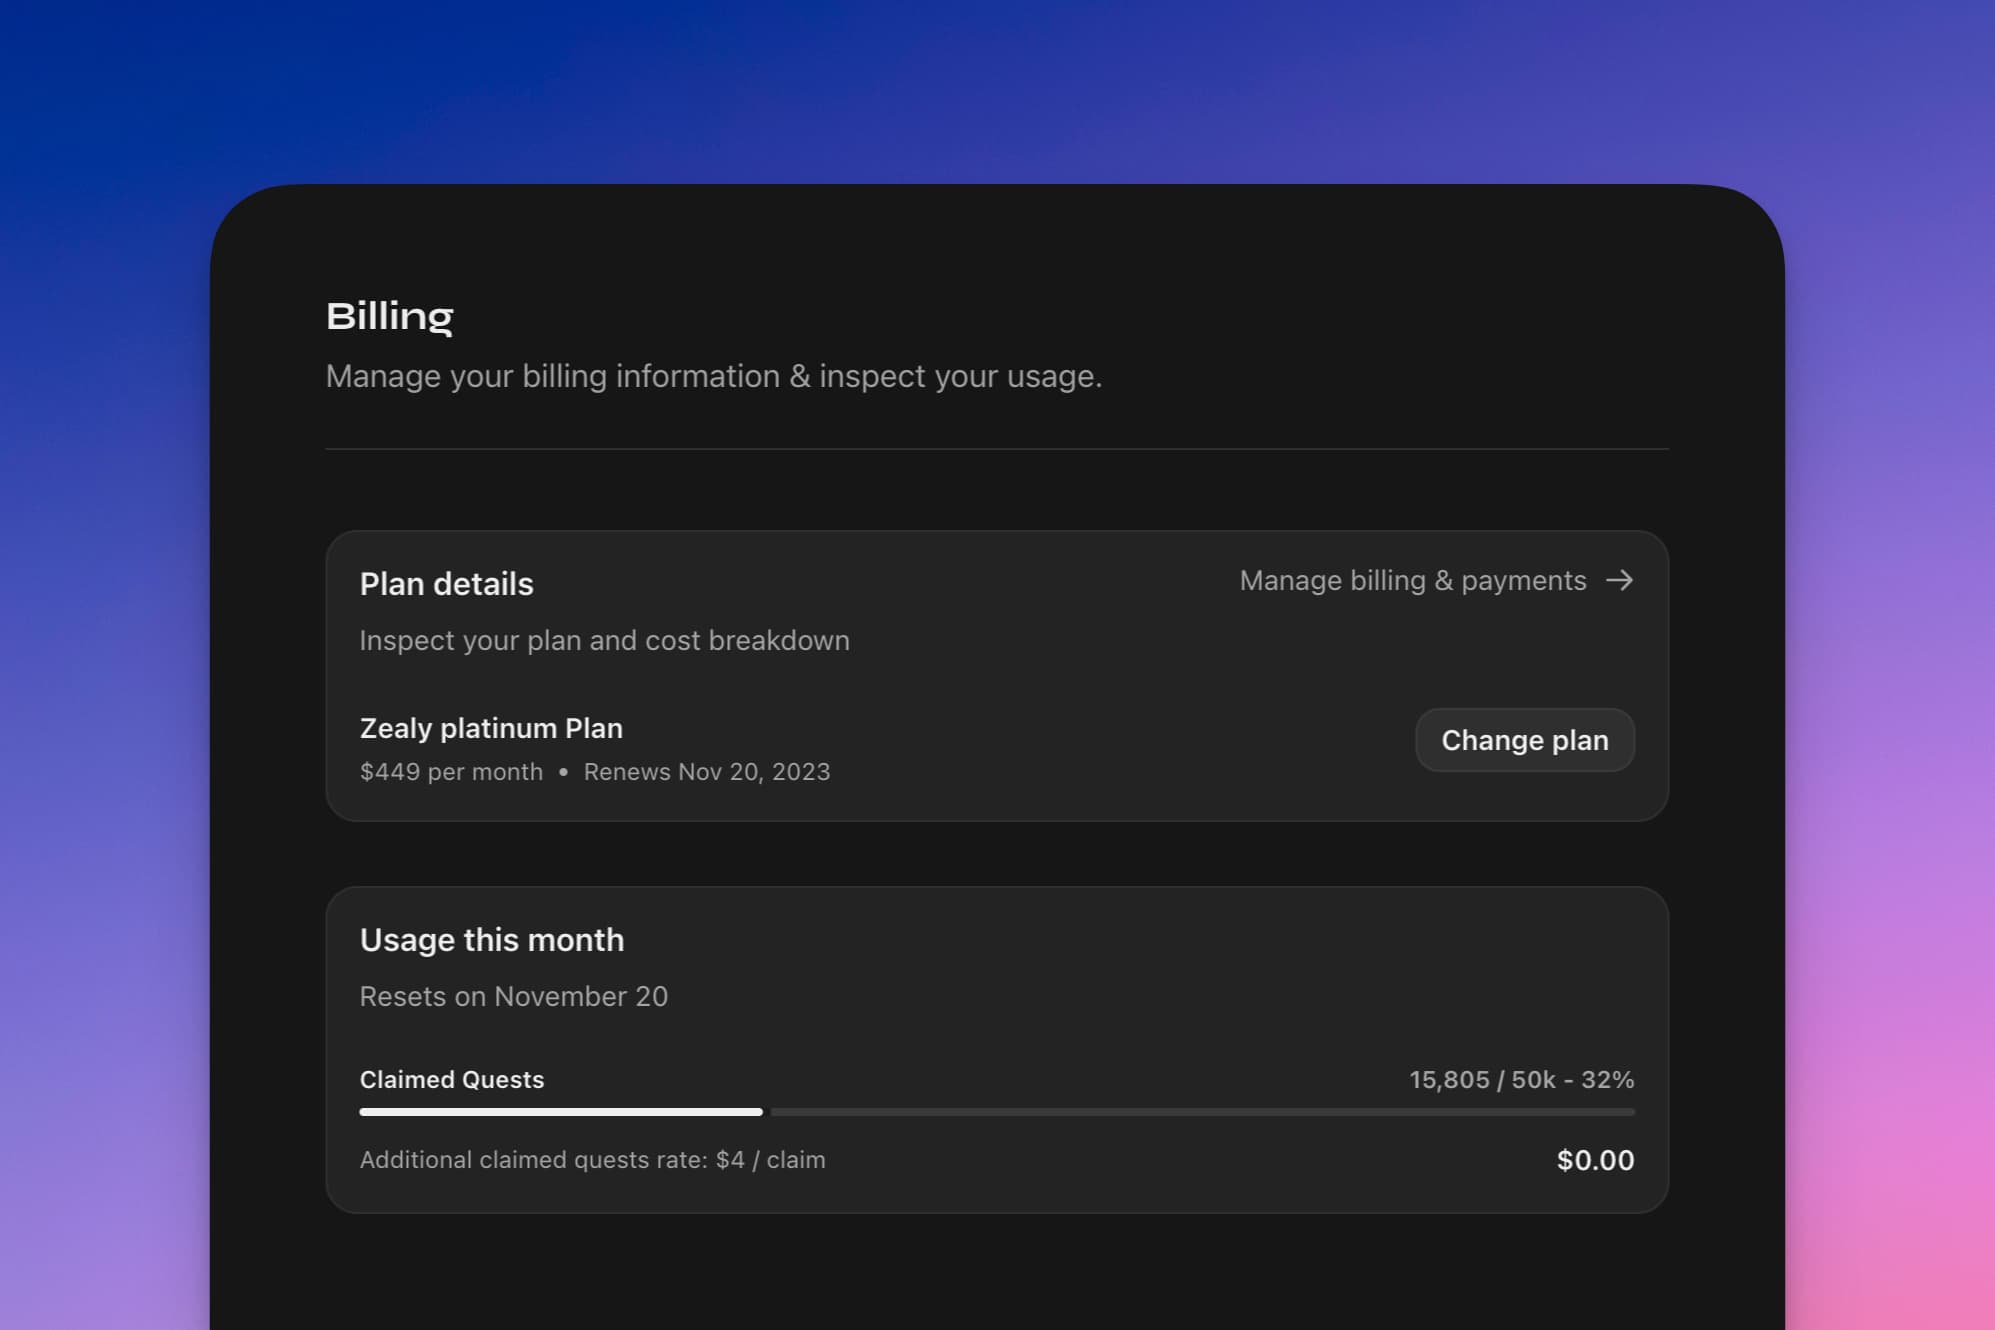
Navigate to Settings > Community > Billing to access your plan information and make changes.
From here, you can:
- View and change your plan.
- View your usage and any additional fees if you pass the included quotas
- Access your Stripe page from which you can update your billing information and see billing history
Add a VAT number
To add a VAT number, choose the I'm purchasing as a business option on the checkout page when upgrading or please reach out to contact@zealy.io for assistance.
Change or cancel a subscription
Workspace admins can cancel a plan subscription from Settings > Community > Billing. Subscription updates take effect at the end of the billing cycle. If you are on a monthly plan, this will be at the end of the billing month. If you are on a yearly plan, this will be at the end of the billing year. We do not provide refunds, so if you are uncertain you are ready to commit to a full year, we recommend starting on a monthly plan first. You can switch to yearly a later date when you are ready to commit longer term and take advantage of the discounted rates.
Create modules
Learn how to group quests using modules
 Overview
Learn how to group quests using modules.
Basics
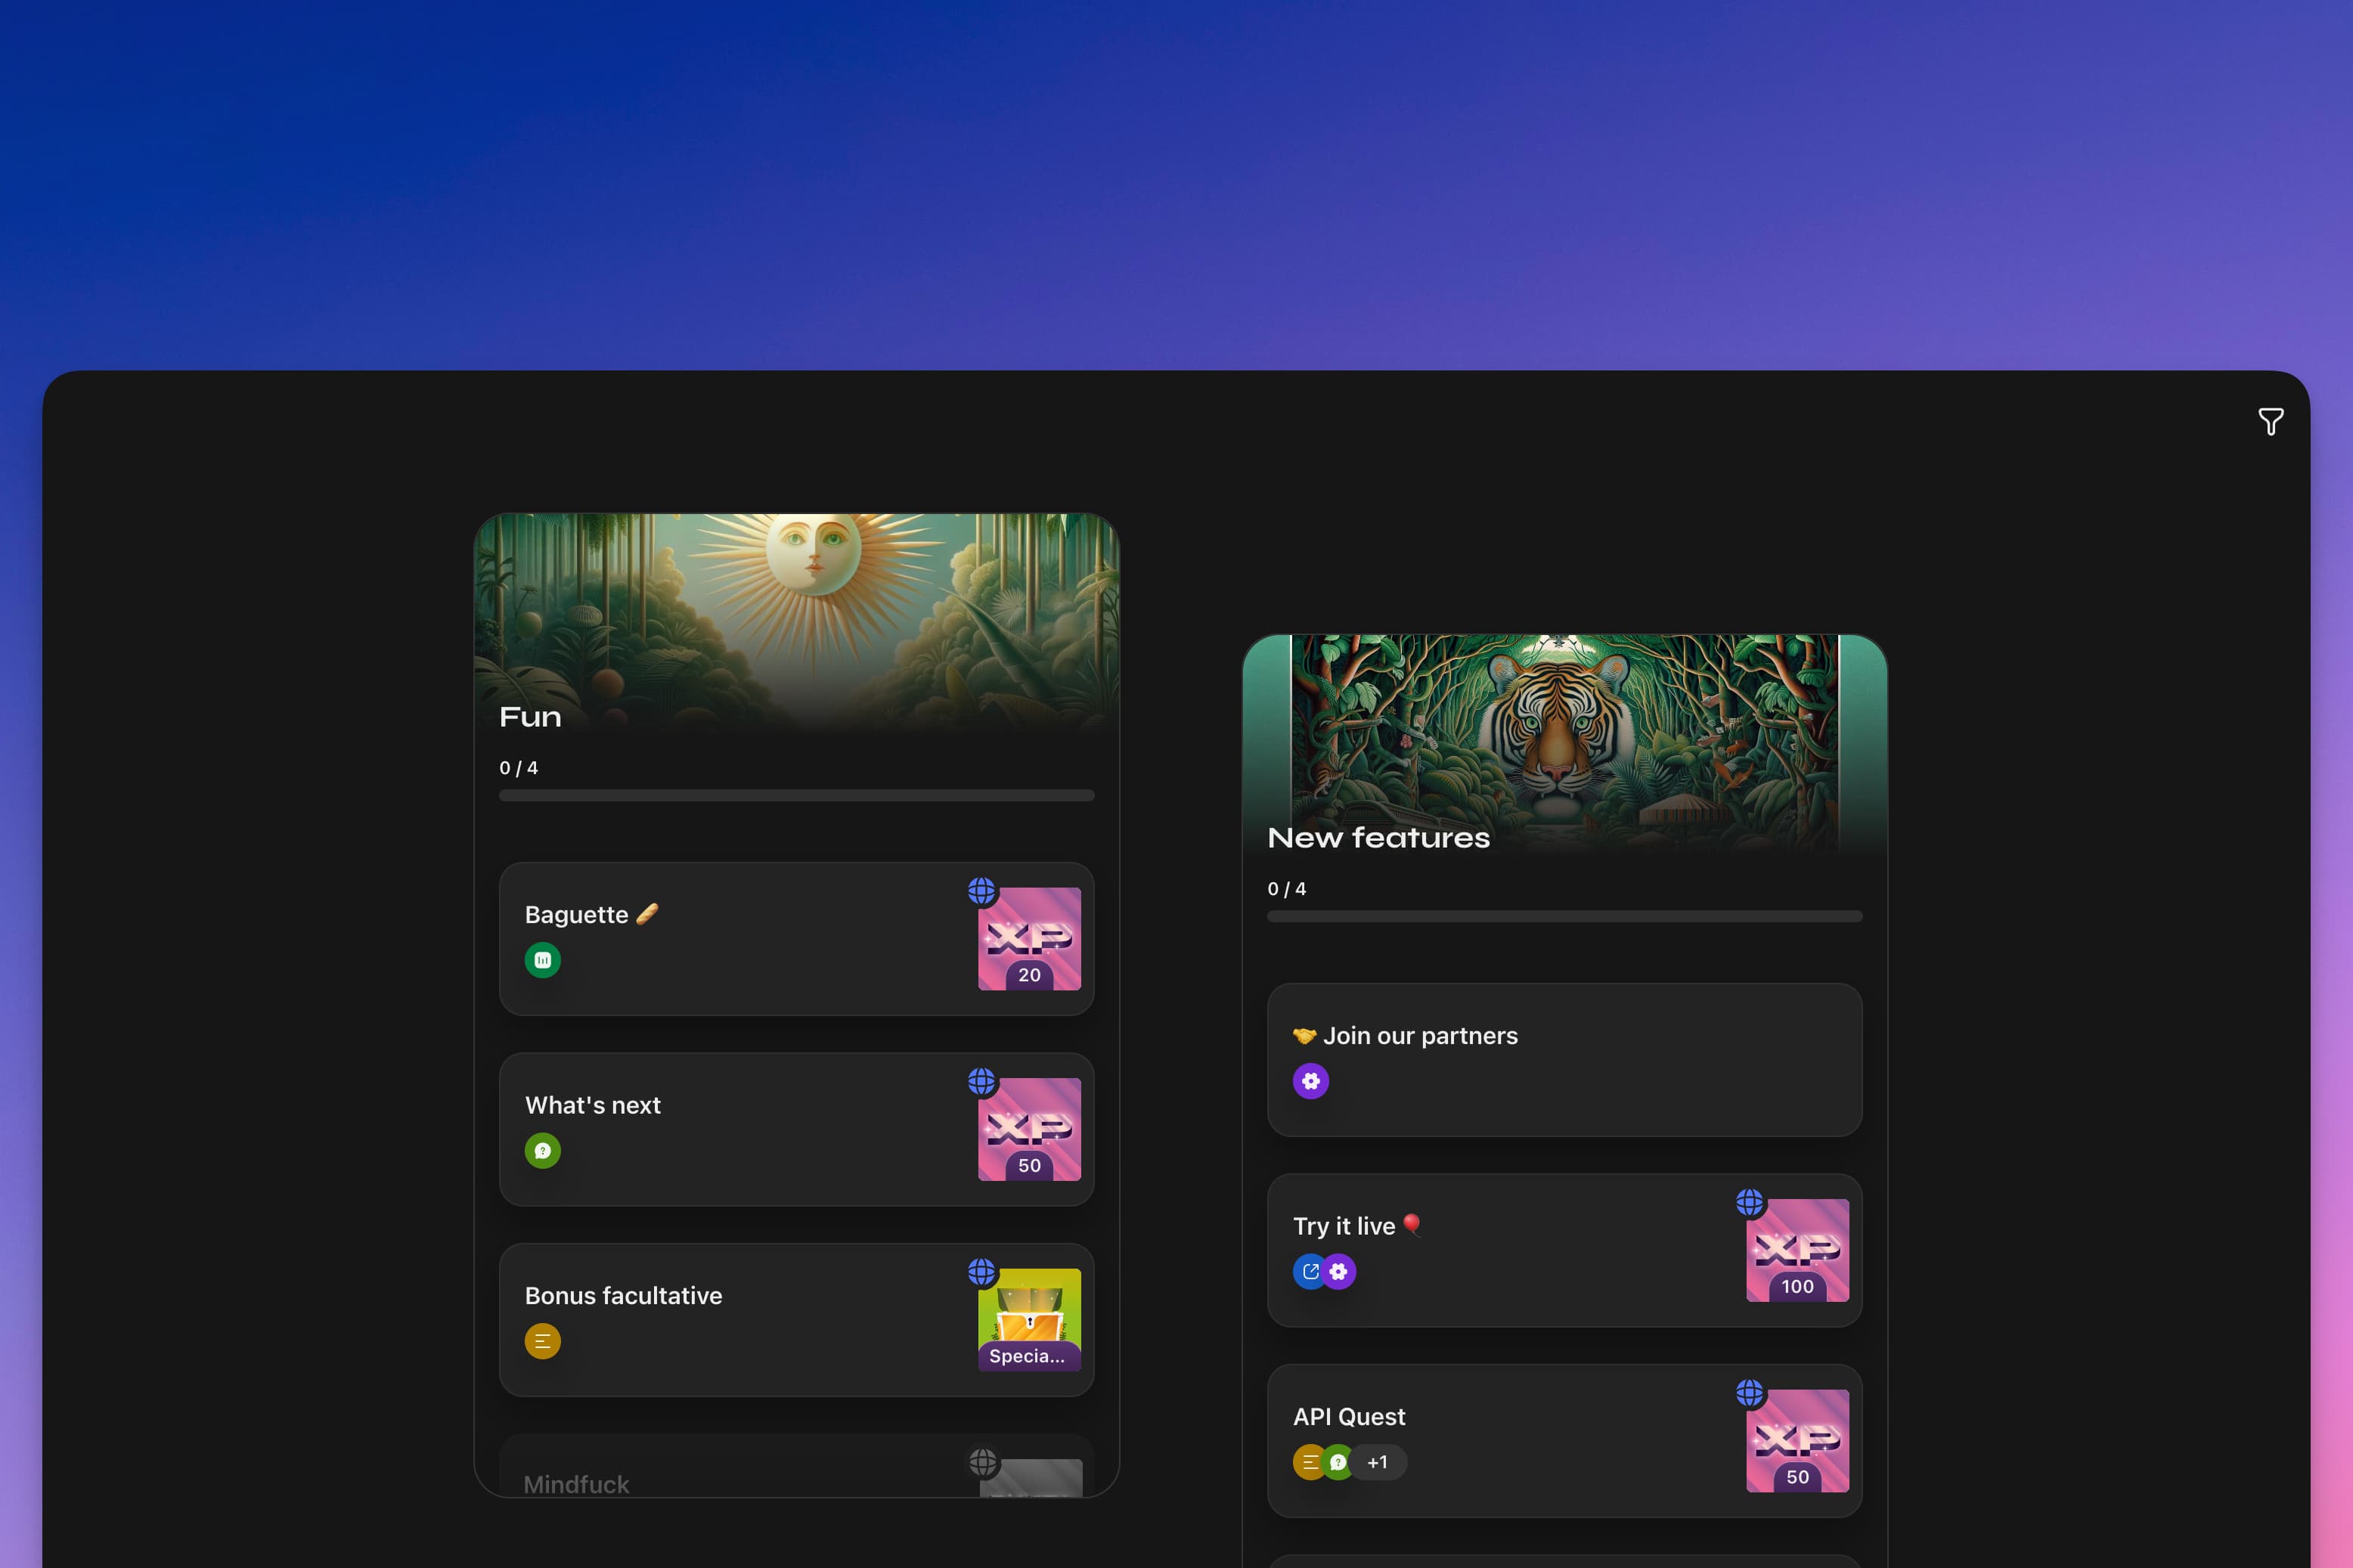
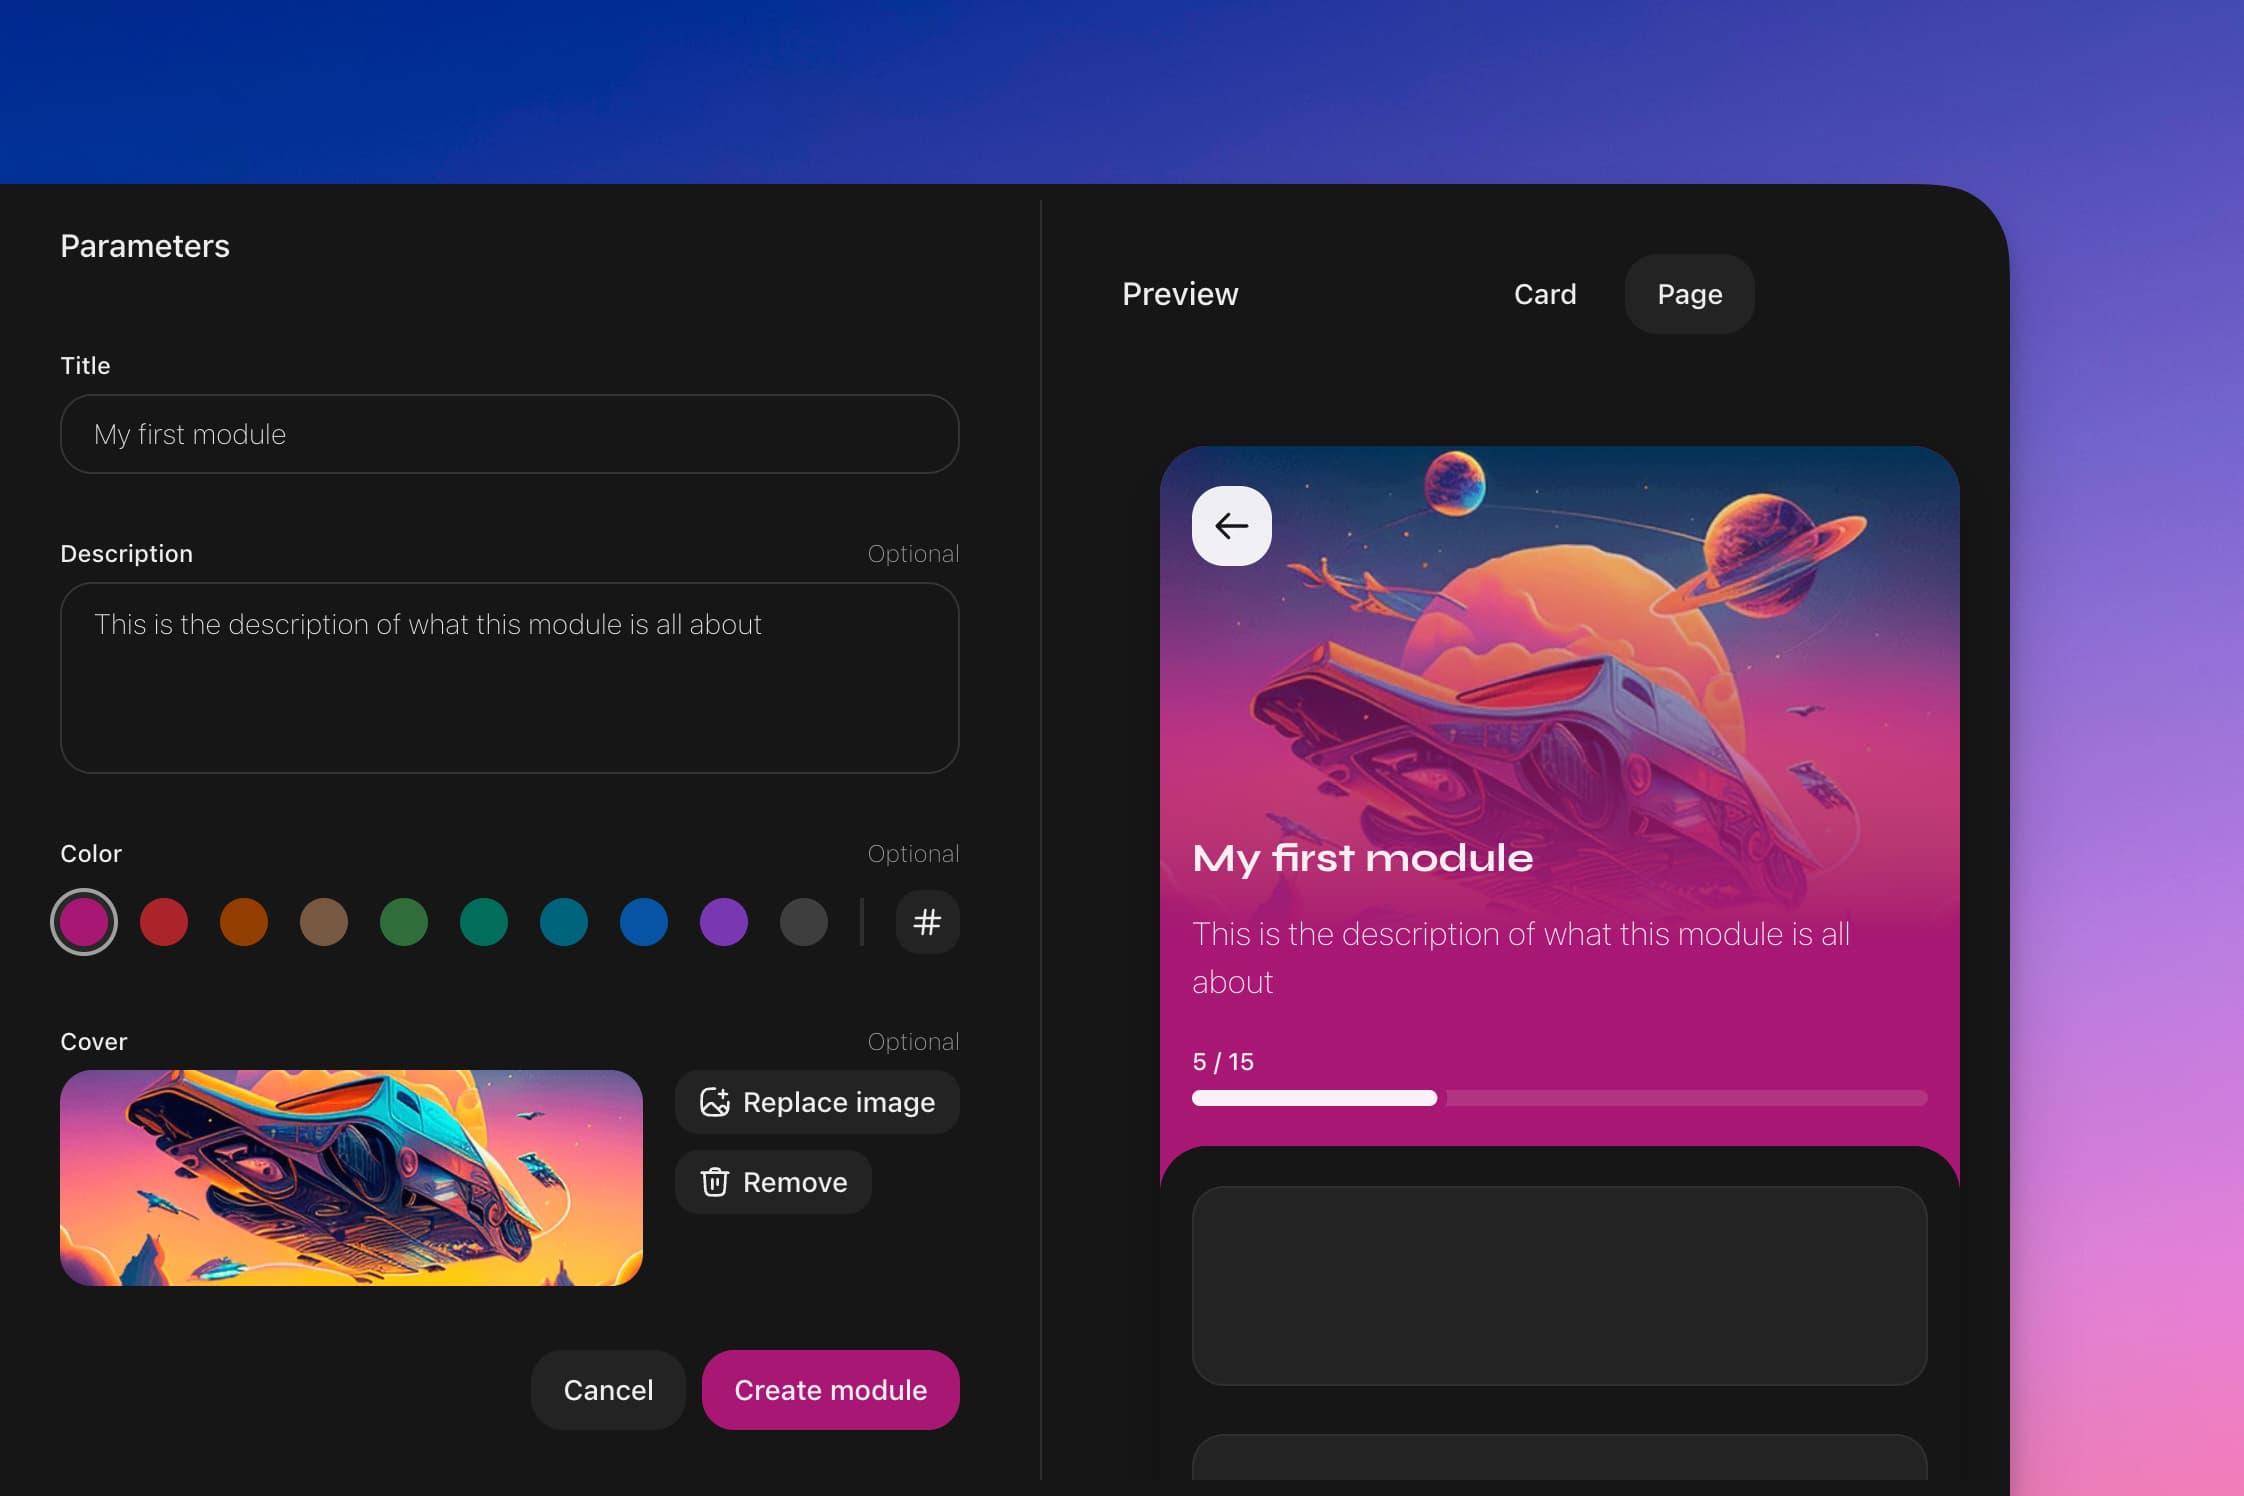
To create a module, click the arrow beside 'New quest'. Then choose 'New module'. Set a title and description to inform contributors about the module's theme.On the premium plans, you can add additional branding and storytelling with a color and a cover image.
Whenever you make changes to your module, it’s reflected on the preview on the right. This shows how it appears on the quests page and when someone accesses the module.
Edit modules
Learn how to group quests using modules
 Overview
In this guide, you'll discover how to effectively modify modules on Zealy.
Basics
Edit a module
To make changes to a module, start by clicking on the '…' button located on the right side of the module's interface or by right-clicking the module. From the dropdown options, select 'edit module' to access the module's settings and make desired adjustments.
Changing order
If you wish to change the sequence of quests or modules, simply hover over the quest or module. Upon hovering, you'll notice a drag icon appearing on the left side. By clicking and holding down on this icon, you can drag the quest or module to its new position.
It's important to note that for contributors, the quests will always be displayed in this newly adjusted order if they are all accessible. However, if a quest is already completed or if it's locked due to specific conditions, accessible quests will be displayed above.
Migrating from the old questboard
Dive into the revamped quest board We've upgraded our questboard, and it's a game-changer. Before we talk about what's new, let's discuss why we did it.
Imagine a world where every click opens a story, every task a chapter, every quest an adventure. That's Zealy. With this update, we're moving beyond mindless clicks to meaningful connections. Our questboards are not just lists; they're narratives that engage, entertain, and fascinate. Each quest is an opportunity to feel, to experience, to care. We're here to create a community of true fans, people who dive deep into your world because they love it, not just skim through. Zealy is where quests become memories, and contributors become storytellers.
What's new?
It's faster
- 5X faster setup: Making a quest board is now as quick as typing in a Google Sheet. Our tests show that you can set up quest boards and modules of quests up to 5 times faster than before.
- Easy in-line edits: edit quests directly, or just right-click to archive, or delete. Zero hassle.
It looks better
- Your style, your story: Add colors, pictures, and layouts that tell your story to categories of quests. It's not just a questboard; it's a visual journey.
- Better previews: Links to Discord, Twitter, and Telegram now look fantastic, making your questboard more inviting.
It's smarter
- Multi-step quests: Quests can have several steps, making them more engaging and interactive.
- Real results: A new results tab shows you how each quest is doing with advanced metrics.
It's powerful
- API Quests: Automate quests anywhere - in apps, on the blockchain, across social media. Validate transactions, purchases, contributions, and more. Sky's the limit.
Why this matters
- For engagement: We're crafting experiences, not task lists. Our questboards are about stories, emotions, and real engagement. This is for fans who care, not clickers.
- For growth: Whether it's welcoming newbies, expanding your reach, or keeping your community active, this questboard is built for all phases: onboarding, growth, and retention.
- For innovation: With API quests, create loyalty programs that automatically reward your most active users over time.
Switching to the new questboard isn't just an upgrade; it's a revolution. It's faster, better-looking, smarter, and more powerful. It's designed for creators who want to engage deeply with their community, and for users who love to dive into stories and truly connect with content.
This isn't about doing things the old way, faster farming. It's about doing better. Making every click count. Building a community that's engaged, entertained, and loyal.
Together, let's turn every click into a story worth remembering.
Create quests
Learn everything you need to know about quests in Zealy
 Overview
Zealy uses quests as its main building block. Contributors finish these quests to earn rewards and unlock new ones.
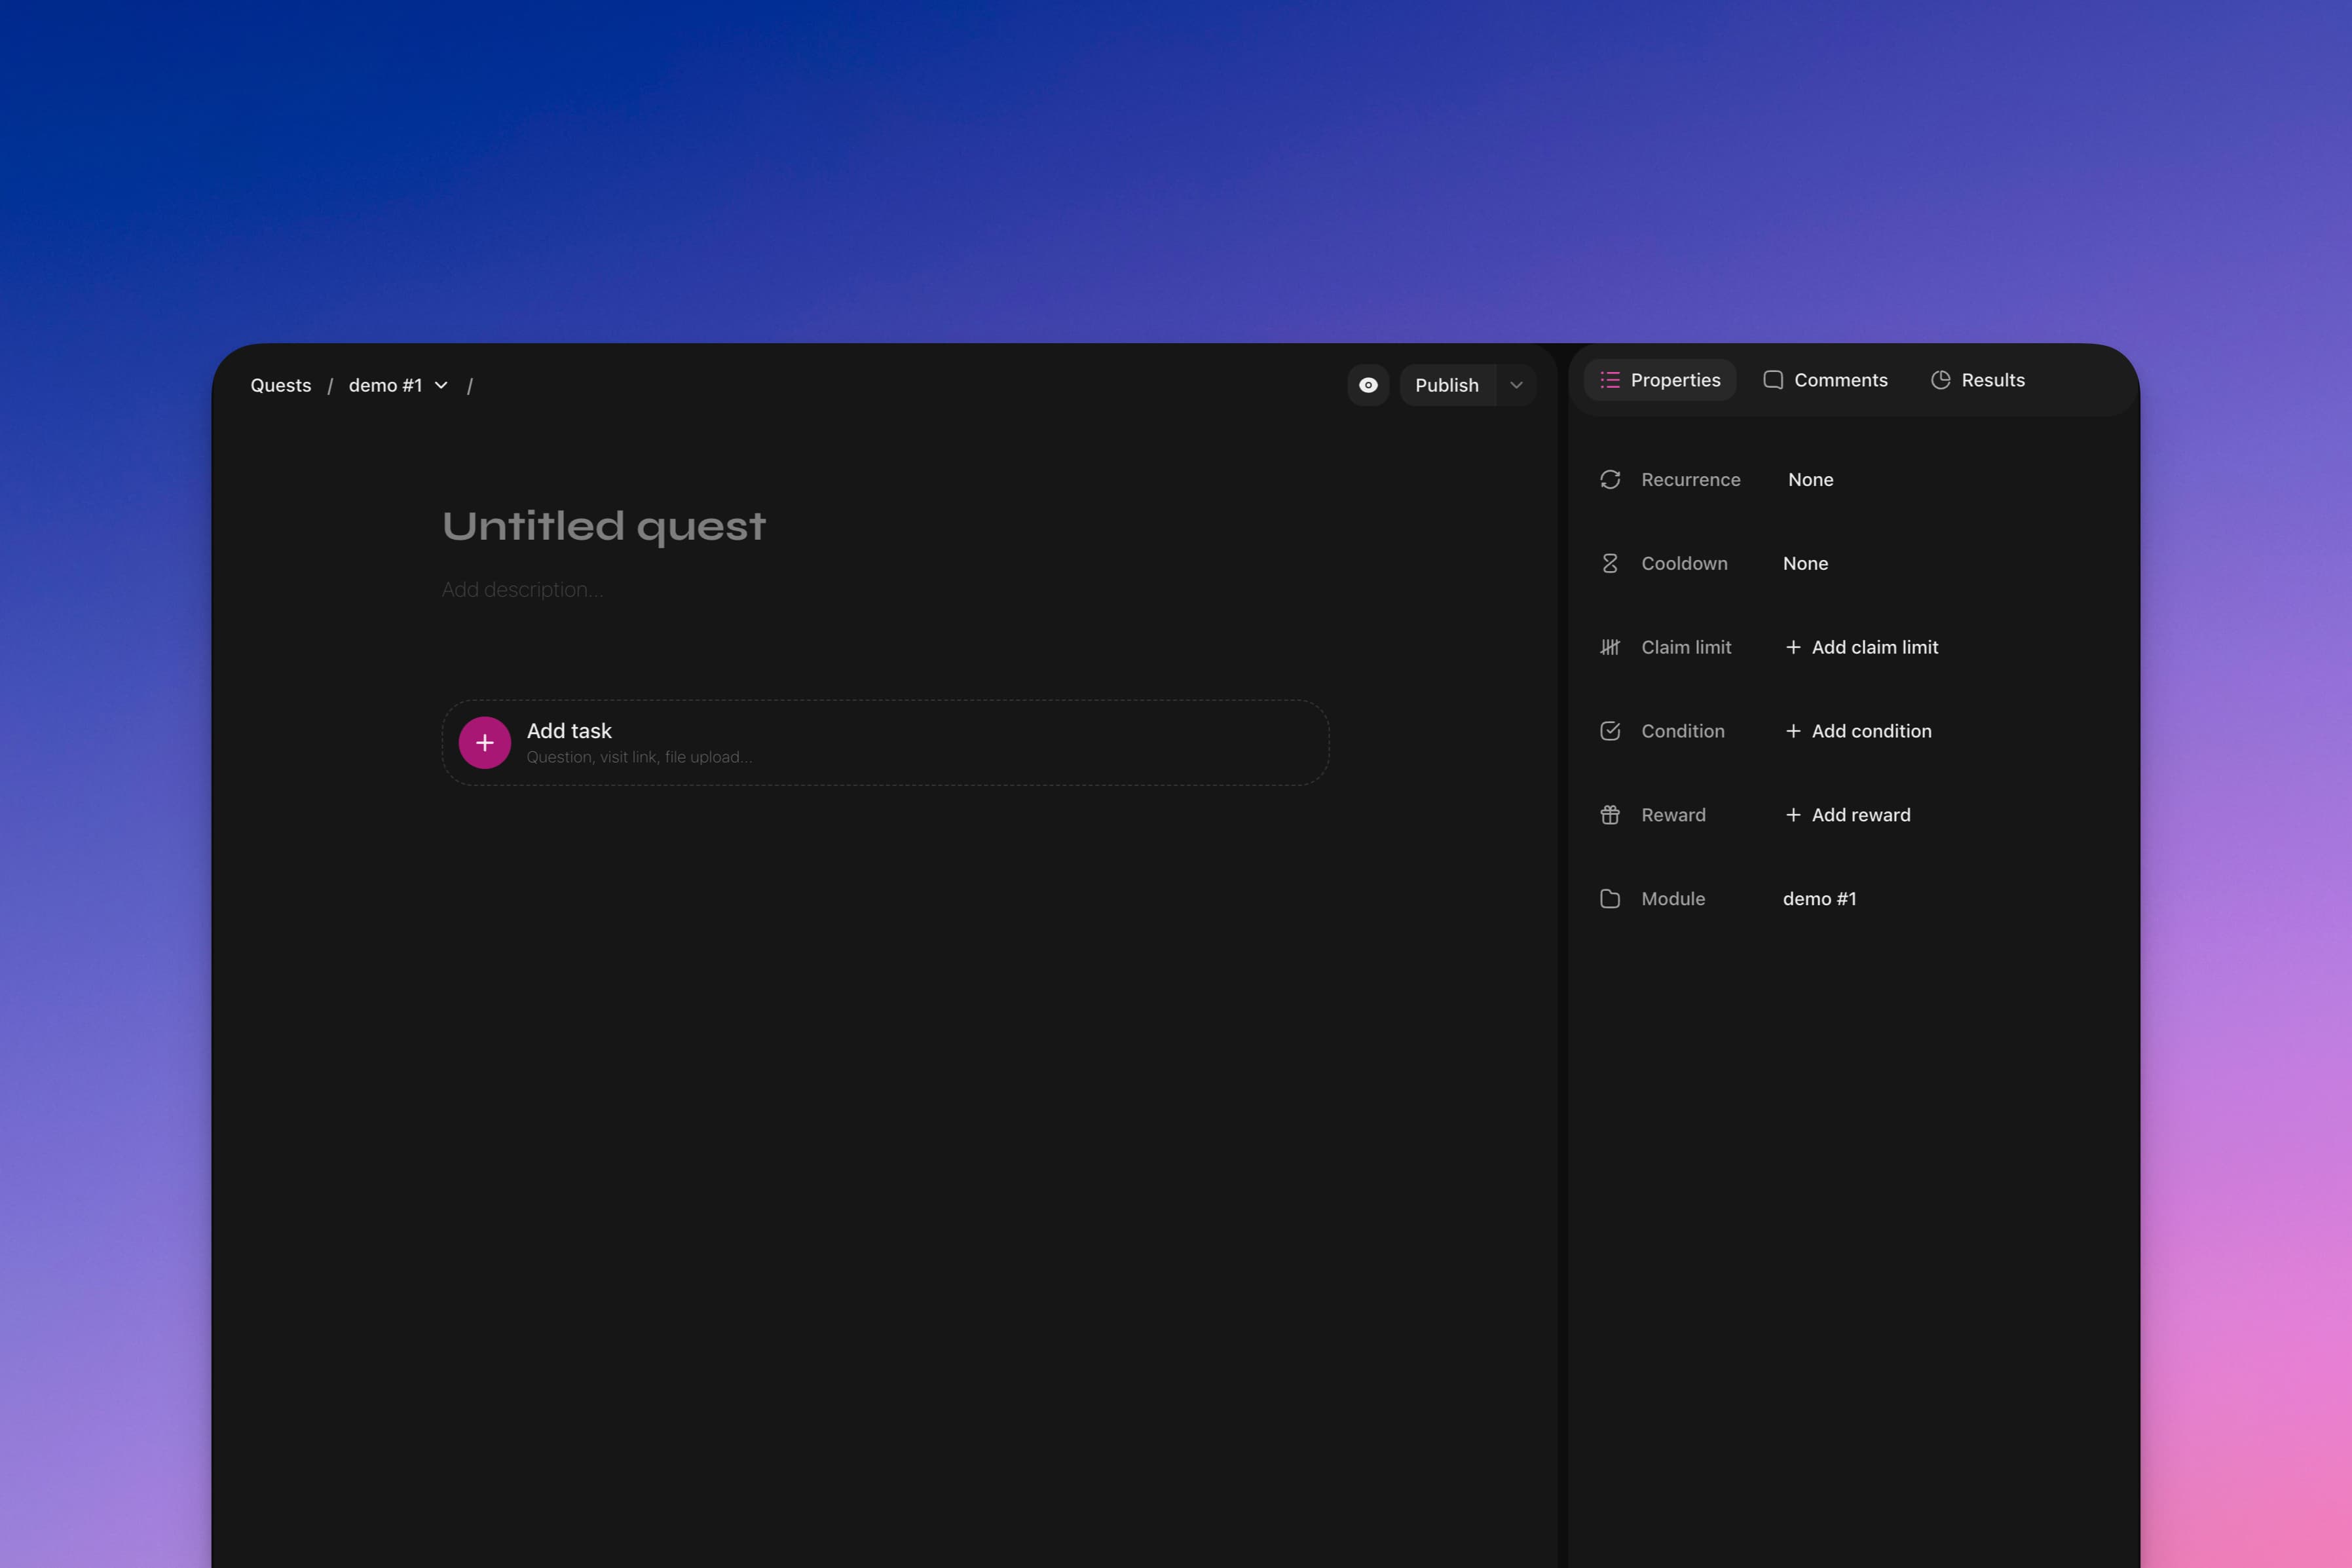
Every quest links to a module. This helps group similar quests. Each quest has a title, description, rewards, and tasks. Some quests might have limited visibility based on certain conditions.
Basics
Create quests
There are three ways to create quests:
- Using a Template: On the quests page, click 'New quest' at the top right to use a template.
- On a New Page: Click the plus sign next to a module to open the new quest in the editor.
- Inline: Click “+ New quest” below a module to make a quest without navigating to a new page.
Configuring tasks
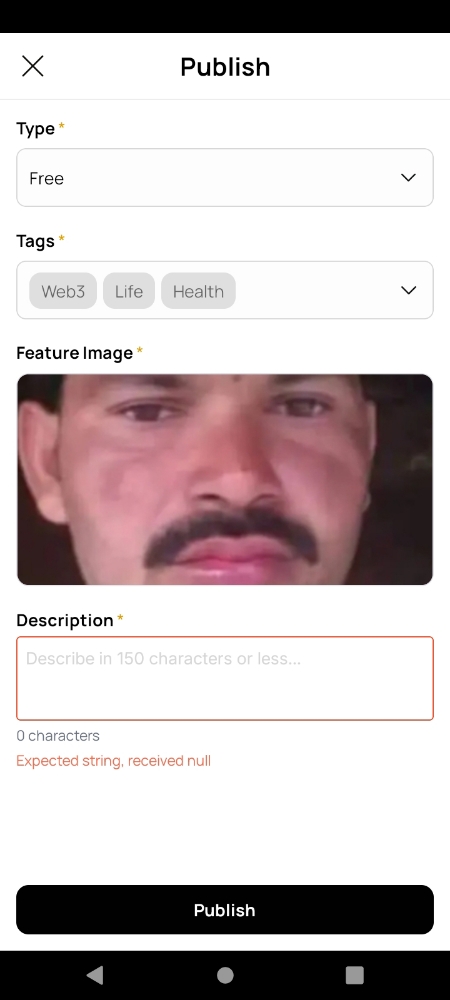
You can add up to five tasks to a quest. Click 'Add task' below and pick a task type. These tasks ensure contributors follow instructions. Tasks mostly auto-verify. However, sometimes you may want manual checks, like confirming an image's content. You can do this in the review panel. For details on each task type, see the dedicated section.
Save options
When you're ready to save, click the arrow beside the publish button. Choose 'Publish' to make it live or 'Save as draft'. Drafts are visible to other editors but remain hidden from contributors until published.
Edit quests
Learn how to quickly update your quests
 Overview
All editors and admins are able to edit the quests, regardless of who created them.
Basics
Editing inline
You can edit any quest title by clicking on it from the quests page, right-clicking and selecting ‘Rename’ or from the quest editor.
The recurrence, cooldown, rewards, and publication status can all be edited from the quests page by clicking the property and choosing another value in the dropdown. All other properties can only be edited from the quest editor.
Editing multiple quests
In order to edit or delete multiple quests at the same time you can hover the quest near the title and select it by clicking the checkbox. When selecting one or multiple quests a menu will appear at the bottom of the page. Select the property you’d like to edit and the value and it will update on all the selected quests.
Quest editor
Click on any quest from the admin quests page to open the editor. Edit the properties you want and click the “publish” button on the top to save.
Archive quests
Learn how to quickly archive your quests
 Overview
All editors and admins are able to archive the quests, regardless of who created them.
An archived quest is not available to your community until you put it back to draft or published.
Basics
Archive inline
You can archive any quest by right-clicking on it from the admin quests page and selecting Archive.
Archive from quest editor
Click on any quest from the admin quests page to open the editor. Click the ... button at the top of the page and select Archive.
Retrieving archived quests
From the admin quests page, open the filter at the top of the page (All by default) and select Archived. You can then click on the quest and put it back as draft or published
Delete quests
Learn how to quickly delete your quests
 Overview
All editors and admins are able to delete the quests, regardless of who created them.
A deleted quest is not available to your community and is not recoverable either.
Basics
Delete inline
You can delete any quest by right-clicking on it from the admin quests page and selecting Delete.
Delete multiple quests
You can delete multiple quests at the same time by hovering the quest near the title and select it by clicking the checkbox. When selecting one or multiple quests a menu will appear at the bottom of the page and you can click the Delete button to delete then all.
Delete from quest editor
Click on any quest from the admin quests page to open the editor. Click the ... button at the top of the page and select Delete.
Markdown editor
Learn how to edit the description of a quest
 Overview
We support most Markdown elements in our text editor. Type in Markdown or paste it directly and it will be converted into rich text automatically.
Read more about Markdown and access full capabilities here.
You can also apply styling with a toolbar, which will pop up after you highlight a word or phrase.
Basics
Text styling
These styles can be applied using keyboard shortcuts or by highlighting text to bring up a styling toolbar:
**text**or ⌘ B for bold text_text_or ⌘ I or for italicized text1.or ⌘ ⇧ 7 for a numbered list*or ⌘ ⇧ 8 for a bulleted list[]or ⌘ ⇧ 9 for a checklist- ⌘ U for underlined text
>or ⌘ ⇧ B for blockquotes#then Space Heading 1##then Space Heading 2###then Space Heading 3- ⌘ E for inline code
- ⌘ ⇧ X for strikethrough
`then Space or ⌘ ⌥ C for a code block___then Space for a horizontal divider
Helpful commands
- ⌘ A to select all content in a description (to copy or delete)
- ⌘ Z to undo typing
- ⌘ ⇧ Z to redo typing
- ⇧ ↩ to generate a line break
Recurrence
Control how often a quest can be claimed with the recurrence property
 Overview
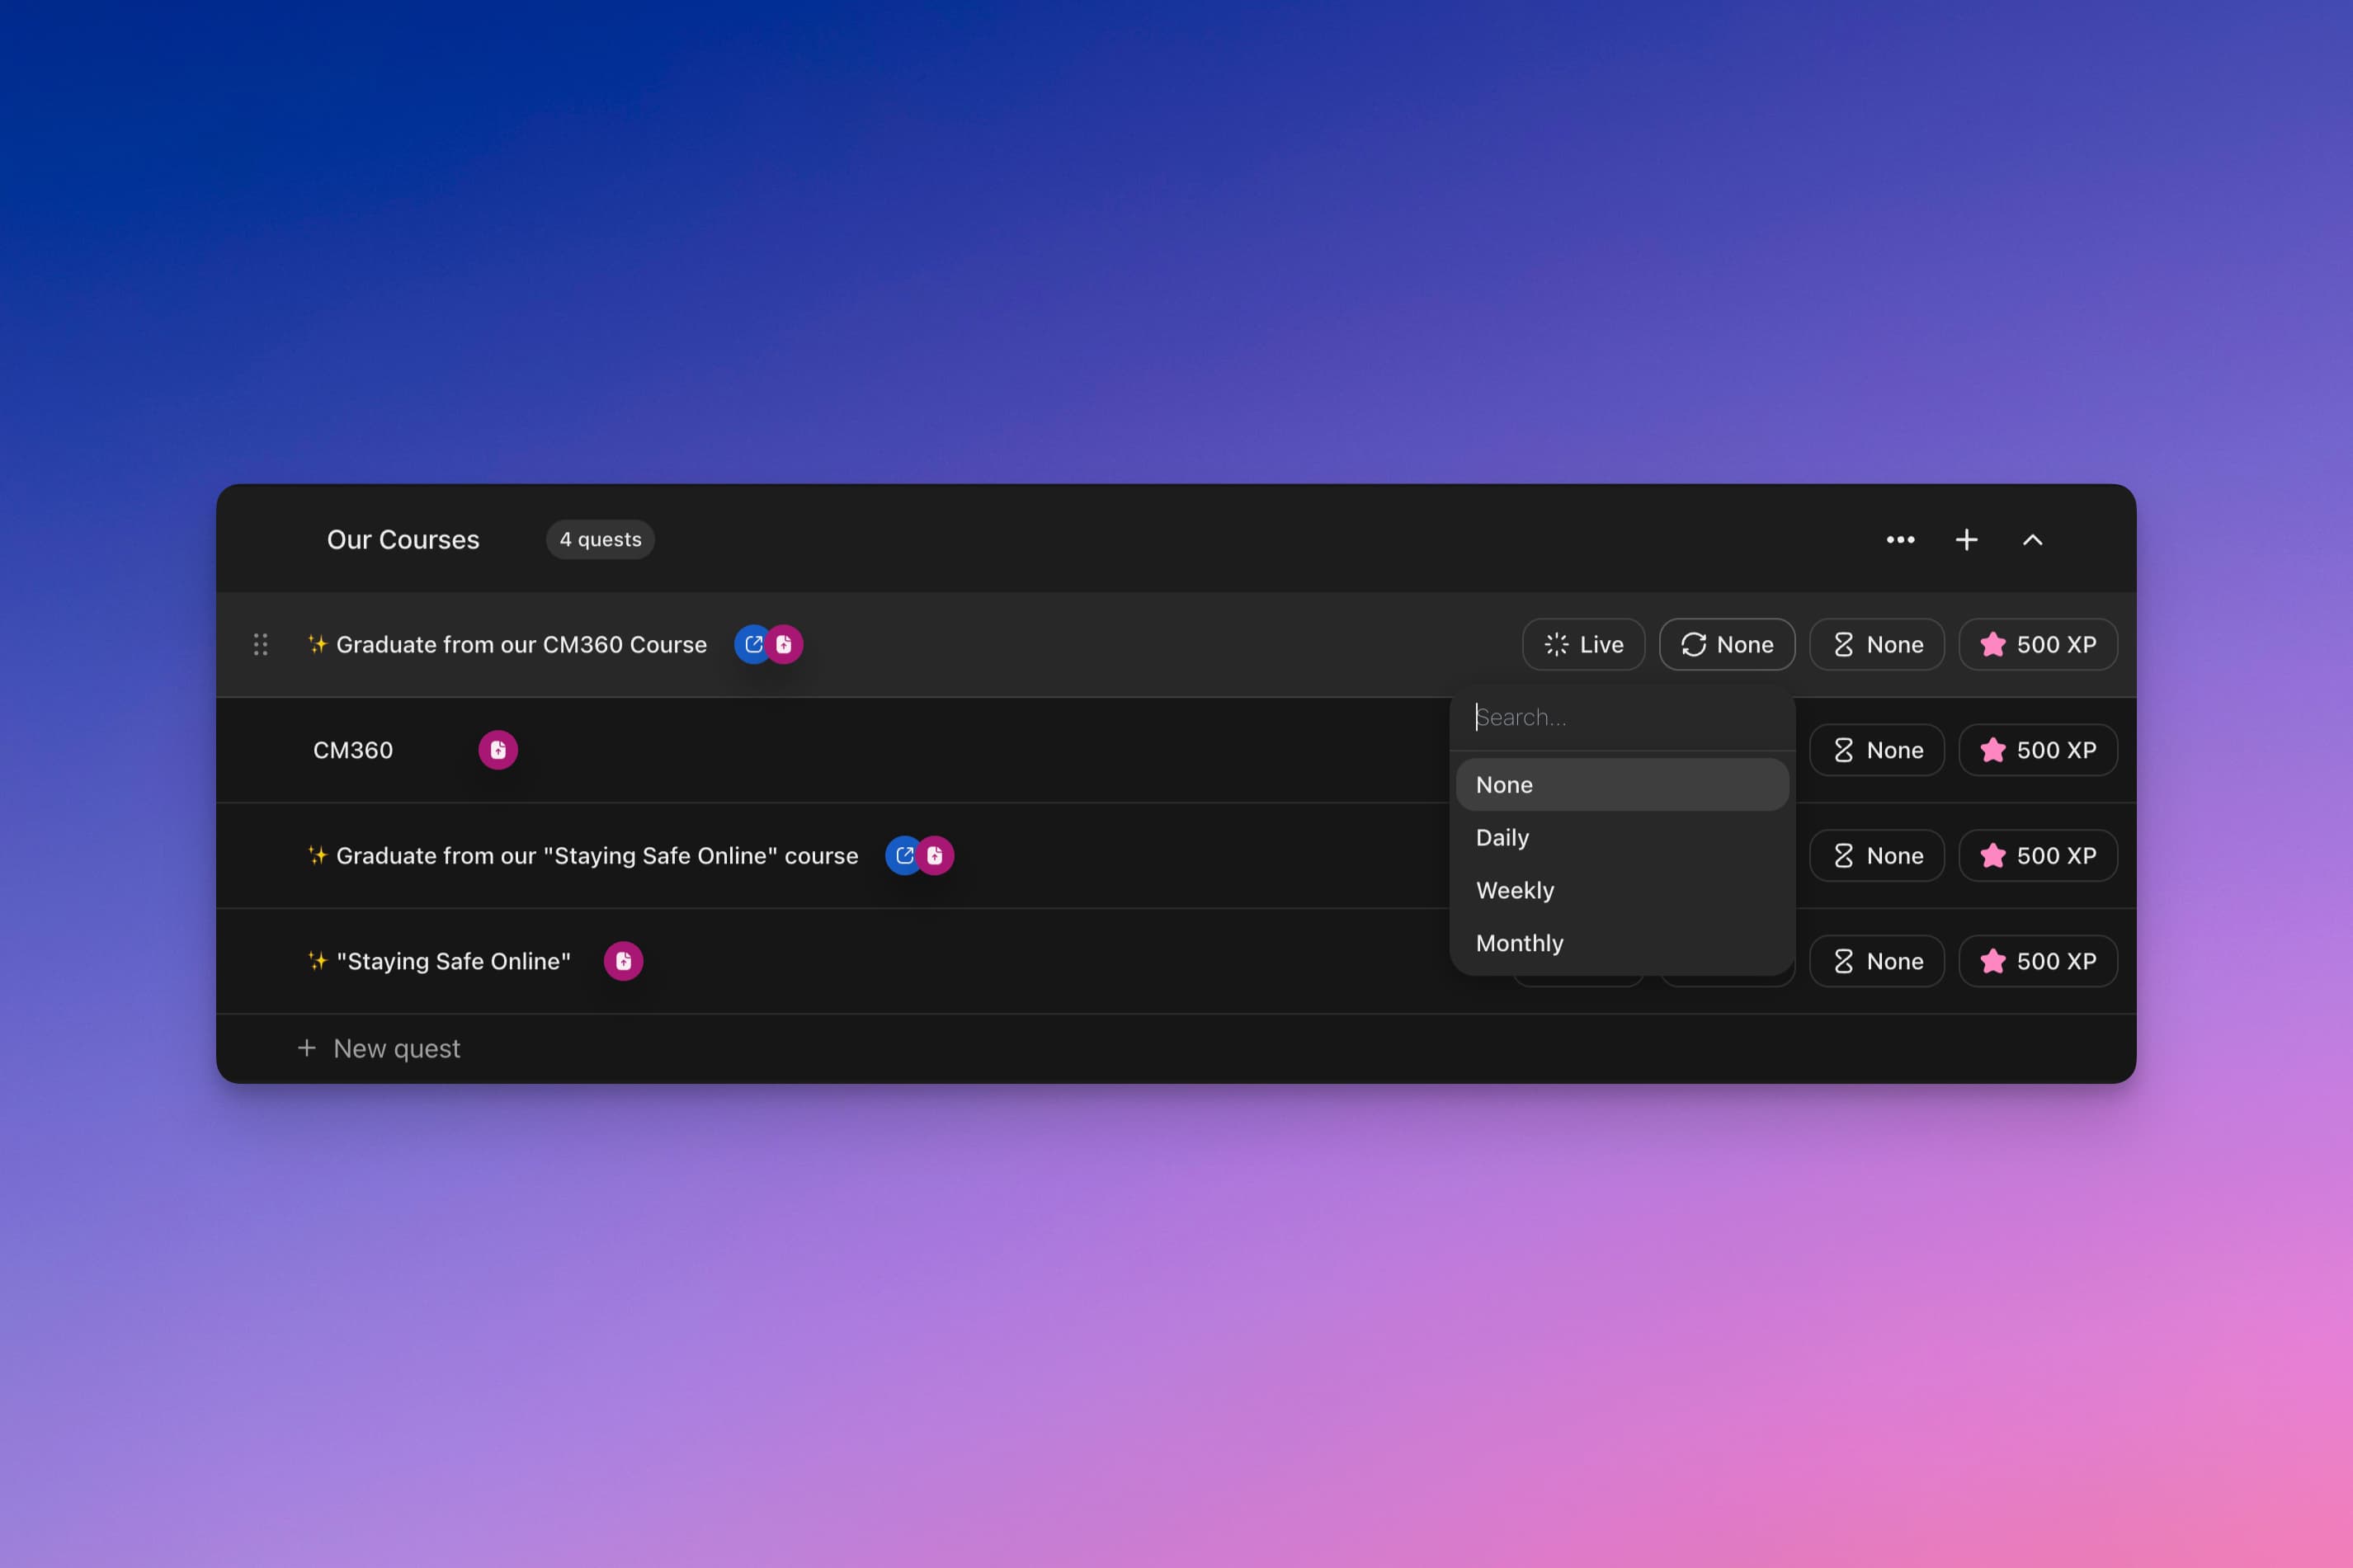
Recurrence lets you control how often a contributor can complete a quest. By default, it’s set so contributors can only complete the quest once. You can add the following recurrence to quests: daily, weekly, and monthly.
Basics
Set recurrence
On the quests view, change the recurrence by clicking on the current value and selecting a new one in the dropdown.
Resetting
All the recurrence types reset at 00:00 UTC. The weekly resets are on Mondays. The monthly is on the first of each month.
Recurrence with reviews
When the recurrence is set, the contributor can claim every period even if the previous claim is pending. The quest will automatically unlock at the beginning of the new period.
Cooldown
Control how long after failing a user can retry a quest
 Overview
Use cooldown to control how fast a user can retry a quest after failing. The cooldown can be set to 1 minute, 5 minutes, 30 minutes, 1 hour, 1 day, 1 week, 1 month, or no retry, which means the user only gets one shot at the quest.
Basics
Set cooldown
On the quests view, change the cooldown by clicking on the current value and selecting a new one in the dropdown.
Cooldown and reviews
The cooldown is calculated from when the quest was claimed, not from the review.
Claim limit
Limit how many times a quest can be claimed
 Overview
Set a claim limit if you want to limit the amount of claims for a quest.
Basics
Set claim limit
On the quest editor, click ‘Add claim limit’ on the properties panel on the right.
Claim limit and reviews
Only successful or pending claims are counted towards the limit, which means that when someone is reviewed as failing the quest it will let one more person claim.
Conditions
Control who has access to view and claim a quest
 Overview
With conditions you can control who has access to view and claim a quest. If a contributor does not fulfill the requirements, they will only be able to see the title, the rewards, and why they can’t access the quest, but not the description and the tasks.
Basics
Condition types
- Quest: only users who have done or not done specified quests will have access.
- Level: only users who have reached or have not reached the specified level will have access.
- Role: only users who have or do not have the Discord role will have access.
- Date: configure a quest to open or close at a certain date
- NFT: only users holding the specified NFT will be able to access
Configure conditions
On the quest editor, click ‘Add condition’ on the properties panel on the right. Select the desired condition type and fill in the requested info.
In order to configure a role condition you must first connect our bot in the ‘Automation’ tab.
Rewards
Add rewards for the actions to motivate contributors to complete quests
 Overview
Add rewards for the actions to motivate contributors to complete quests and level up in the leaderboard.
Basics
Reward types
- XP: will make the users level up, and rank higher in the leaderboard and the sprint. The XP will be automatically given when a quest is successfully claimed. To calculate the levels see [LINK]
- Role: reward users with a Discord role. The role will be automatically given when a quest is successfully claimed if the user has connected a Discord account and is present on your server.
- Other:: for any rewards that we don’t currently support you can specify them here.
Configure rewards
On the quest editor, click ‘Add reward’ on the properties panel on the right. Select the desired reward type and fill in the requested info.
In order to configure a role reward you must first connect our bot in the ‘Automation’ tab.
Publishing
Hide unfinished quests from contributors
 Overview
Keep any unfinished quests as a draft. This will hide them from contributors, while still showing them to other editors.
Basics
Save as draft
When editing a quest you can save it as draft by clicking the arrow down next to the ‘Publish’ button. You can also toggle this from the quests page by clicking on the current value and changing it in the dropdown.
Publishing
When the quest is ready, just click ‘Publish’ on the quest editor.