How to build a computer from scratch (step by step)
Introduction
Building a computer from scratch can be an incredibly enriching experience for technology enthusiasts or those who want to customize their machines according to their specific needs. This process encompasses several steps, from the careful selection of components to the final assembly and configuration of the operating system.
When starting to build a computer, it is crucial to have knowledge about each hardware component and its function. From the motherboard to the choice of processor (CPU), RAM, graphics card, storage and power supply, each part plays a vital role in the machine’s performance and functionality.
The careful choice of components is the first step. Various criteria, such as compatibility, purpose of use (gaming, video editing, work, etc.), budget and personal preferences, must be considered when selecting the elements that will make up the computer. Each piece must be evaluated considering its technical specifications, reputable brands and performance analyses.
After purchasing the components, careful assembly is essential. It is crucial to understand the connections between the motherboard, CPU, memory, graphics card, storage devices and other peripherals for successful assembly. Each component must be installed precisely to ensure correct system operation.
Furthermore, installing the operating system is a crucial step. After physically assembling the computer, it is necessary to install and configure the chosen operating system. This includes creating disk partitions, installing drivers, and initially configuring the system to ensure it functions properly.
During the entire assembly and configuration process, technical challenges and problems may arise. It is important to be prepared to deal with possible setbacks such as hardware incompatibility, boot failures or software compatibility issues. Solving these problems requires patience, research and, in some cases, specialized technical assistance.
Building a computer from scratch is an exciting and educational journey, offering the opportunity to better understand the inner workings of a computing system and providing the satisfaction of creating a personalized, functional machine. In the next steps of this guide, we’ll explore each step of this process in detail, providing essential information and guidance to help you successfully build a computer of your own.
Before You Start
Please note that this guide only serves to be as detailed an explanation as possible, depending on the component models, it is not possible to specify how the components will be fitted/assembled, so it is always necessary to have the Instruction Manual for the respective components. .
Happy reading 😊
Step 1: Choosing Hardware According to Intended Use
Before beginning to assemble a computer, it is crucial to determine the purpose and primary use of the machine. Each hardware component must be selected based on these specific needs. Here are some general guidelines for different uses:
General Use (Navigation, Office, Social Media)
- CPU : Mid-range processors or even entry-level models are sufficient for basic tasks. Processors from the Intel Core i3 or AMD Ryzen 3 line are viable options.
- RAM Memory : For general use, 8GB to 16GB of RAM is adequate to run multiple applications simultaneously without any problems.
- Storage : A moderately sized SSD (250GB to 500GB) for the operating system and an additional HDD for data storage may be a good option.
Games and Video/Photography Editing
- CPU : More powerful processors are required for demanding games and editing tasks. Processors from the Intel Core i5/i7 or AMD Ryzen 5/7 line are recommended.
- Graphics Card : A dedicated graphics card is essential for gaming and editing. Opt for newer models like Nvidia GeForce RTX or AMD Radeon RX.
- RAM Memory : For gaming and editing, 16GB to 32GB of RAM is recommended for smooth performance.
- Storage : A larger capacity SSD (500GB to 1TB) for installing heavier games or applications is a good choice.
Graphic Design or 3D Rendering Work
- CPU : Processors with multiple cores and high processing power are ideal for rendering. Processors from the Intel Core i7/i9 or AMD Ryzen 7/9 line are recommended.
- Graphics Card : A powerful graphics card is essential for intensive workloads. Consider professional or high-performance models such as Nvidia Quadro or AMD Radeon Pro.
- RAM Memory : 32GB to 64GB of RAM is recommended to handle heavy applications and rendering.
- Storage : Fast, higher capacity SSDs (1TB or more) are essential for storage and quick access to large projects.
When choosing hardware components, it is crucial to check their compatibility, ensuring that all elements are compatible with each other and with the chosen motherboard. This initial selection is the basis for assembling a personalized computer that meets the user’s specific needs.
Bonus Step: Examples of components for 3 situations
Motherboard
Use for Work:
- ASUS Prime B560M-A: Supports 11th Gen Intel processors, M.2 slots for fast storage, and USB 3.2 Gen 2 ports for high-speed data transfer.
Use for Games/Image and/or Video Editing:
- MSI MPG X570 Gaming Pro Carbon Wi-Fi: Features support for high-performance Ryzen processors, PCIe 4.0 technology for faster data transfer speeds, and built-in Wi-Fi connectivity.
Usage for Rendering:
- ASUS ROG Strix Z590-E Gaming WIFI: Supports 11th and 10th Gen Intel processors, PCIe 4.0 technology, USB 3.2 Gen 2x2 ports for ultra-fast transfers and high-fidelity audio.
CPU (Processor)
Use for Work:
- Intel Core i5–11400: A six-core processor capable of handling multitasking efficiently and offering good performance for productivity tasks.
Use for Games/Image and/or Video Editing:
- AMD Ryzen 7 5800X: With eight cores and high processing capacity, it is excellent for gaming and offers solid performance in image and video editing tasks.
Usage for Rendering:
- AMD Ryzen 9 5900X: With twelve cores and excellent multitasking performance, it’s a powerful choice for rendering and processing heavy content.
RAM memory
Use for Work:
- Corsair Vengeance LPX 16GB (2x8GB) DDR4 3200MHz: Offers a decent amount of RAM for multitasking and office applications.
Use for Games/Image and/or Video Editing:
- G.SKILL Trident Z RGB Series 32GB (2x16GB) DDR4 3600MHz: Offers greater capacity and speed for intensive gaming and image and video editing.
Usage for Rendering:
- Crucial Ballistix MAX 64GB (2x32GB) DDR4 4000MHz: Increased capacity and speed to handle demanding high-resolution video rendering and editing tasks.
These examples represent some component options suitable for different purposes. It is essential to consider other factors, such as budget, compatibility, and specific needs, when choosing components to assemble a computer for a specific use.
Step 2: Materials Required for Assembly
1. Screwdriver and Other Basic Tools
- A screwdriver compatible with the screws used in the components.
- Possibly a Phillips screwdriver and other common adjustment tools.
2. Adequate Work Surface
- Work on a clean, flat surface to avoid damaging components.
3. Antistatic Wristband (Optional, but Recommended)
- To prevent electrostatic discharge damage to sensitive components, wear an anti-static wrist strap connected to a suitable ground.
4. Components Manual
- Be sure to have the component instruction manuals for reference during assembly.
5. Adequate Space and Lighting
- Have enough space to work comfortably and good lighting to see details.
6. Patience and Time
- Assembling a computer can take some time. Be patient and avoid rushing to ensure proper assembly.
7. Magnetic Bracelet (Optional)
- A magnetic wrist strap can be useful for holding screws and small components during assembly.
8. Electrical Stability
- Make sure you have a stable power source. It is recommended to work in an area with good electrical power and, if possible, use a voltage stabilizer.
9. Cables and Connections
- Check that you have all the necessary cables to connect the components to the power supply, motherboard and other devices.
These materials are essential for successful computer assembly. Having a suitable environment and appropriate tools will help ensure safe and efficient assembly of components.
Step 3: Care to be taken before, during and after assembling a computer
1. Electrostatic Discharge
- Static electricity can damage sensitive components. Wear an anti-static wrist strap or touch a grounded metal surface to discharge static electricity from your body before handling components.
2. Component Compatibility
- Carefully check the compatibility between components. Make sure that the processor is compatible with the motherboard, the RAM memory is of the appropriate type and speed, among other specifications.
3. Component Orientation
- Correctly align components before installation. Make sure the processor pins match the motherboard socket, and the RAM slots are aligned before inserting it.
4. Excessive Force
- Avoid applying excessive force when fitting components. If something doesn’t fit, check the orientation and fit before forcing.
5. Mounting Outside the Cabinet (Optional)
- Some builders prefer to mount the essential components (CPU, RAM, GPU) outside the case before inserting them. This can make component access and assembly easier.
6. Be careful with cables
- Carefully organize cables to maintain adequate airflow and avoid obstructions to fans or components.
7. BIOS updates (if necessary)
- In some situations, the motherboard may require a BIOS update to work with certain newer processors. Check this before assembly.
8. Documentation and Guidelines
- Always consult the component instruction manuals. They contain essential information for correct assembly.
9. Regular Cleaning
- Keep your hands clean and avoid touching component connectors to prevent possible damage from dirt or grease.
These warnings are essential for successful computer assembly. By following these precautions and guidelines, you will be better prepared to build your PC safely and efficiently.
Step 4: Preparation of Components
1. Workspace Organization
- Clean and organize the work area, ensuring enough space for necessary components and tools.
2. Open Packages Carefully
- Open component packaging carefully to avoid damaging the products. Keep the boxes and manuals for future reference if necessary.
3. Visual Inspection
- Perform a visual inspection of the components to ensure there is no visible damage or loose parts.
4. Careful Handling
- Handle components with care, avoiding touching sensitive areas, such as processor pins or RAM memory contacts.
5. Motherboard Preparation
- Place the motherboard on a clean, flat surface. Make sure the mounting brackets on the case match the holes on the board to ensure correct mounting.
6. Processor Preparation (CPU)
- Check the correct orientation of the processor according to the arrow in the corner. Open the motherboard socket lock and insert the processor carefully, avoiding touching the pins.
7. RAM Memory Installation
- Open the memory slots on the motherboard and insert the RAM modules by aligning the notches with the retention brackets. Apply even pressure until the side snaps close.
8. Other Preparations
- Check the expansion slots (PCIe) for the graphics card, SATA slots for the storage devices, and power connectors for the power supply.
9. Connections and Cables
- Check the cables supplied with the components (SATA cables, power cables, etc.) and arrange them to facilitate installation.
Making sure to carefully prepare and inspect each component before assembly is crucial to ensuring smooth and efficient computer assembly. This initial preparation will help minimize possible errors during the assembly process.
Step 5: Assembly/Installation of Components
1 — Processor Installation (CPU)
Motherboard Preparation
- Place the motherboard on a clean, flat surface. Make sure it is out of static range.
CPU Socket Location
- Locate the CPU socket on the motherboard. Open the socket retention latch following the instructions in the motherboard manual.
Correct Processor Orientation
- Observe the arrow or marking on the CPU and motherboard socket to ensure correct orientation. Do not force the CPU into the socket, it should fit in effortlessly.
CPU Installation
- Carefully apply thermal paste and position the CPU in the socket, aligning the CPU pins/latches with the socket slots. Do not apply pressure, the CPU should fit easily.
Socket Closure
- Carefully close the socket retention lever or latch to secure the CPU in place. Make sure it is firmly seated.
Precautions
- Avoid touching the CPU pins or processor surface to avoid static or contact damage.
- Do not force the CPU to be installed, it should fit naturally into the socket.
- Make sure to correctly align the CPU orientation with the motherboard socket before closing the latch.
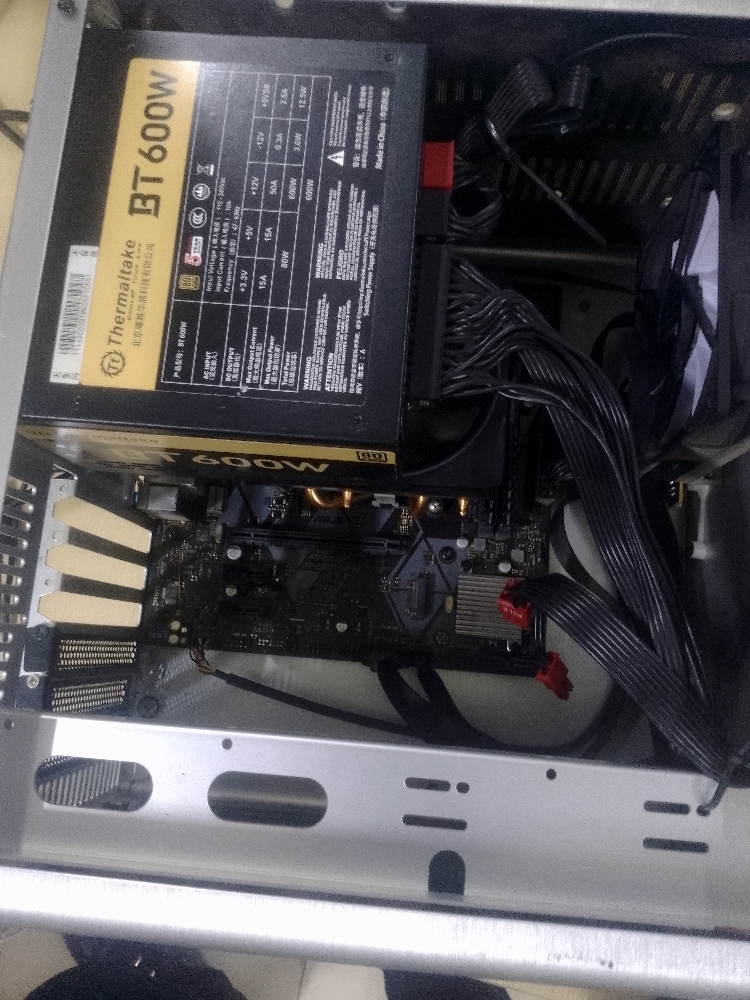
2 — Power supply (PSU)
Selecting the appropriate location
- Identify the space designated for the PSU in the case. It is usually located at the bottom rear of the case.
PSU Guidance
- Position the PSU with the cooler (fan) facing down if there is a large vent at the bottom of the case for better air circulation. Otherwise, the fan must face upwards or away from the case.
Alignment and fixation
- Slide the PSU into the appropriate space, aligning the mounting holes with the corresponding holes on the case.
Fixing the screws
- Use the screws provided with the case to secure the PSU. There are generally four screws, one in each corner.
Connecting the cables
- Route the PSU cables through the appropriate spaces in the case to connect to the motherboard, storage devices and other components.
Connection to Motherboard
- Connect the PSU power cables to the corresponding connectors on the motherboard. Be sure to insert each cable in the correct position to avoid damage.
Precautions
- When handling the PSU, avoid damaging the cables and connectors. Handle with care.
- Make sure the PSU is firmly fixed in the case to avoid unwanted vibrations.
- Connect cables correctly to avoid damaging components during system startup.
3 — Motherboard
Cabinet Preparation
- Position the cabinet so the back (where the input/output ports will be) is facing up. Remove the side panels and any brackets that may obstruct the motherboard assembly.
Positioning of Spacers (Standoffs)
- Install the standoffs in the cabinet. They are small metal parts that elevate the motherboard from the chassis to prevent short circuits. Check that they are aligned with the motherboard mounting holes.
I/O Board Installation — Back Panel
- Fit the I/O board supplied with the motherboard to the back panel of the case. Make sure the connectors line up correctly with the input/output holes.
Motherboard Positioning
- Carefully position the motherboard on the standoffs, aligning the screw holes on the board with the corresponding holes on the case.
Fixing the Motherboard
- Use the screws provided to secure the motherboard in place. Tighten the screws carefully, starting at the corners and then the other holes.
Connecting the Cables to the Motherboard
- Connect the case cables (power button, LEDs, USB ports, etc.) to the motherboard according to the instructions in the instruction manual.
Precautions
- Avoid over-tightening the screws to avoid damaging the motherboard.
- Make sure all holes on the motherboard are correctly aligned with the standoffs to avoid short circuits.
- Carefully connect the case cables to the motherboard on the correct pins to avoid damaging the components.
4 — HDD/SSD/NVMe storage devices
Location of Assembly Bays
- Identify the designated mounting bays on the cabinet for the storage devices. They are generally located on the front or back of the case.
Device Preparation
- If it is an SSD, it can be fixed using screws or a quick-fit system. For an HDD, they are fitted into brackets which are then fitted into the bay. For NVMe, see the next step (installing an M.2 SSD)
Fixing Devices in the Bay
- Position the storage device into the corresponding mounting bay on the cabinet. Use the screws provided to secure the device in the appropriate location.
Connecting SATA and Power Cables
- Connect one SATA cable from the motherboard to the storage device and another to the power supply. Make sure to fit the connectors correctly.
Cable Organization
- Organize SATA and power cables to avoid obstructions to airflow and ensure a clean appearance.
Precautions
- Avoid forcing devices when inserting them into the bays to avoid damaging the connectors. Be sure to use suitable screws to secure the devices securely.
4.1 — Installing an M.2 NVMe SSD
Identification of the M.2 Slot on the Motherboard
- Identify the M.2 Slot on the motherboard. It is usually located close to the processor (CPU) and may be covered by a heatsink.
M.2 Slot Preparation
- If the motherboard includes a heatsink for the M.2 slot, remove it if necessary, following the instructions in the motherboard manual.
M.2 /NVMe SSD Installation
- Position the storage device in the corresponding slot on the motherboard, aligning the device’s connector with the slot. Insert the M.2/NVMe SSD at an angle of 30º to 45º degrees and press down firmly until it is level.
Fixation
- If the motherboard includes a mounting bracket, use a +screw to secure the M.2/NVMe SSD in place. Otherwise, fixing must be done by fitting the M.2 slot
Thermal Sink Replacement (if applicable)
- If it was necessary to remove the Heatsink, put it back in place according to the motherboard instructions.
Precautions
- When handling the storage device, avoid touching the gold contacts to prevent static damage or dirt.
- Install the device carefully and avoid applying too much force, as it must only be fitted with a simple fitting or screw.
- Make sure you follow the motherboard instructions if applicable
5 — Installation of fans and coolers
Identification of Assembly Locations
- Identify the designated locations in the case for installing fans and coolers. There are usually specific mounting points at the top, front and back of the case.
Fan Positioning
- Determine where you want to install the fans for proper air circulation. Front fans generally bring cool air into the case, while rear and top fans remove hot air.
Fan Installation
- Secure the fans in the desired locations using the screws provided. Connect the fan cables to the corresponding connectors on the motherboard or to the fan controller (if applicable).
Cooler Installation (Heat Sink)
- If the CPU cooler has not been previously installed, follow the instructions to securely attach it to the CPU. Connect the cooler cable to the motherboard at the designated connector.
Cable Organization
- Organize fan and cooler cables to avoid obstructions and ensure adequate airflow inside the case.
Precautions
- Check the airflow direction of the fans to ensure they are oriented correctly.
- When installing the cooler on the CPU, apply the correct amount of thermal paste (if necessary) and carefully secure it for proper contact with the CPU.
- Be sure to connect the fan and cooler cables to the correct ports on the motherboard to ensure proper operation.
6 — Installing RAM Memory
Identification of Memory Slots on the Motherboard
- Identify the memory slots on the motherboard. They will be located near the CPU and are usually four or two, with different colors. Place them following the instructions on the motherboard.
Opening of Slots
- Open the retention clips on the memory slots. They are located on both sides of the slot and serve to hold the RAM memory.
RAM Alignment
- Check the correct orientation of the RAM memory by looking at the module alignment key. Align this key with the notch in the motherboard slot.
Insertion
- Carefully hold the memory modules by their edges and insert them into the aligned slot, applying firm and even pressure to the edges until the tabs close on their own.
Installation check
- Make sure that the memory is firmly and well placed in the slot, and the clips are closed, taking into account that they must close automatically.
Precautions
- Handle the memory modules carefully, avoiding touching the gold contacts.
- Make sure to correctly align the RAM alignment switch with the notch in the motherboard slot.
- Apply even pressure to the edges of the memory module when installing it, ensuring it is seated correctly.
7 — Graphics Card Installation
PCI-Express Slot Identification
- Identify the PCI-Express x16 slot on the motherboard. This is the slot where the graphics card will be installed.
Removing the Three Slot Latches
- Remove the PCI-Express slot latches by unscrewing the screws that secure the corresponding back covers to the slot.
Graphics Card Positioning
- Carefully position the graphics card over the PCI-Express slot, aligning it with the slot and making sure the back of the card is flush with the case.
Fixing the Graphics Card
- Using firm, even pressure, push the graphics card down into the slot until it is fully seated and the connectors are visibly inserted into the slot.
Fixing the Graphics Card to the Case
- Use the screws provided to secure the graphics card to the case. There is usually a tab on the back of the graphics card that must be attached to the case.
Connecting Power Cables (if necessary)
- If the graphics card requires additional power from the power supply, connect the appropriate PCI-Express cables to the inputs on the graphics card.
Precautions
- When handling the graphics card, hold it by the edges and avoid touching the gold contacts or components.
- Make sure the card is firmly seated in the PCI-Express slot and securely attached to the case.
- Connect additional power cables to the graphics card if necessary to ensure proper operation.
8 — Connecting the Power Supply Cables
Identification of Power Supply Cables
- Identify the power supply cables. These typically include specific connectors for the motherboard, CPU, graphics card (if necessary), and storage devices.
Motherboard Connection
- Connect the main power cable from the power supply to the motherboard. This cable is usually large, has 24-pin connectors, and plugs into the jack on the end of the motherboard.
CPU Connection
- Connect the CPU power cable to the motherboard. This cable is smaller and has a 4- or 8-pin connector, usually located near the CPU on the motherboard.
Graphics Card Connection (if applicable)
- If the graphics card requires extra power from the PSU, connect the PCI-Express power cables to the graphics card.
Connecting Storage Devices and Fans
- Connect the SATA cables from the power supply to the storage devices (HDD/SSD/NVMe) and fans if necessary.
Connection of Peripheral Cables
- Connect peripheral power cables (extra fans, RGB controllers, etc.) as needed.
Precautions
- Make sure the connectors are properly aligned before applying pressure to connect the cables.
- Do not force the connectors, they must fit smoothly and without applying excessive force.
- Make sure all connections are secure to avoid power failures.
9 — Cable Organization
Identification of Loose Cables
- Identify cables that are loose or poorly organized inside the case.
Cable Routing
- Route cables along designated routes in the cabinet. Use plastic ties, organizing tape, or dedicated spaces to route and secure cables.
Grouping by Categories
- Separate cables into groups based on the components they are connected to, such as motherboard power, GPU power, SATA, etc.
Organization of Surplus Cables
- Try to organize the excess power supply cables so that they do not obstruct the airflow in the case. Use specific spaces to hide extra cables.
Connecting Front Cables
- Connect the case front panel cables (USB, audio, power button) to the motherboard, routing them appropriately for a clean appearance.
Precautions
- Avoid excessively bending or squeezing cables, as this may damage them.
- Make sure that the cables do not obstruct the fans or air inlets/outlets, compromising the airflow and cooling of the case.
10 — Final Check of Components
Visual inspection
- Perform a visual check of all components inside the case. Check that all cables are connected correctly, that components are properly secured and that there are no loose cables or obstructing ventilation.
Checking Connections
- Make sure that all cables are correctly connected to the motherboard, power supply, graphics card, storage devices and other components/peripherals.
Checking Fittings and Screws
- Make sure all boards, components and peripherals are securely fixed/screwed in place.
Thermal Paste Check
- If a cooler has been installed on the CPU, check whether thermal paste has been applied correctly between the cooler and the CPU for good heat dissipation.
Checking Additional Components
- Check that all additional components, expansion cards, are correctly positioned in the correct slots and properly connected.
Final Cleaning
- Carry out a final cleaning to remove any residue or fragments of material that may have remained inside the cabinet during assembly.
Precautions
- Make sure you are in a static-free area when handling components.
- Check that all connections are secure to avoid malfunctions during startup.
Finishing
The part we’ve all been waiting for… The moment of truth… The closing of the case and the first boot of the computer.
Close the case, turn on the monitor, keyboard, power supply and start the computer. If it gives an image, that’s fine! Don’t worry if the computer doesn’t boot into Windows or an Operating System, it’s normal! We haven’t installed it yet!
In order not to prolong this article any longer, I will publish a new one for installing an Operating System, Windows or Linux.
Do you have questions about assembling/constructing your computer? Did you not understand the article well? Are you having problems with your computer and don’t know how to solve them?
Contact me! I will do my best to help you and if you are my follower on medium you will get free help!
Telephone number: +351 930576303
Email: joelespiritosanto21@petalmail.com
Why is the help free?
The answer is simple, I am a student in this area, both hardware and software (programming) and I like to help. I’ve repaired some computers and I simply do it because I like it 😊.