Filliquid Part 2
Testnet
To get started, you need to prepare a wallet on the Filecoin Calibration network and load it with FIL test coins. The following section will explain how in detail.

Preparing Wallet
The FEVM currently supports TP Wallet and MetaMask. In this guide, we will use the TP wallet to provide an example of how to add the Calibration network to the wallet for testing. The same steps can be used to add the Calibration network to MetaMask.
- The first step is to open the TP Wallet and click the “Discover” tab from the bottom menu bar. In the URL section at the top of the screen, enter the following URL: https://chainlist.org/
- Chainlist is a network navigator service that makes it easier to add Testnets from different networks to your wallet

- Once Chainlist appears, the next step is to enter Filecoin in the text box, as shown by “number 1” in Figure 3
- It’s important to check the option to “Include Testnets” (number 2) to ensure the Calibration network appears as an option
- Finally, find the Calibration testnet and click “Add to MetaMask” to add it to your TP Wallet (number 3)

- That’s all there is to it. Your TP Wallet (or MetaMask) is now connected to the Filecoin Calibration testnet network and is ready to use on the FILLiquid testnet
Received Free Test Coin
Once the wallet is connected to the Calibration network, the next step is to load it with $FIL testnet tokens.
Testnet tokens can be received through the Calibration network faucet through the following link;
https://beryx.zondax.ch/faucet
Simply enter the wallet address from your TP Wallet, and you will receive 10 $FIL Testnet tokens.

Beginning The Testing
Now that your wallet is connected to the Calibration testnet and is loaded with testnet coins, it’s time to begin testing the FILLiquid protocol.
You can access the protocol through the following FILLiquid testnet address;
https://test.fliquid.io/
The website portal can be opened through the Discover tab in the wallet, as shown in Figure 2 above.
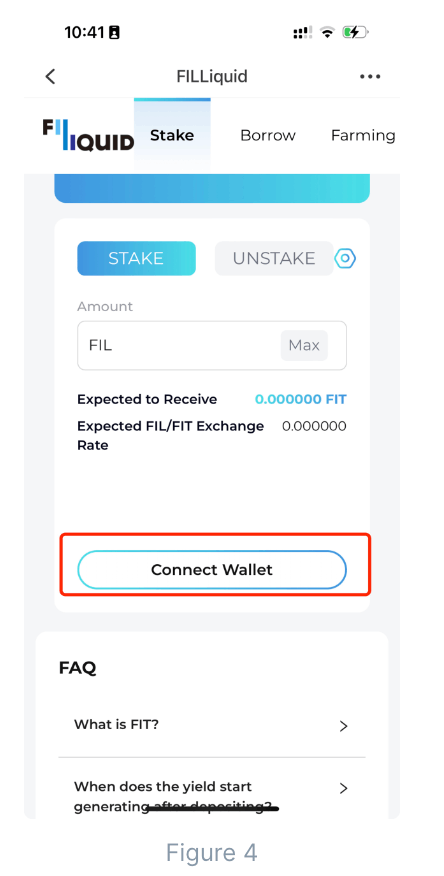
- You will need to connect your wallet to the protocol upon entering it for the first time. Simply hit “Connect Wallet,” as shown in Figure 4.
- Next, select “TP Wallet” in the following screen (or MetaMask if you’re using that wallet)

- The final image in Figure 6 shows a successful wallet connection
And now can to test for staking, borrow and farming
https://test.filliquid.io/
https://fill-liquidity-pool-for-storage.gitbook.io/fill_doc/testnet-user-manual/