How to Setup and Transact NFTs on Oracle Blockchain

How to Setup and Transact NFTs on Oracle Blockchain
In my last blog post on “How to Implement NFTs on Oracle Blockchain”, we showed how quickly and easily you can implement Non-Fungible Token (NFT) on the Oracle Blockchain Platform (OBP). We used Blockchain App Builder, a low code development toolset, to auto-generate the ERC-721 compliant NFT chaincode for the NFT art collection marketplace. Since Hyperledger Fabric, which Oracle Blockchain is based on, doesn’t have built-in token support, we used Blockchain App Builder to create the tokenization chaincodes that create and manage the entire life cycle of fungible and non-fungible tokens. We then customized the chaincode to add a couple of custom buy and sell methods for marketplace operations. We quickly deployed the chaincode on the Oracle Blockchain Platform Cloud Service (OBP-CS) and stored the art image and its metadata on InterPlanetary File System (IPFS) to prepare for minting an NFT.
In this post, we illustrate how to set up the accounts; and then mint and transact the NFTs on Oracle Blockchain using the deployed chaincode. To use the NFT chaincode, we need to set up the user identities, which will be mapped to accounts, and invoke the critical APIs. Now that the NFT chaincode has been deployed and we know how to create token URIs in IPFS, we can invoke the chaincode using REST APIs. For illustration, we’ll use Postman – a popular test tool for REST APIs. Of course, these APIs can be easily integrated into a custom front-end, such as a Web or Mobile application. They can also be integrated with various enterprise systems that might want to leverage the NFT capabilities.
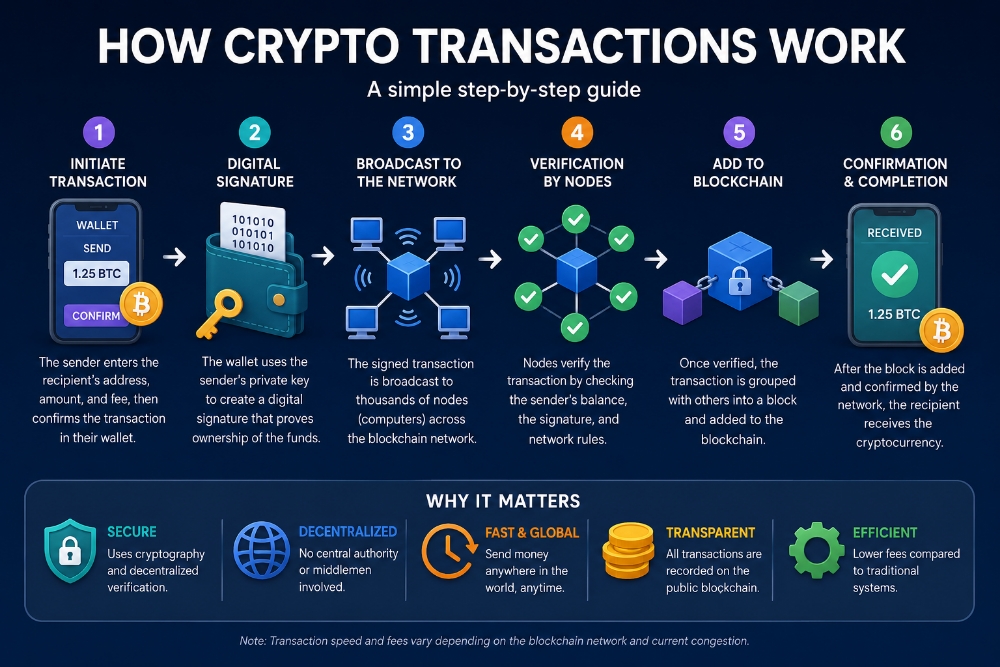
The chaincode testing can be done in 6 easy steps, as shown in the diagram below.
- Create NFT accounts
- Add minter role to an NFT creator’s account
- Create / Mint NFT
- Post the NFT for sale in the marketplace
- Buy the NFT in the marketplace
- Track the complete history of an NFT
Figure 1. NFT Marketplace Flow
Let's walk through each of these steps.
1. Create NFT accounts
For NFT implementation, we need to create NFT accounts for custodial wallets on Oracle Blockchain Platform. However, before creating the NFT accounts, we need to set up the associated user identities in Oracle Cloud, which is a two-step process.
a) User Identity on Identity Cloud Services (IDCS)
Custodial wallets on OBP are associated with OCI user accounts in Identity Access Management via federation to Identity Cloud Services (IDCS). The IDCS will manage the user’s account and password. After creating the IDCS users, we need to assign them the OBP REST_CLIENT application role. IDCS users assigned REST_CLIENT role will be issued custom enrollment certificates in OBP and can trigger the REST APIs to perform the NFT lifecycle operations.
You must use the OCI menu to navigate to "Identity & Security" > "Federation" page and select the IDCS application URL. You can add a user account by going to "Users" vertical navigation option.
Figure 2(i). Creating Users in IDCS
You can also find the IDCS application associated with your blockchain instance by searching for an "Oracle Cloud Services" vertical navigation and the application name begins with your instance name, “OBP224p”, in the example below. Once you’ve opened that page, navigate to Application Roles on the horizontal navigation bar, and use the hamburger menu on the right margin of the REST_CLIENT row to select the Assign Users action, as shown in the screenshot below.
Figure 2(ii). Assigning Roles in IDCS
You can automate the creation of the user accounts and associate them to the REST_Client role for specific OBP instance using REST APIs.
b) User Identity on Hyperledger Fabric
From the Hyperledger Fabric perspective, each IDCS user must have an identity in the Fabric blockchain network. We need to create one custom enrolment for each user in the OBP REST proxy and map the IDCS user to its corresponding enrolment. This can be done from the OBP Console in the Nodes tab by opening the “More Actions” menu on the right-hand side of the restproxy row and selecting “View or manage enrollments” action as shown below.
Figure 3. Managing Enrolments via Nodes Tab in OBP Console
Then on the Enrollment Management pop-up, you can create New Enrollment for each token user and map the user created in IDCS to the enrollment ID. For token user identities on Hyperledger Fabric, one and only one user must be mapped to each enrollment ID.
Figure 4. Managing Client Enrolments in OBP
Similar to setting up IDCS accounts, creating/deleting enrollments and associating/removing users can also be handled using REST APIs.
Once the user identities and custom enrollments have been set up, the NFT admin can create NFT accounts on-chain by invoking the auto-generated method “createAccount”. The sample postman collection file can be downloaded from OBP console > Developer Tools using the link “Download Specification Samples and Related Code” under "Specification Samples". Unzip the downloaded "obp-app-builder-samples" file and open "Samples for Mac,Linux" or "Samples for Windows" folder to find"NFTArtCollectionMarketplaceERC721Ts" subfolder with "NFT Art Collection MarketPlace with ERC721 -TypeScript Specific.postman_collection.json" file, which you can import into Postman.
Note the following requirements when using Postman to work with OBP REST API.
- Select the POST method and enter the URL to the REST proxy for your OBP instance, which is in the following form: https://<rest_server_url:port>/<resource-path>. The first part you can copy from the REST proxy row is shown in the Nodes tab in the OBP Console. Then add the second part, which is the resource-path to trigger a smart contract transaction, api/v2/channels/{channelName}/transactions, where {channelName} is the channel you’ve specified when deploying the chaincode from the Blockchain App Builder. This could be “default” channel or a new channel you might’ve created.
- Authorization should be set to Basic Auth and username/password entered on that tab
- Headers tab must include Content-Type set to application/json
- Body must be set to raw and filled with the JSON structure specified as shown below:
{
"chaincode": "",
"args": [
"createAccount",
"",
"",
"nonfungible"
],
"sync": true
}
Note that values in are Postman environment variables that can be set and re-used in all API calls. The bc_museum_orgid should be set to MSPId of the created instance, and the bc_museum_userid should be set to the userid associated with that custom enrollment. The variables are set in the postman collection with the sample values as depicted in the screenshot below.
Figure 5. Postman collection with sample values of the variables
The complete request and its response are shown below.
Figure 6. Postman request/response for createAccount API
The custodial wallet account has now been created; note that in the response body, the result includes the blockchain transaction id as well as a payload indicating asset type “oaccount” and its properties – accountID, userID and orgID associated with the account, account tokenType (nonfungible) and current number of NFTs in the account.
Additional accounts for other museum curators and marketplace users can be created using the same API with changing values of orgID and userID in the request body.
2. Add Minter Role
The NFT admin can specify which user will be able to mint an NFT by assigning the minter role to the NFT account. NFT admin will invoke the auto-generated method “addRole” to assign minter role to an existing NFT account.
The JSON body for this API is shown below, followed by the complete request/response in Postman:
{
"chaincode": "",
"args": [
"addRole",
"minter",
"",
""
],
"sync": true
}
Figure 7. addRole API
The account specified can now mint or create NFTs, and the transaction ID associated with this on-chain is returned in the response result along with the Success message. You can add this role for any other accounts of museum NFT creators.:
3. Create / Mint NFT
The user with the minter role can create / mint NFT by invoking the auto-generated method “createArtCollectionToken”. Note that the method includes the class name “ArtCollection” in its name since it was generated from the template for the ArtCollection NFT class. After minting the NFT, the token will be automatically owned by the user who minted the token and will be in their custodial wallet. The JSON body for this call is shown below:
{
"chaincode": "",
"args": [
"createArtCollectionToken",
"<< NFT_JSON_Object_Parameters >>"
],
"sync": true
}
<<NFT_JSON_Object_Parameters>> is a JSON object in the following form
"{
"field1_name\":\"field1_value\",
\"field2_name\":\"field2_value\",
…
}"
where
- Field 1 is a tokenID, which must have a unique value
- Field 2 is a tokenURI we retrieved from IPFS for our JSON metadata file
- Field 3 is in a form \”metadata\”: <<embedded JSON object with metadata fields (painting_name, image URL, and painter) >>
- Field 4 is a custom property price field set to 0
- Field 5 is a custom property on_sale_flag set to false
The complete request is shown in the Postman screenshot below.
Figure 8. createArtCollectionToken
The response includes the transaction ID and all the NFT properties – its metadata, intrinsic attributes, such as creator and owner, and custom properties.
{ "metadata": {
"painting_name": "Oracle – Red Bull Partnership",
"description": "Oracle test NFT",
"image": https://ipfs.io/ipfs/QmVap6Gkh3Cp9DiLLWvkvJHpuXpFmYB2GzU1caM57gNcAa?filename=Oracle_RedBull_N1.jpeg,
"painter": "Alex"
},
"assetType": "otoken",
"tokenId": "NFT1",
"tokenName": "artcollection",
"tokenDesc": "",
"symbol": "ART",
"tokenStandard": "erc721+",
"tokenType": "nonfungible",
"tokenUnit": "whole",
"behaviors": [
"indivisible",
"singleton",
"mintable",
"transferable",
"burnable",
"roles"
],
"roles": {
"minter_role_name": "minter"
},
"mintable": {
"max_mint_quantity": 20000
},
"owner": " "oaccount~eadf1b0ae857164f8681d1742b6328089a7d33ebec76d8248cb909da7a84f42a",
"createdBy": "oaccount~eadf1b0ae857164f8681d1742b6328089a7d33ebec76d8248cb909da7a84f42a",
"creationDate": "2022-05-16T10:53:45.000Z",
"isBurned": false,
"tokenUri": "https://ipfs.io/ipfs/QmV68aiT7xw2WX8pmDbeTWpGP2or35NUFan9RagymsLpgV?filename=ArtCollection_N1.json",
"price": 0,
"on_sale_flag": false
}
Note that metadata fields can be updated for a minted NFT as long as it hasn’t been transferred to another account. Once it’s been transferred, the metadata is no longer updateable. However, the custom properties, in this case “price” and “on_sale_flag” can be updated by a current owner of the NFT throughout its lifecycle.
4. Make NFT Available for Sale in the Marketplace
When minted, the NFT is in user’s wallet. When the marketplace application searches for NFTs to display under the Marketplace tab, it filters using on_sale_flag = true. The user who minted the NFT will need to post it in the marketplace for the buyers to find and buy this NFT. The NFT minter, who’s also the current owner, can invoke the custom method “sell”, which sets the on_sale_flag to true and updates the NFT price. The custom attributes like on_sale_flag and price can only be updated by the NFT owner. To invoke the custom method, use the request body below:
{
"chaincode": "",
"args": [
"sell",
"",
"250"
],
"sync": true
}
Figure 9. sell API
This supplies the price we want to set and sets on_sale_flag to true, then updates the token in the state database. At that point, any marketplace queries for sellable NFTs will include this NFT and it will be shown as available for sale at price of $250.
5. Buy the NFT from the Marketplace
Once the NFT is available for sale, any user, who is not the current NFT owner, can now buy the NFT. The payment integration is not shown in this example, but a marketplace app can integrate with a variety of payment gateways using published APIs to process fiat payments; for example using Oracle Integration Cloud PayPal adapter, Oracle Monetization Cloud, or more flexible Oracle CX Commerce payment options. Or you can use OBP Fungible Tokens, possibly funded by a fiat payment or exchange of crypto tokens from a public blockchain, and then handle NFT payments as a Fungible Token transfer from buyer’s to seller’s account.
Once a payment has been processed, the marketplace can invoke the custom method “buy” to transfer the NFT from the museum’s wallet (i.e. NFT minter’s account) to the new buyer’s account and sets the on_sale_flag to false. Setting the on_sale_flag to false will ensure that the NFT is not saleable in the marketplace until the current owner decides to sell it by calling the custom “sell” method and setting a price. The JSON body for this invocation is shown below:
{
"chaincode": "",
args": [
buy",
",
"
",
",
",[MER1]
250"
],
"sync": true
}
Figure 10. buy API
Note that for simplicity sake, all non-museum marketplace users can be under platform provider’s orgId. The response returns the transaction ID and a payload message indicating successful NFT transfer.
6. Track the Complete History of an NFT
Any user can track the complete history of an NFT by invoking the auto-generated method “getTokenHistory” using the “chaincode-queries” instead of the “transaction” in the URI and the following body:
{
"chaincode": "",
"args": [
"getTokenHistory",
"",
"250"
],
"sync": true
}
The complete transaction history of the NFT as returned from the ledger is shown below with 3 transactions listed (most recent one on the top):
- Transfer – when the NFT was bought
- Change in properties – when the NFT was put on sale and assigned a price
- Minting – when the NFT was created
Figure 11. getTokenHistory API
{ "returnCode": "Success",
"error": "",
"result": {
"payload": [
{
"trxId": "2e373bde5c91553ffed861dc5b1be31a3c9663f0d767ee6478fe26f21a4044ec",
"timeStamp": "2022-05-16T10:55:26.000Z",
"value": {
"metadata": {
"painter": "Alex",
"painting_name": "Oracle - Red Bull Partnership",
"image": "https://ipfs.io/ipfs/QmVap6Gkh3Cp9DiLLWvkvJHpuXpFmYB2GzU1caM57gNcAa?filename=Oracle_RedBull_N1.jpeg"
},
"assetType": "otoken",
"tokenId": "NFT1",
"tokenName": "artcollection",
"symbol": "ART",
"tokenStandard": "erc721+",
"tokenType": "nonfungible",
"tokenUnit": "whole",
"behaviors": [
"indivisible",
"singleton",
"mintable",
"transferable",
"burnable",
"roles"
],
"roles": {
"minter_role_name": "minter"
},
"mintable": {
"max_mint_quantity": 20000
},
"owner": "oaccount~075bc2c2456e746939646e38d22eb5090ee40b374c4d0ca9b6dcb0316adabd20",
"createdBy": "oaccount~eadf1b0ae857164f8681d1742b6328089a7d33ebec76d8248cb909da7a84f42a",
"transferredBy": "oaccount~075bc2c2456e746939646e38d22eb5090ee40b374c4d0ca9b6dcb0316adabd20",
"creationDate": "2022-05-16T10:53:45.000Z",
"transferredDate": "2022-05-16T10:55:26.000Z",
"isBurned": false,
"tokenUri": "https://ipfs.io/ipfs/QmV68aiT7xw2WX8pmDbeTWpGP2or35NUFan9RagymsLpgV?filename=ArtCollection_N1.json",
"price": 250,
"on_sale_flag": false
}
},
{
"trxId": "7e8ab8be813d14c6771f0be5536230bcc0d8437927e6876fbd3a3239633c83f8",
"timeStamp": "2022-05-16T10:54:32.000Z",
"value": {
"metadata": {
...
...
"owner": "oaccount~eadf1b0ae857164f8681d1742b6328089a7d33ebec76d8248cb909da7a84f42a",
"createdBy": "oaccount~eadf1b0ae857164f8681d1742b6328089a7d33ebec76d8248cb909da7a84f42a",
"creationDate": "2022-05-16T10:53:45.000Z",
"isBurned": false,
"tokenUri": "https://ipfs.io/ipfs/QmV68aiT7xw2WX8pmDbeTWpGP2or35NUFan9RagymsLpgV?filename=ArtCollection_N1.json",
"price": 250,
"on_sale_flag": true
}
},
{
"trxId": "af4d438e6d8fc98d02aa291fe60c75b67e06ec94480f36f68af450e56a5f849c",
"timeStamp": "2022-05-16T10:53:45.000Z",
"value": {
"metadata": {
...
...
"owner": "oaccount~eadf1b0ae857164f8681d1742b6328089a7d33ebec76d8248cb909da7a84f42a",
"createdBy": "oaccount~eadf1b0ae857164f8681d1742b6328089a7d33ebec76d8248cb909da7a84f42a",
"creationDate": "2022-05-16T10:53:45.000Z",
"isBurned": false,
"tokenUri": "https://ipfs.io/ipfs/QmV68aiT7xw2WX8pmDbeTWpGP2or35NUFan9RagymsLpgV?filename=ArtCollection_N1.json",
"price": 0,
"on_sale_flag": false
}
}
],
"encode": "JSON"
}
}
We’ve completed a core sequence of NFT lifecycle operations – from on-boarding a user with a custodial wallet, to assigning roles, minting the NFT, transferring it through the sell and buy methods in the marketplace, and looking up its transaction history. In the process we have illustrated two custom methods and just four of the 30+ automatically generated methods and REST APIs that can be used to build a complete NFT application.
You can download the NFT art collection marketplace sample chaincode along with the postman collection file from your OBP console -> Developer Tools -> Download Specification Samples and Related Code under "Specification Samples" to help you to get started with your NFT implementation journey.