[Node] BABYLON node'unuzu çalıştırın
 Babylon, Bitcoin sahiplerinin aracılara, köprülere, token paketlemeye, üçüncü taraf saklamaya veya oracle'lara ihtiyaç duymadan doğrudan Proof-of-Stake (PoS) blok zincirlerinde stake etmelerine olanak tanıyan Bitcoin stake etme için çığır açan bir yöntem sunuyor. Herhangi bir verinin (PoS blok zincirleri gibi) kısa ve doğrulanabilir zaman damgalarını Bitcoin'e gönderen bir protokol olan Bitcoin zaman damgasını ve Bitcoin'in varlığın güvene dayalı olmayan (ve kendi kendine saklanan) stake etme yoluyla herhangi bir merkezi olmayan sisteme ekonomik güvenlik sağlamasına izin veren bir protokol olan Bitcoin staking'i içerir.
Şu anda, test ağı aşamasında olan Babylon, önde gelen risk sermayesi şirketlerinden 18 milyon dolarlık fon sağladı. Bu adım adım kılavuzda, node'unuzu kurmayı ve çalıştırmayı ve kendi doğrulayıcınız olmayı öğreneceksiniz!
Node Science'a hoş geldiniz! Burada, önceden herhangi bir teknik bilgi olmadan düğümünüzü kolay ve hızlı bir şekilde nasıl kuracağınızı öğrenecek ve anlayacaksınız.
Düğümlerle ilgili her şeyden haberdar olmak için bizi Twitter'da takip etmekten çekinmeyin ve topluluğumuzla daha fazla tartışma veya herhangi bir soru için Discord'umuza katılın!
I) VPS yapılandırması
Bir düğümü çalıştırmak için bir VPS'ye (Sanal Özel Sunucu) ihtiyacınız olacak ve en güvenilir ve en ucuz çözümlerden biri Contabo'dur. 2003 yılında kurulmuş, sağlam performansı ve güvenilirliği ile bilinen, çok çeşitli bilgi işlem ihtiyaçlarını ve bütçelerini karşılayan uygun maliyetli bir Alman VPS çözümüdür.
Buraya tıklayarak CLOUD VPS 2'yi seçebilirsiniz. Üzerinde birden fazla farklı düğümü daha ekonomik bir şekilde çalıştırmak için daha güçlü bir sunucu (VPS 3 veya 4) tercih edebileceğinizi unutmayın.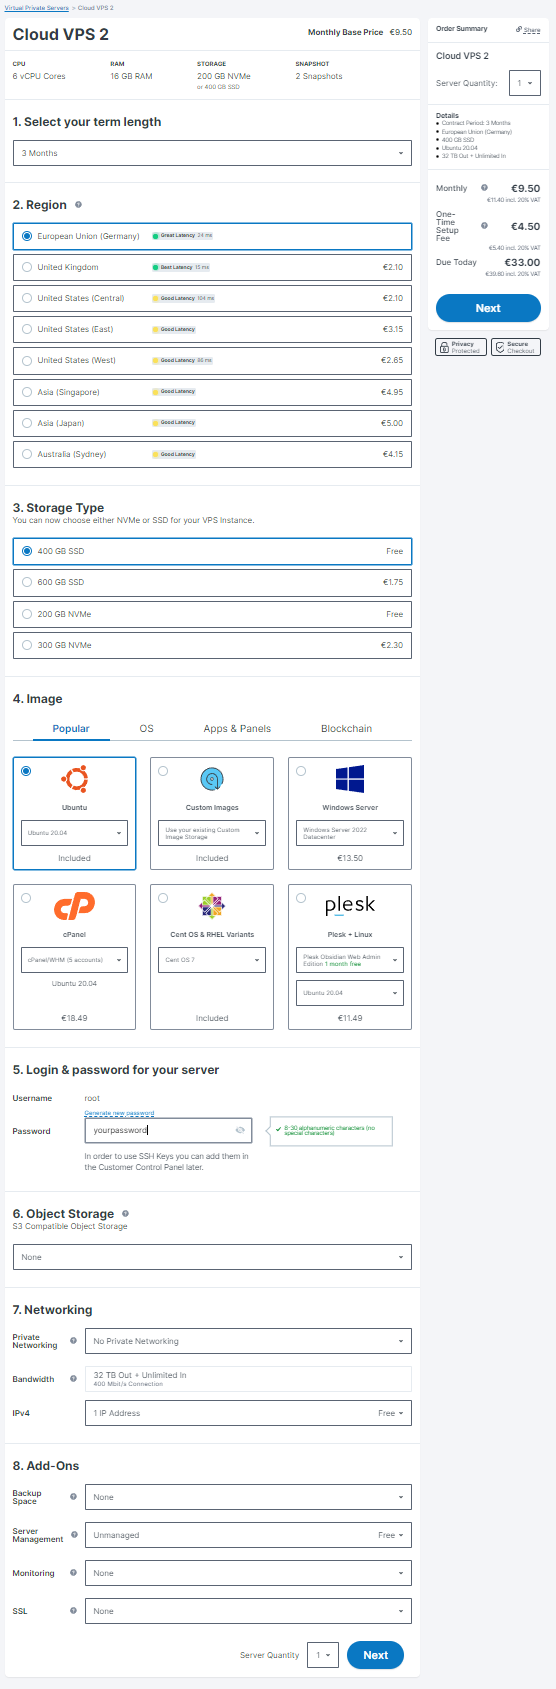 Don’t forget to choose a password.
Once payment is complete, you’ll receive an e-mail with your IP address entitled “Your login data!”. To connect to your VPS and securely run your node, you must download and install the Putty software, which enables a secure connection. Type your IP address and Open.
II) Node deployment
Ensure you copy each command line using (Ctrl+C), and then paste it into your terminal by right-clicking your mouse. Execute them sequentially, pressing Enter after each, if required.
Start by refreshing the local package index to incorporate the most recent modifications made in the repositories.
apt-get update && sudo apt-get upgrade -y
Then installs several essential tools and dependencies.
sudo apt -qy install git build-essential curl jq lz4 screen
- git: İşbirlikçi yazılım geliştirme için yaygın olarak kullanılan dağıtılmış bir sürüm kontrol sistemi.
- build-essential: Derleyiciler ve geliştirme kitaplıkları dahil olmak üzere Ubuntu'da yazılım derlemek için temel öğeleri yükleyen bir meta paket.
- curl: URL'lerle veri aktarmak için bir komut satırı aracı. Genellikle web'den dosya indirmek için kullanılır.
- jq: JSON verilerini işlemek için bir komut satırı aracı. Kabuk betiklerinde JSON verilerini işlemeye ve analiz etmeye yardımcı olur.
- lz4: Hızlı bir sıkıştırma algoritması.
- Ekran: Tek bir terminal penceresi veya oturumu içinde birden fazla sanal terminal oluşturmanıza olanak tanır.
Şimdi Google tarafından tasarlanan ve resmi olarak Kasım 2009'da duyurulan bir programlama dili olan Go'yu yüklemeniz gerekiyor.
İlk olarak, muhtemelen var olan Go kurulum dizinini kaldırarak başlayın.
sudo rm -rf /usr/local/go
Ardından go.dev'dan Linux AMD64 mimarisi için Go programlama dili ikili dağıtımını indirin, indirilen tar.gz dosyasının içeriğini ayıklayın ve dizininize kurun./user/local
curl -Ls https://go.dev/dl/go1.20.12.linux-amd64.tar.gz | sudo tar -xzf - -C /usr/local
Ardından, Go yürütülebilir ikili dosyalarının bulunduğu dizinleri dahil etmek için sistem genelinde ve kullanıcıya özgü PATH ortam değişkenlerini güncelleştirin.
eval $(echo 'export PATH=$PATH:/usr/local/go/bin' | sudo tee /etc/profile.d/golang.sh)
eval $(echo 'export PATH=$PATH:$HOME/go/bin' | tee -a $HOME/.profile)
"babylon" adlı dizini ve tüm içeriğini kullanarak mevcut dizininizi ana dizininize değiştirin ve ardından yinelemeli ve zorla kaldırın.
cd $HOME
rm -rf babylon
Babylon deposunu kopyalayın, geçerli dizininizi "babylon" dizini olarak değiştirin ve ardından Git deponuzdaki geçerli dalı "v0.7.2" olarak etiketlenmiş sürüme geçirin.
git clone https://github.com/babylonchain/babylon.git
cd babylon
git checkout v0.7.2
Giriş dizininizin altında (Cosmos SDK tabanlı zincirlerin ikili sürümünü yönetmek için güçlü bir yardımcı programdır) için bir dizin oluşturun ve yürütülebilir dosyayı dizinden bu dizine taşıyın. Son olarak, derleme dizinini silin.cosmovisorbabylondbuild
make build
mkdir -p $HOME/.babylond/cosmovisor/genesis/bin
mv build/babylond $HOME/.babylond/cosmovisor/genesis/bin/
rm -rf build
Sembolik bağlantılar oluşturarak, sorunsuz sürüm güncellemelerine izin vererek ve komuta sistemdeki herhangi bir yerden kolayca erişilebilir hale getirerek ayarlayın.cosmovisorbabylond
sudo ln -s $HOME/.babylond/cosmovisor/genesis $HOME/.babylond/cosmovisor/current -f
sudo ln -s $HOME/.babylond/cosmovisor/current/bin/babylond /usr/local/bin/babylond -f
Sisteminizde Go programlama dili yüklü olduğundan, artık 1.5.0 sürümünü yükleyebilirsiniz.cosmovisor
go install cosmossdk.io/tools/cosmovisor/cmd/cosmovisor@v1.5.0
Create and enable a service for the Babylon node, managed by . The Babylon node service is then configured to start automatically under the management of , using for automatic updates and process management.systemdcosmovisorsystemdcosmovisor
sudo tee /etc/systemd/system/babylon.service > /dev/null << EOF
[Unit]
Description=babylon node service
After=network-online.target

[Service]
User=$USER
ExecStart=$(which cosmovisor) run start
Restart=on-failure
RestartSec=10
LimitNOFILE=65535
Environment="DAEMON_HOME=$HOME/.babylond"
Environment="DAEMON_NAME=babylond"
Environment="UNSAFE_SKIP_BACKUP=true"
Environment="PATH=/usr/local/sbin:/usr/local/bin:/usr/sbin:/usr/bin:/sbin:/bin:/usr/games:/usr/local/games:/snap/bin:$HOME/.babylond/cosmovisor/current/bin"

[Install]
WantedBy=multi-user.target
EOF
sudo systemctl daemon-reload
sudo systemctl enable babylon.service
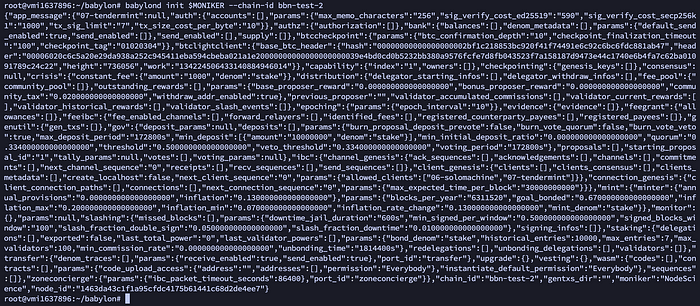
Assign the name of your choice to your node, such as MONIKER="NodeScience"
MONIKER="YOUR_MONIKER"
Set the chain ID of your node to . The chain ID is a unique identifier for a blockchain network, ensuring that nodes connect to the correct network.bbn-test-2
babylond config chain-id bbn-test-2
Configure the keyring backend to . The keyring backend is responsible for storing private keys securely.test
babylond config keyring-backend test
Sets the address of the node daemon to . This tells your client where to send RPC (Remote Procedure Call) requests.tcp://localhost:16457babylond
babylond config node tcp://localhost:16457
Initialize your node with the moniker specified by the variable you set earlier and associates it with the chain ID . This step sets up the basic configuration and directory structure for your node, preparing it to sync with the Babylon network specified by the chain ID.MONIKERbbn-test-2
babylond init $MONIKER --chain-id bbn-test-2
 Use curl to download the and the files. The contains the initial state of the blockchain, such as the initial accounts, their balances, and other blockchain parameters while the file contains a list of known peers on the network. This helps your node to quickly find and connect to other peers in the network.
genesis.jsonaddrbook.jsongenesis.jsonaddrbook.json
Then, redirect your downloaded files into your node’s configuration directory .$HOME/.babylond/config
curl -Ls https://snapshots.kjnodes.com/babylon-testnet/genesis.json > $HOME/.babylond/config/genesis.json
curl -Ls https://snapshots.kjnodes.com/babylon-testnet/addrbook.json > $HOME/.babylond/config/addrbook.json
Use sed (a stream editor for filtering and transforming text), to modify configuration settings in the and files of your Babylon node setup. Each command searches for specific lines in these configuration files and replaces them with new settings.config.tomlapp.toml
sed -i -e "s|^seeds *=.*|seeds = \"3f472746f46493309650e5a033076689996c8881@babylon-testnet.rpc.kjnodes.com:16459\"|" $HOME/.babylond/config/config.toml

sed -i -e "s|^minimum-gas-prices *=.*|minimum-gas-prices = \"0.00001ubbn\"|" $HOME/.babylond/config/app.toml

sed -i \
  -e 's|^pruning *=.*|pruning = "custom"|' \
  -e 's|^pruning-keep-recent *=.*|pruning-keep-recent = "100"|' \
  -e 's|^pruning-keep-every *=.*|pruning-keep-every = "0"|' \
  -e 's|^pruning-interval *=.*|pruning-interval = "19"|' \
  $HOME/.babylond/config/app.toml

sed -i -e "s%^proxy_app = \"tcp://127.0.0.1:26658\"%proxy_app = \"tcp://127.0.0.1:16458\"%; s%^laddr = \"tcp://127.0.0.1:26657\"%laddr = \"tcp://127.0.0.1:16457\"%; s%^pprof_laddr = \"localhost:6060\"%pprof_laddr = \"localhost:16460\"%; s%^laddr = \"tcp://0.0.0.0:26656\"%laddr = \"tcp://0.0.0.0:16456\"%; s%^prometheus_listen_addr = \":26660\"%prometheus_listen_addr = \":16466\"%" $HOME/.babylond/config/config.toml
sed -i -e "s%^address = \"tcp://localhost:1317\"%address = \"tcp://0.0.0.0:16417\"%; s%^address = \":8080\"%address = \":16480\"%; s%^address = \"localhost:9090\"%address = \"0.0.0.0:16490\"%; s%^address = \"localhost:9091\"%address = \"0.0.0.0:16491\"%; s%:8545%:16445%; s%:8546%:16446%; s%:6065%:16465%" $HOME/.babylond/config/app.toml
seedare nodes in the network that your node can connect to for initial synchronization and peer discovery.minimum-gas-pricessets the gas prices used to calculate transaction fees and incentivizes validators to include transactions in a block.pruninghelps manage disk space by removing old state data. These settings specify a custom pruning strategy, keeping the most recent 100 states, not keeping any states permanently (), and pruning every 19th state.0proxy-appupdates various network-related settings such as the addresses and ports for different services. This might be necessary to avoid port conflicts or to adhere to specific network policies.addressupdates the addresses and ports for various APIs.
Use curl to download the latest compressed snapshot of the Babylon testnet blockchain in the correct directory for your Babylon node and wait until it reaches 100%.
curl -L https://snapshots.kjnodes.com/babylon-testnet/snapshot_latest.tar.lz4 | tar -Ilz4 -xf - -C $HOME/.babylond
[[ -f $HOME/.babylond/data/upgrade-info.json ]] && cp $HOME/.babylond/data/upgrade-info.json $HOME/.babylond/cosmovisor/genesis/upgrade-info.json
 Start your Babylon node and immediately display its logs with , allowing you to monitor the node’s activity and troubleshoot any issues that arise during startup or operation in real time.
journalctl
sudo systemctl start babylon.service && sudo journalctl -u babylon.service -f --no-hostname -o cat
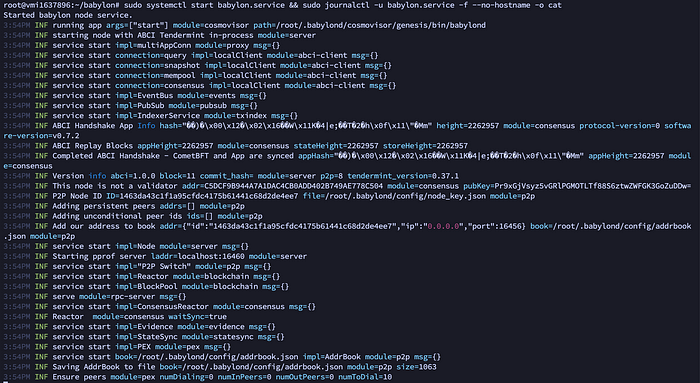 You can exit logs by typing CTRL+C.
Now you need to setup your validator.
Start by creating a new wallet called “wallet” and do not forget to write these informations (address, pubkey, mnemonic phrase) in a safe place !
babylond keys add wallet
Go to Babylon Discord by clicking here, go to Faucet Channel and claim test tokens by typing . There is currently a lot of demand, so it may take some time before you receive them and you must have them for the next stage.faucet <adresse>
You can check your balance with this command:
babylond q bank balances $(babylond keys show wallet -a)
Then generate your BLS (Boneh-Lynn-Shacham) key associated with your previously created wallet.
babylond create-bls-key $(babylond keys show wallet -a)
And finally, restart your node to apply new configurations/updates.
sudo systemctl restart babylon.service
Apply new changes in and files.app.tomlconfig.toml
sed -i -e "s|^key-name *=.*|key-name = \"wallet\"|" $HOME/.babylond/config/app.toml
sed -i -e "s|^timeout_commit *=.*|timeout_commit = \"10s\"|" $HOME/.babylond/config/config.toml
key-name: name of your wallet previously defined.timeout_commit: sets the maximum time before a block is “committed”, so it means that your node will wait up to 10 seconds for commits from other validators before finalizing a block.
Now it’s time to create your validator, but before, ensure that network synchronization is complete.
babylond status | jq .SyncInfo
You have to wait until the variable is “false”.catching_up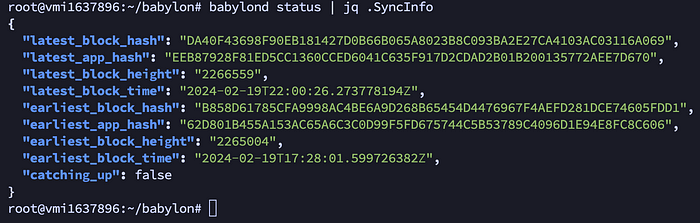 You can then create your validator by replacing everything in capital letters with your own details.
babylond tx checkpointing create-validator \
--amount 1000000ubbn \
--pubkey $(babylond tendermint show-validator) \
--moniker "YOUR_MONIKER_NAME" \
--identity "YOUR_KEYBASE_ID" \
--details "YOUR_DETAILS" \
--website "YOUR_WEBSITE_URL" \
--chain-id bbn-test-2 \
--commission-rate 0.05 \
--commission-max-rate 0.20 \
--commission-max-change-rate 0.01 \
--min-self-delegation 1 \
--from wallet \
--gas-adjustment 1.4 \
--gas auto \
--gas-prices 0.00001ubbn \
-y
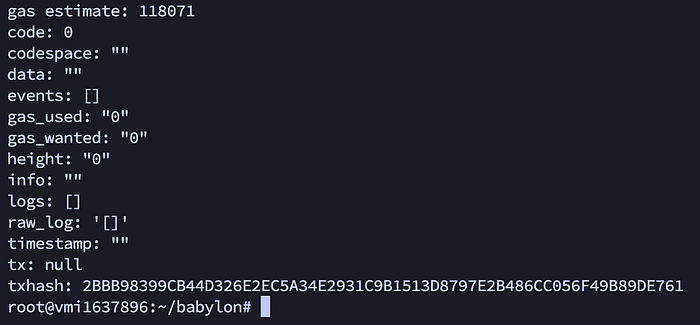 Congratulations, you’ve successfully become a validator on the Babylon network! You can past your txhash on explorers to ensure your transaction is a success.
As usual, you can attach to a screen session with:
screen -S babylon
and follow your real-time logs with this command.
sudo journalctl -u babylon.service -f --no-hostname -o cat
Simply press CTRL+A+D to detach from the screen session; your node will keep running. And if you to reattach to the existing screen session, just type .screen -r babylon
Düğümlerle ilgili her şeyden haberdar olmak için bizi Twitter'da takip etmekten çekinmeyin ve topluluğumuzla daha fazla tartışma veya herhangi bir soru için Discord'umuza katılın!