BITFLOW BTC Swap: sBTC Testnet Guide

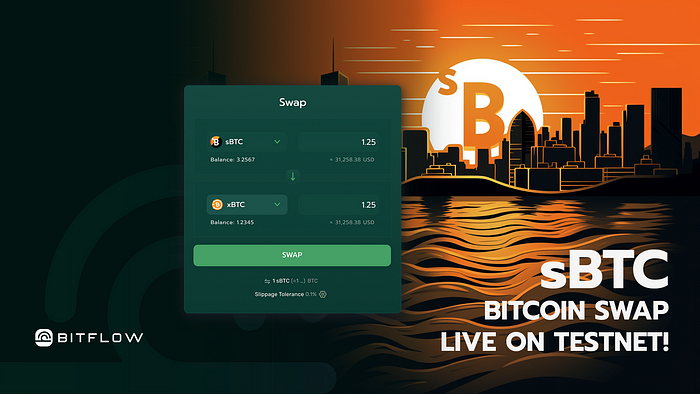 Bitflow’s sBTC Swap DEX is now live on Testnet (https://test.bitflow.finance/)offering users a decentralized and efficient way to swap different versions of Bitcoin and earn real Bitcoin yield — soon on Mainnet!
In this guide, we will walk you through the steps to use Bitflow’s BTC Swap DEX and provide you with tips to make the most out of your testing experience. Your feedback from testing the our DEX will directly impact the user experience and protocol, as we aim to become the decentralized exchange for Bitcoiners!
- BITFLOW members who participate in testing, provide feedback, and help us improve the application will be rewarded — so join our waitlist and our official Discord Channel to participate in our upcoming incentivized program and community rewards!
- In case of any issues, bugs, or suggestions for improvements, please post on the BITFLOW Discord 🗨┃ report-bugs or submit a ticket on 📩┃ticket-support channel.
- Learn more about our protocol and and check out our Documentation here.
About Testnet
The testnet is a separate blockchain from the Stacks mainnet analogous to a staging environment. It’s a network developers use to test their apps, smart contracts, or changes to the protocol in a production-like environment. It produces blocks at roughly the same rate as the mainnet; about 1 block every 10 minutes on average.
What is sBTC?
sBTC is a 1:1 pegged Bitcoin-backed asset on the Stacks Bitcoin L2. sBTC operates under a fully decentralized framework, overseen by an open-membership group of signers. Learn More
BitFlow DEX: How to Connect
First you want to make sure you have a Stacks compatible wallet, such as Leather (Formerly Hiro) or Xverse Wallet app installed, then make sure your wallet is set to MAINNET:
1 — Open the Xverse/Leather Wallet App by clicking on the browser extension
2 — Click “…”, then click “Change Network”.
3 — Select the default Stacks Mainnet, and the Wallet app will display Mainnet name.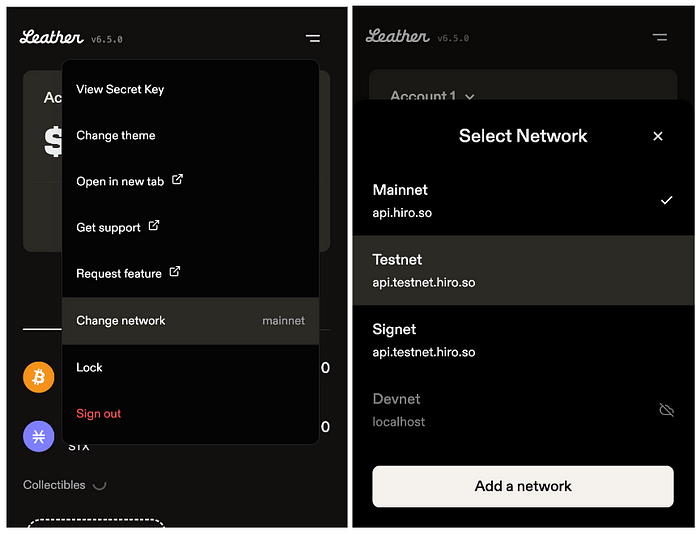 Changing Network on the Leather Wallet (Stacks Protocol/Hiro.so)
Ways to Use The Protocol:
- Navigate to https://test.bitflow.finance/
- Connect Wallet
- Go to the Faucet page, and follow the directions below to mint sBTC.
- Trade stables and sBTC/xBTC on the Swap page.
- Add / Remove liquidity on the Pool page.
- Stake your LP tokens to start earning and claiming Rewards on the Earn page.
Click “Connect your Wallet” Button on Bitflow App page to start!
Faucet
The BITFLOW testnet faucet provides you with free tokens to test with. Note: These are not the same as Tokens on mainnet and have no value!
How to receive Testnet Tokens on Stacks Chain?
1 — Connect your Wallet to https://test.bitflow.finance/
2 — After you connect, you’ll see the top menu navigation; click FAUCET to navigate to the BitFlow Faucet page.3 — Select a Token from the Dropdown (xBTC or sBTC)
sBTC: First you need to get testnet BTC here, in order to mint on the sBTC Bridge!
- To mint sBTC you’ll need a minimum of 0.0001 BTC Testnet Tokens
- You can mint BTC from the Bitcoin Faucet — max amount per request is 0.00008 (mint 2x for 0.00016 example)
4 — Enter Amount
5 — Click on Confirm
6 — Tokens coming your way shortly!
The FAUCET deposit process requires an on-chain transaction to receive confirmation. This normally takes 10–15 mins in the testnet environment (this is because we are using same blocktime as BTC mainnet).
SWAP sBTC
The Swap function on BITFLOW provides a trustless and decentralized exchange (DEX) of price-similar assets on the Stacks blockchain (such as sBTC<>xBTC).
These traders pay fees to the protocol, which are then proportionally claimed by liquidity providers.
Using Swap
1 — First, select the “SWAP” tab on the top menu bar to navigate to the swap panel
2 — Select a Token at the top, “base token” or token that you currently hold (sBTC or xBTC for example).
3 — Enter Amount that you will submit in the exchange. (Testnet is Limited to 0.01 BTC per swap)
4 — Then select the token below, the “quoted” token, or token that you will receive in the exchange.
5 — Enter the MINIMUM amount you are willing to accept in return. The smart contract will return as much as possible above that amount. If trade lowers the price of the other asset too much, then the swap will fail because of too much “slippage” and you will retain your tokens.
5 — Once you are ready to move forward, click “Confirm” which will bring up the smart contract confirmation window where you would select “Confirm” to sign the transaction.After signing, you should see that your transaction has been broadcasted, taking you to the “Explorer” link to verify your transaction status.
Please note that it may take up to ~10–15 minutes for your balance to be updated in your wallet. BITFLOW is built through Stacks smart contracts which settle on Bitcoin. This transaction time reflects the Bitcoin block speed and processing on the Stacks network.
Pool: Provide Liquidity on BITFLOW xBTC/sBTC Pool
Here’s a step-by-step guide for providing liquidity in the BitFlow Pool. Becoming a liquidity provider allows you to earn rewards from the fees generated by trades in the pool.
1 — Navigate to the POOL page2 — Select the Pool you’d like to participate (xBTC-sBTC)
3 — Click ADD TO POOL tab
4 — Enter Amount for the first Token5 — Enter Amount for the second token to which you want to add Liquidity
SINGLE-SIDED LIQUIDITY: You have the freedom to provide liquidity from one side — just sBTC for example. No need to add a balanced amount of each token.
7 — Click “Confirm” which will bring up the smart contract confirmation window where you would select “Confirm”
By adding Liquidity, you can now earn the liquidity pool fees simply by staking on the EARN page.
EARN
Earning Rewards involves escrowing your liquidity pool (LP) tokens. The first step is to acquire LP tokens (USDA-sUSDT-LP for example), by adding liquidity to the BITFLOW pools. Please see “How to provide Liquidity on BITFLOW Pools” above.
BitFlow is a Real Yield protocol. What does this mean?
- All of the yield comes directly from trading activity
- Liquidity providers are rewarded with the same underlying tokens they escrowed.
Here’s the breakdown of how fees are distributed across the participants:
- The protocol charges 5 basis points (0.05%) on all swaps.
- 3 bps reserved for LP token Escrowers (Liquidity Providers)
- 2 bps reserved for the protocol
When you escrow your LP tokens on the earn page, you’re signing an agreement that you will not remove liquidity from the pool for as many cycles as you choose. And in return, you will receive a share of the trading fees collected by the protocol during these cycles while your LP tokens are escrowed.
ESCROW (Stacking)
This panel is where you can choose and enter the amount of LP tokens you wish to escrow and select the number of cycles you’ll lock up your tokens for.1 — First, select the “EARN” tab on the top menu bar and navigate to view the escrow panel
2 — Select your Token (xBTC-sBTC-LP)
3 — Enter Amount of Tokens
4 — Using the Slider or Cycles Buttons Select the Number of Cycles you are committing to (1 Cycle ~ 24 Hours), meaning 5 cycles = ~5 days, 60 cycles =~60 days (estimates) and so forth.
5 — Click “Start Earning” which will bring up the smart contract confirmation window where you would select “Confirm”
After signing, you should see that your transaction has been broadcasted popup, with the option to “View Transaction in Explorer” link to verify your transaction status.
Please note that during the escrow period you select your LP tokens (and the ability to remove the liquidity you are providing) are truly locked away and inaccessible until the conclusion of your final escrow cycle. (Takes ~ 1 Block to claim it)
REWARDS
By visiting the EARN page you can see your total rewards in the “My Liquidity” Panel, and on “LP Tokens Tab” in your Escrowed Actively Earning and Available To Reclaim (Once Cycle Completed).Claiming your rewards is the next step — Please follow these instructions:
View Rewards
1 — First visit the EARN page and wait a few moment while reward balances are scanned. Rewards and Balances may take a couple of minutes to load — please do not refresh page.
2 — When complete, “Rewards” tab will show the balances available to claim, and the “LP Tokens” tab will show you Principal in Escrow (Actively Earning) Principal to Claim (Available To Reclaim), these balances are updated every 1 Cycle ~24 hours.
Claim Rewards
How to claim your Liquidity Rewards
1 — Click the “REWARDS” tab on the My Liquidity Panel 2 — Click the “Claim Rewards” button which will bring up the smart contract confirmation window where you would select “Confirm”
How to claim your LP Tokens
Note: You can claim LP TOKENS only after the number of cycles you staked for has ended.1 — Click the “LP TOKENS” tab on the My Liquidity Panel
2 — Here you’ll see your LP Tokens that Actively Earning (Escrowed), and Available To Reclaim (Cycles Completed)
3 — Check the amount of Available LP TOKENS To Reclaim
4 — Click “Claim LP Tokens” which will bring up the smart contract confirmation window where you would select “Confirm”
REMOVE LIQUIDITY
Removing liquidity means you want to convert your LP tokens back into the two types of tokens you originally deposited.
1 — Navigate to the POOL page
2 — Click REMOVE LIQUIDITY button
3 — Select the LP Token (xBTC-sBTC-LP)
4 — Enter a percentage % of your liquidity to withdraw.5 — Click “Confirm” which will bring up the smart contract confirmation window where you would select “Confirm”
Please note that it may take up to 10–15 minutes for your balance to be updated in your wallet. BITFLOW is built through Stacks smart contracts which settle on Bitcoin. This transaction time reflects the Bitcoin block speed and processing on the Stacks network.