How to mint a crypto token on Solana

Here is a step by step guide on how to mint your own token on Solana.
Step 1: install rust
> curl — proto ‘=https’ — tlsv1.2 -sSf https://sh.rustup.rs | sh
Step 2: install Solana CLI
> sh -c “$(curl -sSfL https://release.solana.com/v1.10.8/install)"
Step 3: install SPL token SLI
> cargo install spl-token-cli
From here, you should have all the necessary tools to mint your own crypto token.
Step 4: choose solana cluster
> solana config set --url https://api.devnet.solana.com
This will set your solana cluster to the devnet so you won’t spend real Solana. If you are going to deploy it to the mainnet, use this cluster instead: https://api.mainnet-beta.solana.com
You can find more information about solana clusters here.
Step 5: create a solana wallet
> solana-keygen new --outfile ~/.config/solana/wallet-test.json
This will create a new crypto wallet on Solana. On Solana, a wallet contains a public and private key. The public key is like your public identifier; people can send tokens to your account using the public key. Private key is something that must NEVER be shown to anyone. With your private key, you can approve transactions, which means anyone with your private key will have vito power on what comes you can do with your wallet.
In this line, we are creating a file system wallet, meaning the wallet is stored as an unencrypted keypair in your wallet. If you would like better security, check out this hardware wallets in this documentation from Solana.
Step 6: use your solana wallet
> solana config set --keypair ~/.config/solana/wallet-test.json
After creating your wallet, you can let Solana CLI know that you want to use a specific wallet. Note that the file path can be where ever you put your keypair file.
Step 7: add SOL to your wallet
> solana airdrop 1
Requesting airdrop of 1 SOL
Signature: 4VZ2k3BW7t17QFUmyW6RnKQwUnFDTPAMBatnXPE1MiyS2neQcjMArWYKebUgHUsSX1ERkfykeFGzbqKMPsvzCPTV
1 SOL
Every transaction on Solana requires some SOL. This can be brought from centralised exchanged like Binance or Coinspot. Luckily on devnet, you can obtain free SOL, since it doesn’t convert to any real money on the devnet. 1 SOL will be plenty for all the operations that we will do.
You also fund your devnet wallet with Sol Faucet. It is a quick and user-friendly way to quickly airdrop some SOL into your wallet for testing.
Step 8: create your token
> spl-token create-token
Creating token GnvqQfxKb8cgHEU3U56iiFDXKyTT1e1yy4rMjsgqc9AJ
Signature: 3fdFTFKqTLqsLkmJ2K2uohvviShnQqc497tikLQVp6L2xZPcjFcPtAnXvgFp81TJyMj9AQJVdbVrExLWJyUDZs9J
This command will create your token. You will see that the token has a unique identifier and this is how Solana differentiates tokens. Each token has a unique token address and this will be used for minting our token.
Take note of the transaction fee for this operation. It only costs 0.00001 SOL!
Step 9: create a token account
> spl-token create-account [token_address]
Creating account 8aCmPs6qvgSz51MHLXQkbkmPsFFXGt3SwqoMMRkVKBMb
Signature: 3z5RvzuY1mVEMUDxi4ov8AL89GfS6FYgM9uXsEMpWrS2bYcrbeapxoWpYtmwMZZNaFbLdnmZtA4CfgnjbjVj1NsW
Before you can mint your token, there needs to be a place to store it. This is why we need to create a “associated token account”. You can imagine this as an account that is specialised to store your chosen token. This is similar to how your bank account has multiple “sub” accounts like transaction or savings. An associated token account is like a sub account for your wallet, where it only stores one type of token.
When it is the first time that you interact with a token (i.e. by minting or transfer), you need to open a token account and this is a relatively expensive transaction on Solana. This is usually the most expensive operation, costing 0.002 SOL. An important note here is that the sender will pay for this transaction fee if the receiver has not opened a token account before. It is important that the sender knows about this, if they are to mass transfers tokens to thousands of users who have no token accounts.
Visit this documentation for more details on how it works.
Step 10: mint your token
> spl-token mint [token_address] 100
Minting 100 tokens
Token: GnvqQfxKb8cgHEU3U56iiFDXKyTT1e1yy4rMjsgqc9AJ
Recipient: 8aCmPs6qvgSz51MHLXQkbkmPsFFXGt3SwqoMMRkVKBMb
Signature: 5gd84U15ngxDfNYtPXjYaGSCttuLcam4vjzGRbQKxg3dnqBaHGxQB9mLkux78YfMJT3QdHjqGWzSx6UnLguMrq8A
Now you can finally mint your token! You can choose whatever amount that you want; 1 million, 1 billion, it’s all up to you!
You have minted a Crypto Token!🎉
After all our steps, here is what it looks like. Notice the total supply is 100, exactly the same as the number we typed and the token address also matches. The authority represents the person who created the token which should be the same as your wallet address. It is possible to forfeit your authority on a token and this will mean that you cannot change anything about the token anymore (i.e. total supply).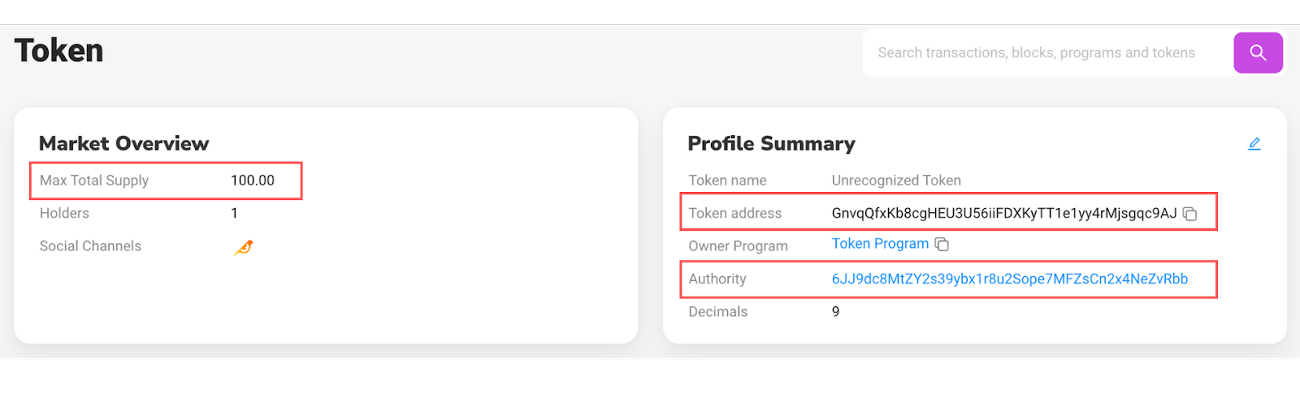
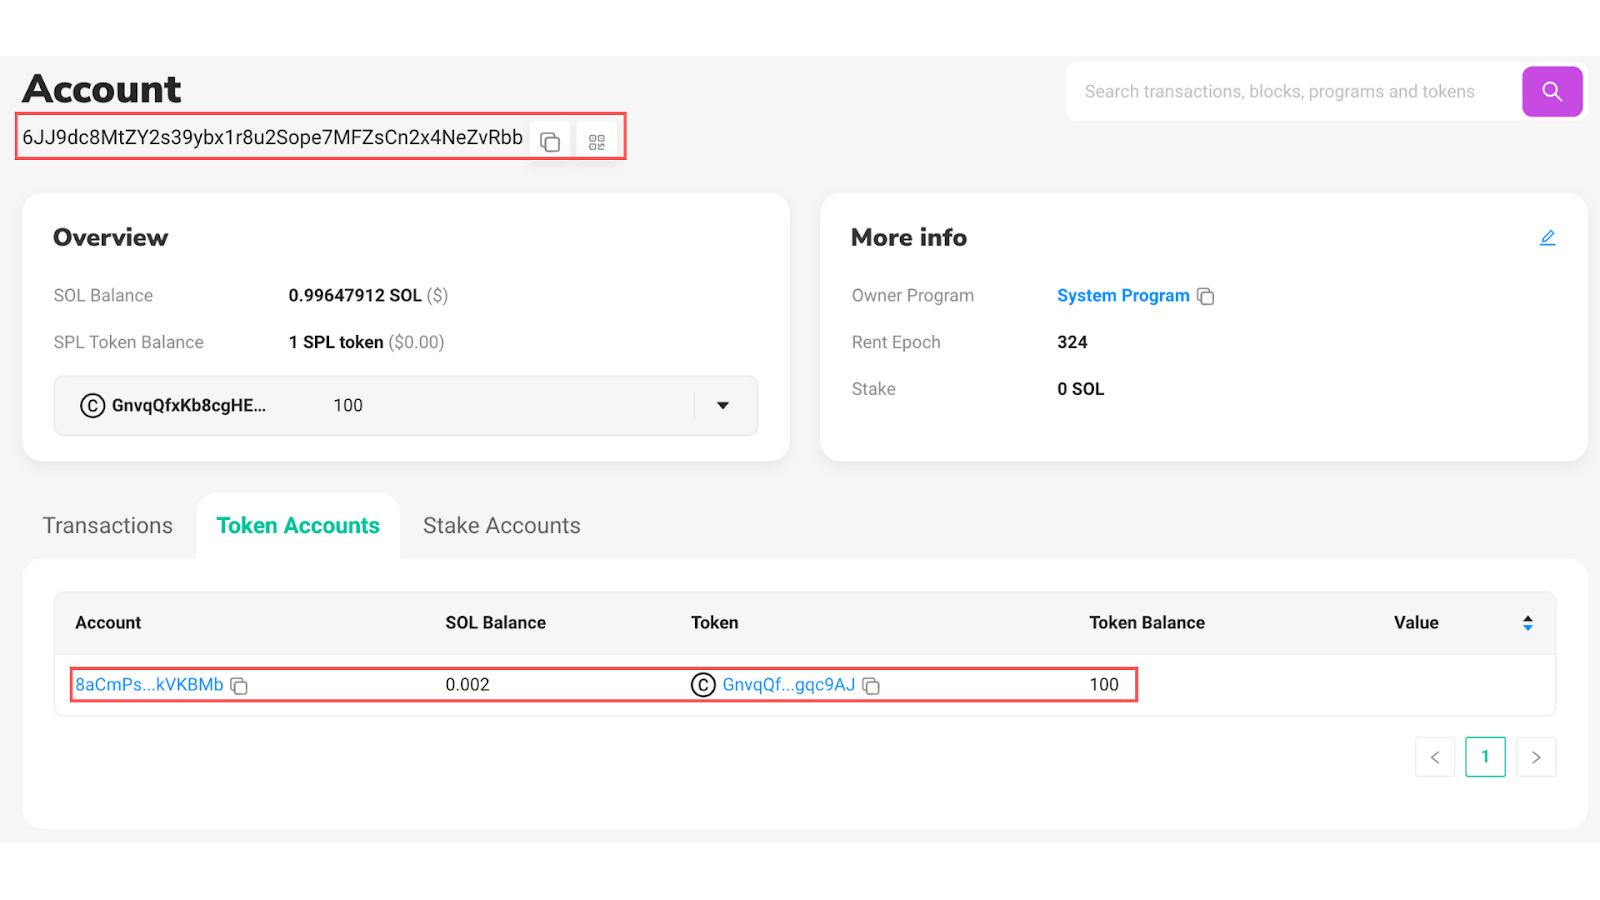
Now let’s take a look at my account. You will see that the wallet address on the top left matches with authority wallet. Notice that my initial SOL balance was 1 and now it is 0.996. This just goes to show how cheap it is to mint your own token on Solana. For our token accounts, you can see that it holds 100 of the token we just minted. When minting tokens, it does directly to the token creator.
You have successfully minted your token on Solana! If you like this tutorial guide, give my profile a follow and comment below what you will do with your own crypto token!
This guide is inspired by this video by Loop Creative Andy. You can check out the official documentation of solana for other token operations like burning and transferring tokens.