Waku: Node Kurulumu için Adım Adım Kılavuz

Waku Network, çeşitli kaynaklara sahip cihazlar için gizlilik, ölçeklenebilirlik ve kapsayıcılık konusunda başarılı olan açık erişimli, eşler arası bir mesajlaşma ekosistemidir. Birkaç yenilikçi özellik sunar:
- Spam ve DoS Koruması: Gizliliği koruyan Hız Sınırlayıcı Geçersiz Kılıcılar aracılığıyla Waku, kullanıcıların spam ve DoS saldırılarına karşı korunmasını sağlar
- Ölçeklenebilirlik: İleti teslimini optimize eden otomatik parça seçimi ile trafik sekiz pubsub konusunda verimli bir şekilde yönetilir
- Tüm Cihazlar için Destek: Waku, sınırlı kaynaklara sahip cihazlara uyum sağlayarak mesaj depolama, alma ve filtreleme için çözümler sunar
Waku'nun misyonu, interneti demokratikleştirmek, teknoloji tekellerinin kontrolünden uzakta iletişim için özgür ve açık bir alan sağlamaktır. Waku, iletişim kanallarını merkezden uzaklaştırarak yalnızca mevcut dijital hiyerarşiye meydan okumakla kalmaz, aynı zamanda herkes için daha güvenli, özel ve erişilebilir bir web'i kolaylaştırır. Bunu yaparken Waku, kullanıcı özerkliğinin ve veri egemenliğinin hayati önem taşıdığı merkezi olmayan bir web'in çekirdeğini temsil eder.
Bu yazının yazıldığı sırada yaklaşık 3.000 Twitter takipçisi ve daha küçük bir Discord topluluğu ile mütevazı çevrimiçi varlığına rağmen, bir Waku Düğümü çalıştırma kararım, projenin bağlılığını ve potansiyelini gösteren birkaç temel faktörden etkilendi:
- Aktif Geliştirme: GitHub'daki nwaku düğümü, Kasım 2020'den bu yana 46 sürümle sürekli ilerleme gösteriyor ve bu da güçlü bir katkıda bulunanlar ekibi tarafından iyileştirmeye yönelik özel bir çabayı gösteriyor
- Ayrıntılı Belgeler: Projenin profesyonelliği, kapsamlı sürüm notları da dahil olmak üzere kapsamlı belgeleriyle parlıyor ve hem yeni başlayanlar hem de uzmanlar için erişilebilir hale getiriyor
- Ufuktaki Teşvikler: 2024 yol haritası, Operatör Teşviki planlarına işaret ederek, topluluğun katılımını sağlamak ve genişletmek için yenilikçi bir yaklaşım önermektedir.
- Strategic Partnerships: Collaborations with prominent projects like Secret Network and Status, among others, underscore Waku’s credibility and its integration within the blockchain ecosystem
- Community Engagement: Participation in major events like Ethereum Denver and ETH Latam and the organization of hackathons with substantial bounties highlight Waku’s focus on product security and active community involvement
These elements reflect Waku’s serious and professional approach towards creating a decentralized communication platform. The project’s active development, strategic collaborations, and emphasis on community and security suggest it’s a promising initiative worth supporting by running a node.
To run a Waku Node effectively, we’ll need:
- VPS: At least 2GB of RAM for stable operation
- Git, Docker and Docker Compose: For code management, updates and deployment
- Ethereum Sepolia Endpoint: Connects our node to the Ethereum test network
- Wallet with Sepolia Ethereum: A small amount (<0.1 Sepolia ETH) for test network transactions
These prerequisites ensure your node can operate smoothly and securely within the Waku network.
Step 1: Order and configure your VPS
To get started with installing your node, you’ll first need to rent a VPS (Virtual Private Server). Using a VPS offers several advantages, such as enhanced performance, scalability and reliability. I’ll guide you through the process of renting a VPS at a lower cost, and show you how to configure it. Follow the steps below to get your VPS ready for the node installation. Research VPS providers: Take some time to explore different VPS providers available in the market. Consider factors like pricing, reputation, and customer reviews to find the right fit for your needs. Look for plans that offer the appropriate amount of resources (CPU, RAM, storage) to support your node. Contabo is my preferred choice due to their combination of affordable pricing, reliable performance, and user-friendly interface.
I personally use and trust Contabo for my blockchain nodes. I’ve recently joined their affiliate program to recommend their services. If you decide to use my affiliate links for Contabo, you’ll be supporting my work at no extra cost to you. This support is important for continuing our journey together in the fascinating world of crypto, and using these affiliate links is a direct and impactful way to back my efforts. Thank you very much for your support!
Given the modest hardware requirements, I suggest opting for the Cloud VPS 1 package, as it offers a suitable balance of performance and efficiency for these needs.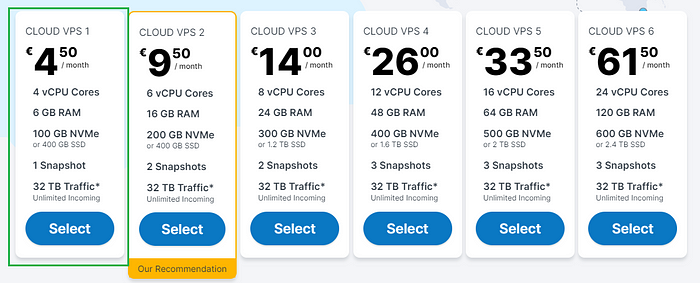 I will initially select a rental period of 1 month, since the network will only be up and running until March 15th:
 Make sure to choose the option “European Union (Germany)” for the best latency:
 I’ll choose the 100 GB NVMe, as this project shoulnd’t require much storage space. Prioritizing faster disk I/O over extra storage space makes more sense to me.
 Navigate to either the “Popular” or “OS” tab and choose the standard Ubuntu 22.04 image from there:
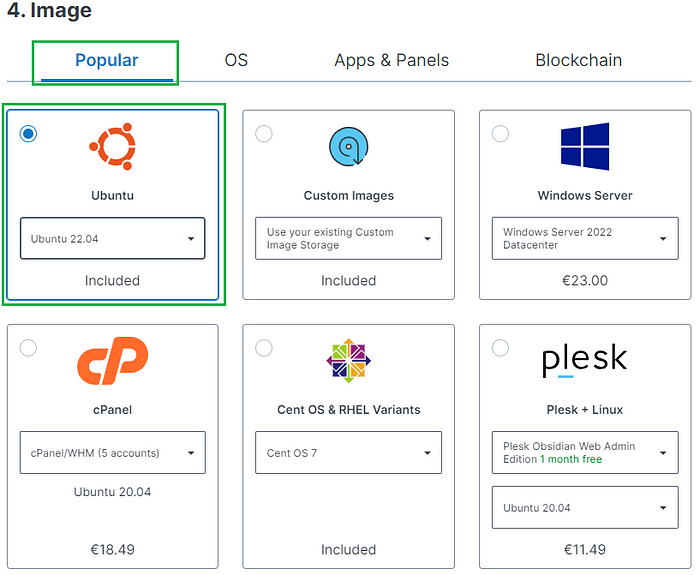 To prioritize security, I highly recommend to generate a strong password and securely store it to ensure maximum protection:
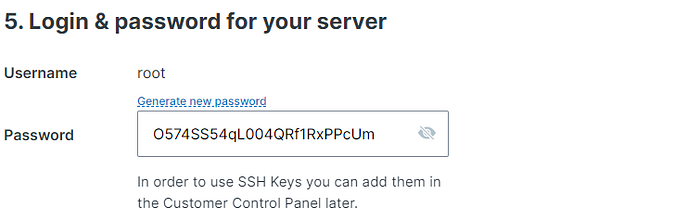 For the final step, it’s recommended to leave the sections titled “Object Storage”, “Networking”, and “Add-Ons” in their default state without any modifications. If you are new to Contabo, please create an account; otherwise, login using your existing credentials. Provide your personal data by filling in the required fields. Complete the remaining fields with your personal information, and click the “Next” button to proceed with the payment. After successfully completing the payment for your order, you will receive an initial email. Within approximately 15 minutes, you will receive a second email containing all the information needed to connect to your VPS.
Step 2: Connect to your VPS via SSH
Download and install most recent edition of PuTTY by visiting the official website: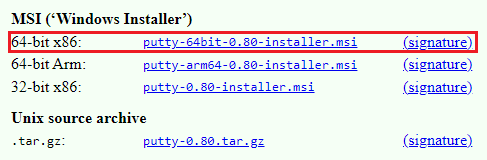 You will find the IP adress of your VPS in the second email. Launch PuTTY, enter the IP address of your VPS and click “Open”:
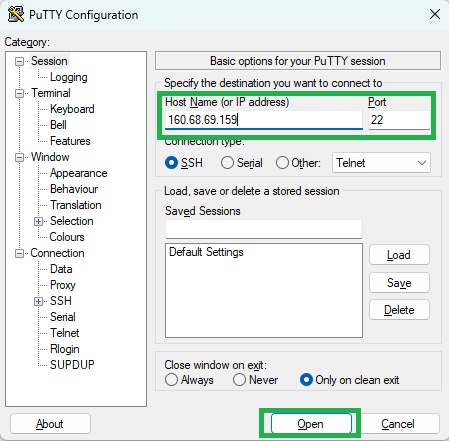 Once the server interface is open, you will be prompted to provide login details; simply enter “root” as the user and use your chosen password:
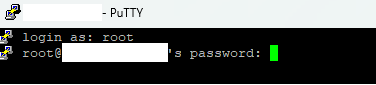 Congratulations! You are now successfully logged into your server:
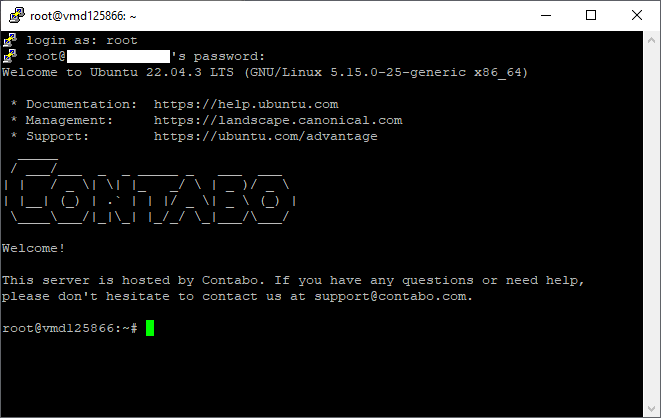
Step 3: Preparations
To continue, we can update the packages by running the following commands in the terminal. The first part of the command (sudo apt update) updates the package lists for upgrades, and the second part (sudo apt upgrade -y) actually performs the upgrades with the “-y” flag allowing for automatic confirmation of prompts during the upgrade process:
sudo apt update && sudo apt upgrade -y
We will now install the standard developer tools, including a C compiler, GNU Make, Bash, Git, Rustup, and PostgreSQL client library.
sudo apt-get install build-essential git libpq5 jq
After, we will install Rust using the rustup installer:
curl --proto '=https' --tlsv1.2 -sSf https://sh.rustup.rs | sh
When asked to select an installation option, we will enter “1” for the default installation and then press the Enter key: We will use the source command which loads environment variables and configurations for the Rust programming language into the current shell session:
source "$HOME/.cargo/env"
Let’s now check the Rust version:
rustc --version
The expected output should look like this, with the version being a minimum of 1.76.0:
4. Adım: Docker ve Docker Compose'u yükleyin
Şimdi Docker'ı kuralım, bu işlem birkaç dakika sürecektir:
sudo apt install docker.io
Yükleme tamamlandıktan sonra, aşağıdaki komutu kullanarak sürümü doğrulayın. Docker sürümü en az 24.0.5 olmalıdır.
docker --version
Ardından, Docker Compose kurulumuna geçelim. En son sürüm için GitHub depolarını doğruladığınızdan ve sürümü ve buna göre şu komutta ayarladığınızdan emin olun:
sudo curl -L "https://github.com/docker/compose/releases/download/v2.24.5/docker-compose-$(uname -s)-$(uname -m)" -o /usr/local/bin/docker-compose
Docker Compose dizininin izinlerini değiştirmek için chmod kullanın:
sudo chmod +x /usr/local/bin/docker-compose
Docker Compose sürümünü doğrulayın; En az v2.24.5 olmalıdır:
docker-compose --version
5. Adım: Docker Compose ile Nwaku'yu çalıştırın
Nwaku'yu kaynaktan oluşturma veya bir Docker Container'da çalıştırma seçeneğine sahip olmama rağmen, Nwaku'yu Docker Compose ile çalıştırmaya karar verdim. İlk önce depoyu klonlayalım:
git clone https://github.com/waku-org/nwaku-compose
cd nwaku-compose
Waku Node kurulumumuzu Docker Compose kullanarak yapılandırmak için, Docker Compose'un özel yapılandırmamızı anlamak için okuyabileceği bir ortam değişkenleri dosyası () hazırlamamız gerekecek. İlk olarak, örnek ortam dosyasını kopyalayıp düzenleyeceğiz:.env
cp .env.example .env
nano .env
To properly configure your Waku Node via the file, it's necessary to adjust specific values that enable your node to interact with the Ethereum Sepolia testnet and participate in the Rate Limiting Nullifier (RLN) contract. Here's a simplified guide on what changes to make:.env
ETH_CLIENT_ADDRESS: This is the RPC URL used to interact with the Ethereum testnet. Services like Alchemy or Infura can be used to generate this URL by creating a new Ethereum Sepolia app on their platform. This URL allows your Waku Node to communicate with the Ethereum blockchain.ETH_TESTNET_KEY: Enter the private key of your Ethereum testnet wallet here. This wallet should contain less than 0.1 Sepolia ETH, which will be used for transactions or staked in the RLN contract. It's important to handle this key securely, as it provides direct access to your funds.RLN_RELAY_CRED_PASSWORD: This is the password you choose to secure your membership in the RLN system, enhancing spam protection within the Waku network. Ensure this password is enclosed in quotes ("") and choose a strong, unique password for optimal security.
For most users, the remaining settings in the file can be left as default. An example configuration might look like this:.env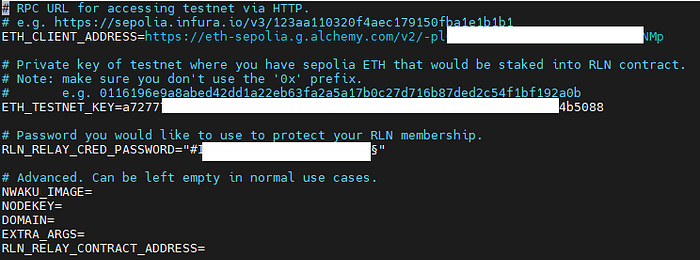 After editing, save and close the file. If you’re using , you can do this by pressing , then to confirm the changes, and to exit. To get started with a Sepolia Ethereum account, obtain some Sepolia ETH from a faucet, or set up an Infura node, the Waku team’s documentation provides comprehensive steps.
nanoCTRL + XYEnter
Step 6: Register For RLN Membership
To register your RLN membership and integrate it with your nwaku node, you’ll use the following command:
./register_rln.sh
This command initiates a script that automates the registration process, leading to the creation of a file within the directory. This file securely stores your RLN membership credentials, linking your node to its unique identity on the network.keystore.jsonkeystore/
Importance of the File:keystore.json
- Secure Storage: It holds your RLN membership information securely, essential for node operation.
- Node Identity: Acts as a digital passport for your node, enabling it to send and receive messages on the Waku Network.
It’s important to keep the file safe and private, as it contains sensitive information that grants access to your node's messaging capabilities on the Waku Network. Proper management of this file ensures your node can communicate effectively and securely within the decentralized web.keystore.json
Step 7: Open Necessary Ports
To configure your server’s firewall for your Waku Node, enable and open the required ports for operation and access:ufw
sudo ufw enable
sudo ufw allow 22     # SSH access
sudo ufw allow 3000   # Grafana dashboard
sudo ufw allow 8545   # Ethereum JSON-RPC
sudo ufw allow 8645   # Waku REST API
sudo ufw allow 9005   # discv5 routine
sudo ufw allow 30304  # libp2p communication
This setup ensures your node communicates effectively and remains accessible as needed, while maintaining server security.
Step 8: Run The Node
To launch your Waku Node and its associated services, including the database for message storage and Grafana for monitoring metrics, use the following Docker Compose command:
docker-compose up -d
This command starts the necessary processes in detached mode, running them in the background:
- nwaku node: Integrates your RLN membership for decentralized messaging.
- Database: Stores messages passing through your node
- Grafana: Provides visual monitoring and metrics analysis
Running in detached mode allows these services to operate seamlessly in the background, ensuring your node supports secure, private communication on the Waku Network without occupying your terminal.
The output should look similar to this: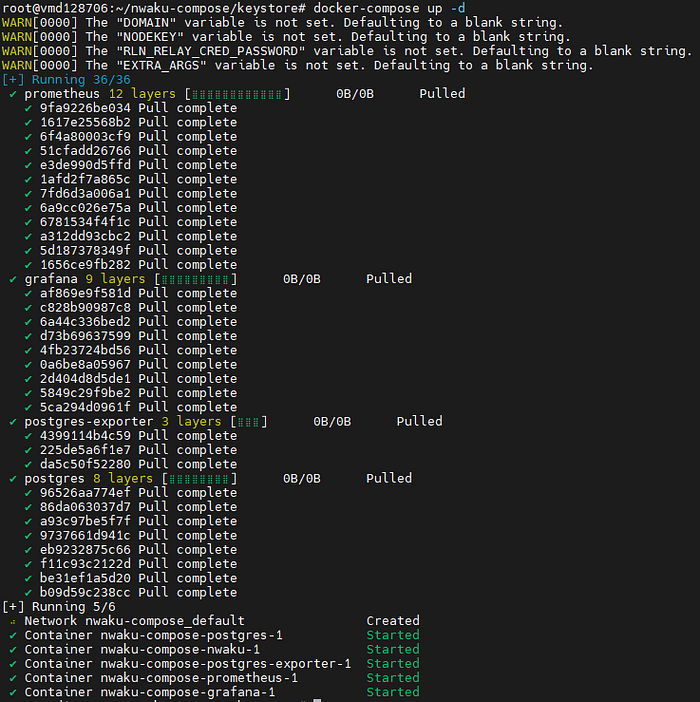
Step 9: Check The Logs
To confirm that your Nwaku node is functioning as intended, you can use the following command to check the status of all services:
docker-compose ps
This command will list all the services managed by Docker Compose, showing their status. Ideally, all services should be listed as “Up,” indicating they are operational, like this: For more detailed insights into how individual services are performing, especially to monitor your Nwaku node’s activity, you can view the logs with:
docker-compose logs nwaku
This will display the logs specifically for the nwaku node, allowing you to verify that it is actively sending and receiving messages as expected.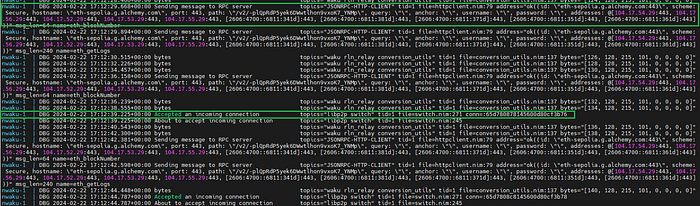 Also, to ensure your setup is fully integrated with the Ethereum network via Sepolia, check your Alchemy or Infura dashboard. Check that your Sepolia application is actively receiving requests, which indicates that your node is properly communicating with the Ethereum network.
Adım 10: Düğümle Etkileşim Kurun
Düğümümüz için gerekli bağlantı noktalarını kurduktan sonra, onunla etkileşime girmeye ve ölçümlerini gerçek zamanlı olarak izlemeye hazırız. Düğüm metriklerinize erişimi yapılandırmak için adım adım bir kılavuz aşağıda verilmiştir:
- Dosyayı Düzenle: kullanarak veya tercih ettiğiniz metin düzenleyicide bulunan dosyanızı açın:
docker-compose.ymldocker-compose.yml~/nwaku-composenano
nano ~/nwaku-compose/docker-compose.yml
2. Satır 105'e gidin ve bağlantı noktası bağlamasını 'den 'ye değiştirin. Bu değişiklik, Grafana panosuna harici erişime izin vererek, yalnızca localhost'tan değil, herhangi bir IP adresinden erişilebilir hale getirir.127.0.0.1:3000:30000.0.0.0:3000:3000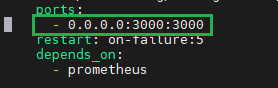 x
x
3. Docker Compose Services'ı yeniden başlatın: Dizinde olduğunuzdan emin olun. İlk olarak, hizmetleri aşağıdakilerle aşağı indirin:~/nwaku-compose
docker-compose down
4. Ardından, bunları ayrılmış modda yeniden başlatın:
docker-compose up -d
Bu komutlar, yeni yapılandırmayı uygulayarak hizmetlerinizi durdurur ve yeniden başlatır. Bir web tarayıcısı açarak düğüm metriklerinize erişin ve VPS'nizin gerçek IP adresiyle değiştirerek 'a gidin. Birkaç dakika sonra pano, ortalama mesaj boyutu, mesaj dağıtımı, bağlı eşler ve çok daha fazlası dahil olmak üzere düğümünüzden ölçümleri gösterecektir.http://<your_ip_address>:3000/d/yns_4vFVk/nwaku-monitoring<your_ip_address>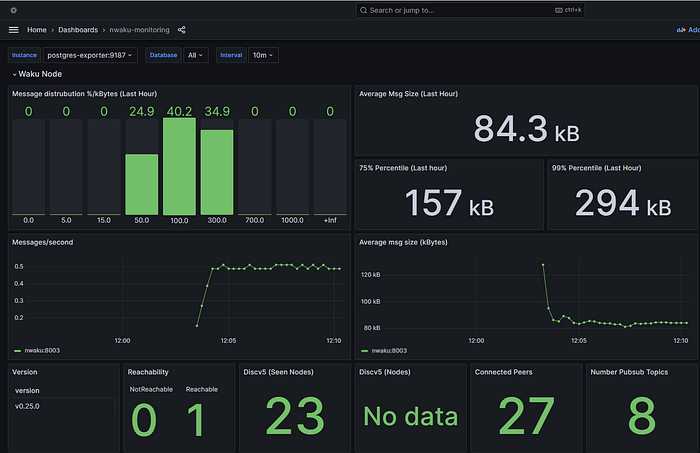
11. Adım: REST API'yi kullanın
Nwaku düğümünüz, 8645 numaralı bağlantı noktasından erişilebilen bir REST API sunar ve çeşitli operasyonel içgörüler için doğrudan düğümle etkileşim kurmanıza olanak tanır. Bunu şu şekilde kullanabilirsiniz:
- Nwaku düğümü sürümünü almak için: nwaku düğümünüzün sürümünü getirmek için aşağıdaki curl komutunu kullanın. Bu, hata ayıklamak veya hedeflenen sürümü çalıştırdığınızdan emin olmak için yararlı olabilir.
curl --location 'http://127.0.0.1:8645/debug/v1/version'
- Nwaku düğümü hakkında bilgi almak için: Bu komut, düğümünüzün yapılandırması ve mevcut durumu hakkında ayrıntılı bilgi sağlar. Düğümün operasyonel parametrelerine kapsamlı bir genel bakış için yararlıdır.
curl --location 'http://127.0.0.1:8645/debug/v1/info'
Bu komutlar terminalinizden yürütülür ve istenen verilerle JSON yanıtları döndürür. Özellikle nwaku düğümünüzün sağlığını ve durumunu izlemek ve ağ içinde beklendiği gibi çalıştığından emin olmak için kullanışlıdırlar.