Be sure to join the DOP Testnet - THEY CAN GIVE A NICE AIRDROP

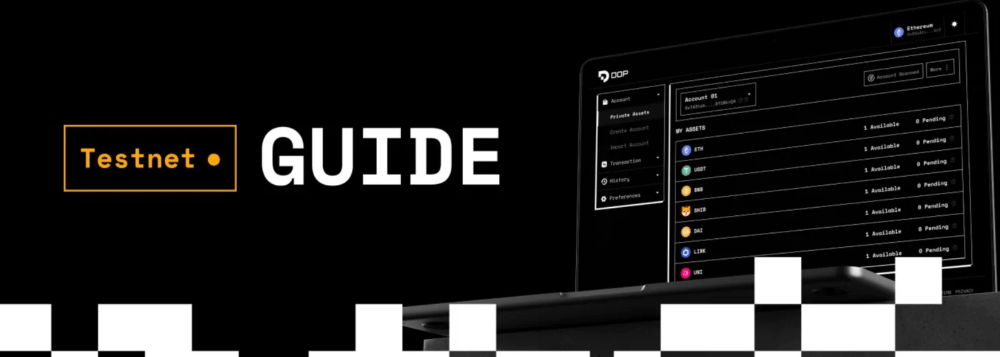
How to use the DOP Testnet
In this article, we’ll guide you through all the steps to login to the DOP Testnet and complete the steps for all the tasks. Once you complete all the tasks, you’ll be eligible to receive DOP token rewards in early 2024, after the token’s official launch. The exact launch date is TBD — we invite you to follow us to stay updated.
Before you begin:
- For an optimal experience, use Google Chrome browser on desktop. Make sure you’re using the latest version. The future mobile version of the testnet is not yet available, and will be released in the near future. We’ll keep you posted!
- Usage is currently only enabled through Metamask wallet.
Getting Started
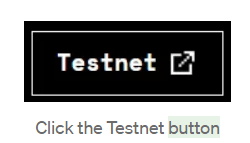
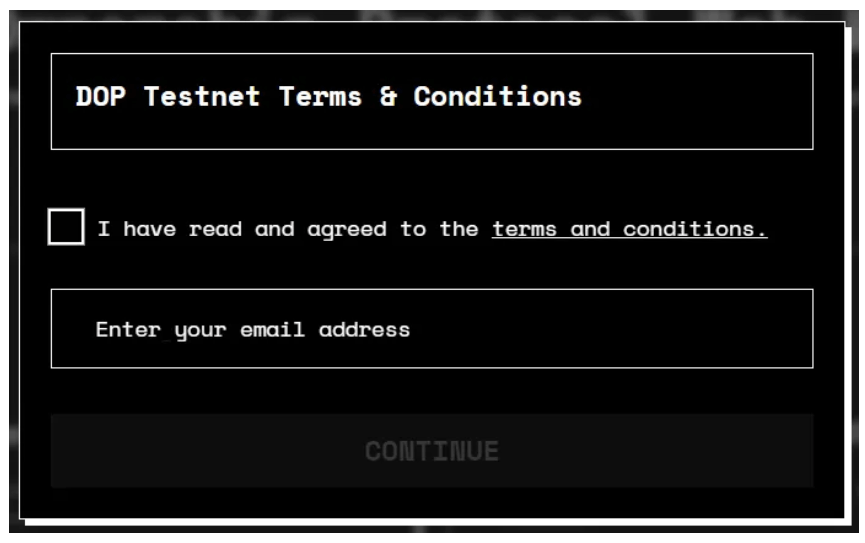
1. To get started, go to DOP’s website and click the Testnet button at the top of the homepage.
2. Check the box to indicate you have read and agreed to the terms and conditions, enter your email address so we could remind you to come back and claim your reward after the official token launch in early 2024, and then click Continue.
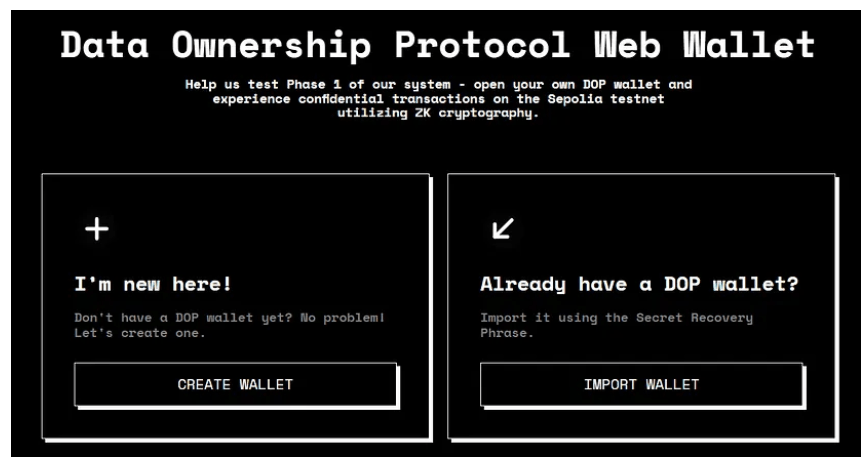
On the next screen, click Create Wallet if you don’t have a DOP wallet yet. If you already have a wallet, click Import Wallet, then follow the onscreen prompt to restore your wallet.
Create a new DOP wallet
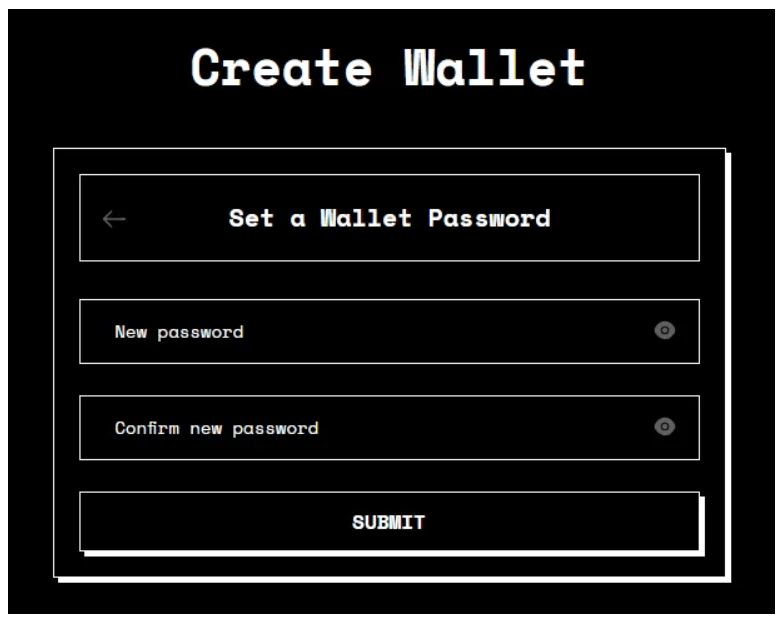
Follow the steps below to create a new DOP wallet, so you can encrypt, send/receive and decrypt crypto assets on the Testnet:
1. On the Create Wallet screen, enter a new password, then type it again in the Confirm new password field. When you’re done, click on Submit.
2. Your Secret Recovery Phrase is displayed. Click Copy Phrase at the bottom to copy the phrase, and save it in a secure location. Make sure to have it handy, as you will need to specify the words in the correct order on the next screen.
3. Click on Verify.
4. On the Verify your Secret Phrase screen, select the words of your secret phrase in the correct order. When you’re done, click on the OK, I’m done.
5. On the Congratulations! screen, click Continue.
6. Your secret key is displayed. Click the Copy icon to copy it, and store it in a safe place.
7. Then, click Done.
8. The Unlock your Wallet screen appears. Enter your password in the Password field and click Unlock at the bottom to unlock your DOP wallet.
9. On the welcome screen that appears, click Start.
10. On the Connect Wallet screen, select Metamask to connect your external wallet. Confirm the connection on your external wallet.
11. The DOP Testing dashboard is now displayed. Read on for an overview of the dashboard and the different actions and transactions you can perform using it.
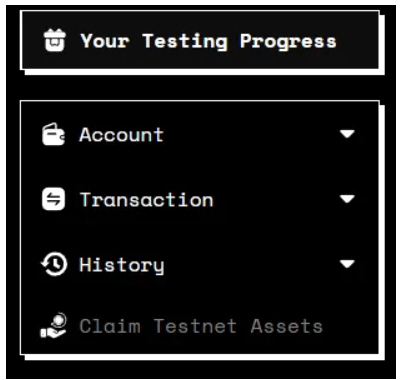
Testing Dashboard Overview
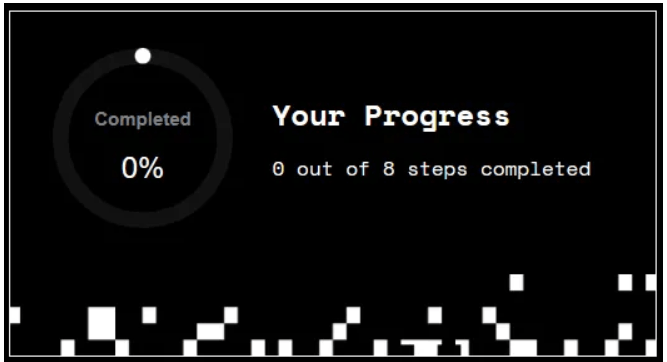
This is the home screen of the testing environment. At the top you can see your progress as you follow the steps to complete the testing tasks.
You need to complete 8 steps in total to be eligible for DOP rewards. The steps are listed below the progress section. Once you complete each step, its status will change to Completed, and the next step will become available.
The menu bar on the upper left side includes all the functions available on the Testnet. Click on any menu item to expand it and reveal the available functions. You can always click on Your Testing Progress to return to the testing dashboard.

Complete the tasks
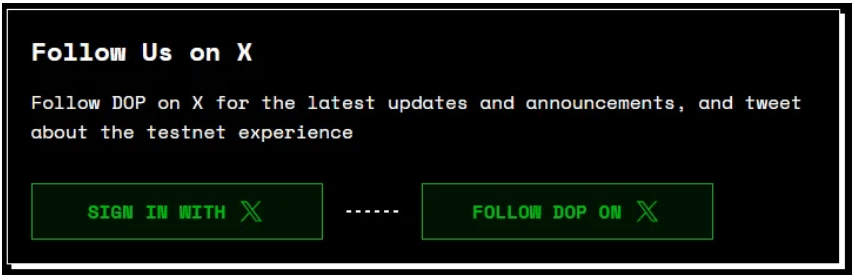
Step 1 — Follow Us on X (formerly Twitter)
The first step is to follow DOP on X.
1. Click Sign in with X. When the button turns green, click Follow DOP on X.
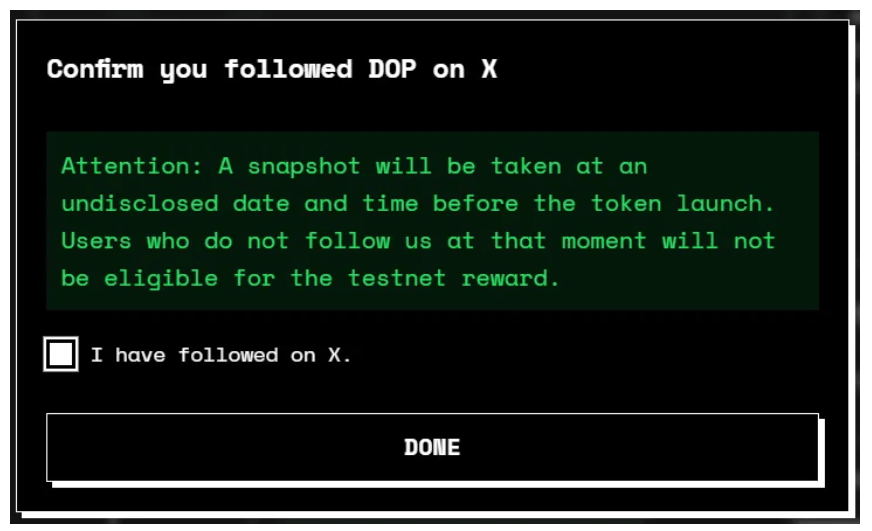
2. In the popup that appears, select the checkbox to confirm you have followed on X, then click Done.
Steps 2–4 — Claim Testnet tokens
In these preliminary steps, you claim test tokens that will be used in the following steps. In Step 2, Step 3 and Step 4, all you need to do is click the Claim button:
- In Step 2, you will get 0.05 tokens of SepoliaETH.
- In Step 3, you will get 1000 tokens of Testnet DOP.
- In Step 4, you will get Testnet versions of 10 crypto assets, 10,000 tokens of each. These are tokens intended for testing use only, and they have no real value.
In Steps 3 and 4, you might want to add the token contracts to your Metamask so they will be visible in the wallet. Simply click on the Metamask fox icon.
You can also manually add individual contracts by selecting the token you want from the dropdown list and clicking Copy.
When you have completed these three steps, your screen should look similar to this:
And now we’re getting to the interesting part, which will allow you to experience the basic functions powered by DOP.
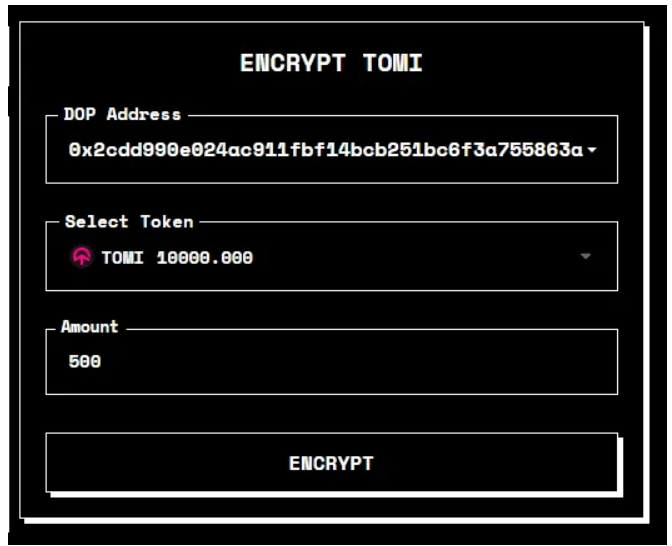
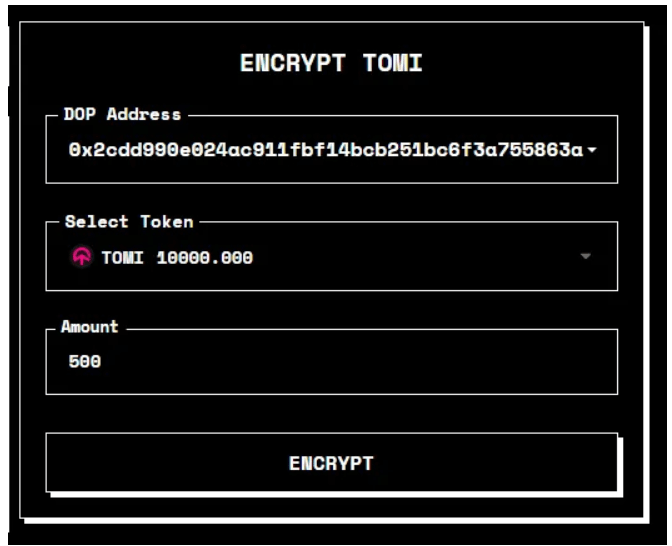
Step 5 — Encrypt Assets
In this step, you will use DOP to encrypt assets, so they will no longer be visible on the blockchain.
1. Click on Get Started to begin the encryption process.
2. On the Encrypt screen, the DOP Address field is pre-populated with your DOP wallet address. If you have created more than one DOP account, you can click the down arrow on the right to open the dropdown and select the account you want.
3. Click inside the Select Token field to display a list of available assets.
4. Click on the currency you want to encrypt to select it. You can also use the search bar to quickly find the token you want.
5. Specify the amount you would like to encrypt in the Amount field, then click on Encrypt at the bottom.
6. On the Transaction Summary screen, click Confirm to confirm the transaction.
7. You’ll also need to confirm the transaction in Metamask.
8. If the transaction is completed successfully, a notification will appear to let you know that the assets were encrypted successfully.
9. To see what the transaction looks like on the Sepolia blockchain (in this case), click on View in Explorer.
10. To finish, click Close. A popup will appear to let you know you have completed the task successfully. Click OKAY to dismiss it.
The assets you’ve selected in step 5 are now encrypted. If you want to see which encrypted assets you have, click on Encrypted Tokens under Account in the upper left menu.
Step 6 — Send Assets
In the Step 6 — Send Assets tile, click on Get Started to go to the Send screen. Then follow the steps below to send encrypted assets to another DOP wallet.
1. Click the down arrow on the right end of the DOP Account field. A dropdown list opens, displaying any DOP accounts you have created in the current wallet, and also a test account address. You can also click inside the DOP Account field and manually enter an address to which you would like to send assets.
2. For the purpose of this test, select Test DOP Account.
3. Click in the Select encrypted token field to display a list of available encrypted assets. The token you have encrypted in the previous step should be available on the list. Click to select it.
4. In the Amount field, enter the amount you want to send.
5. To Send the encrypted assets, click the Send button.
6. Confirm the transaction in the Transaction Summary pane that appears.
7. Confirm the transaction in your Metamask wallet.
8. The transaction should complete within a few seconds.
That’s it! Your funds are on their way to the destination address. Dismiss the two popups that are displayed to continue to the next step.
Step 7 — Decrypt Assets

- In your testing dashboard, click Get Started under the Decrypt Assets step. The Decrypt screen is displayed.
- The External Account field is already pre-filled with your connected wallet address.
- Click inside the Select Encrypted Tokens field to display a list of available encrypted assets. The tokens you encrypted in Step 5 should be available.
- Note: if you have sent all your encrypted tokens in Step 6 — Send Assets, you need to encrypt more tokens to complete this step. Simply click on Transaction > Decrypt in the left navigation menu, and complete the steps listed in Step 5 — Encrypt Assets above.
- Choose the asset you want to decrypt.
- Specify the amount in the Amount field.
- Enter your Wallet Password in the designated field.
- Click Decrypt.
- On the Transaction Summary screen, click Confirm to confirm the transaction.
- You’ll also need to confirm the transaction in Metamask.
- When the transaction is completed, a notification will appear to let you know that the assets were successfully decrypted. You can also click on View in Explorer to see the transaction on the Etherscan. The tokens you have decrypted are now visible again on the blockchain and can be transferred to any wallet outside of DOP.
- Click Close.
Final Step
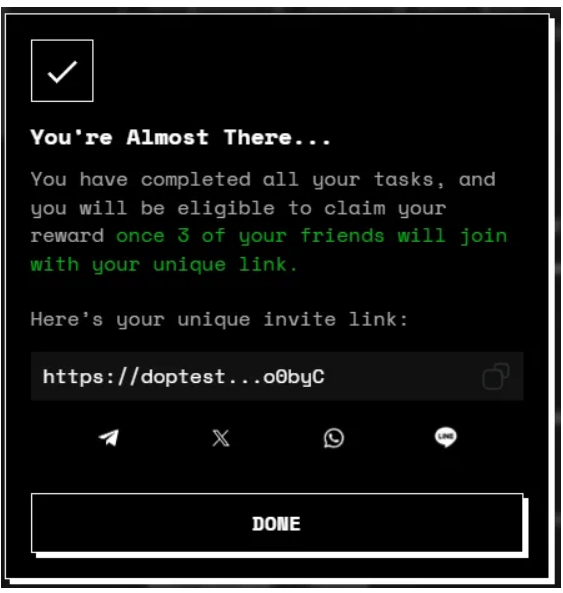
The following popup appears:
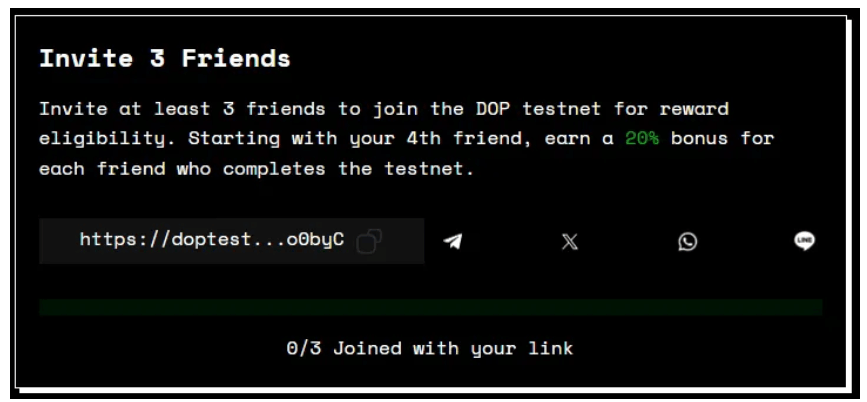
Share your unique referral link with at least 3 friends, and click Done.
At the bottom of the Step 8 — Invite 3 Friends box, you will now be able to see if 3 of the friends you had invited have joined.
All Done!
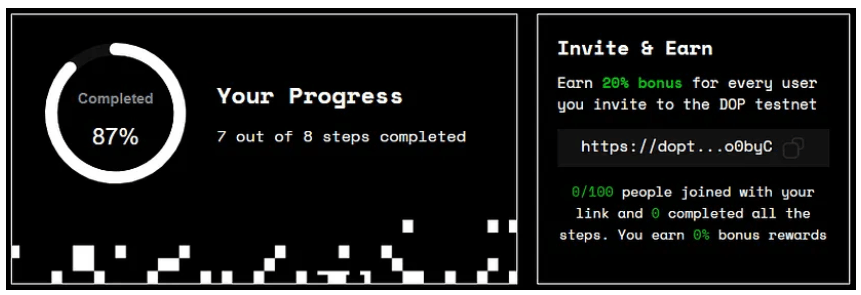
Once 3 friends join through your unique link, you will be eligible to receive your DOP reward after the official token launch in early 2024. Your Progress at the top of the screen will change to 100%.
Mind that for each additional person you refer (up to a maximum of 100) who completes all the testnet steps you will receive a 20% bonus. In other words, you can earn up to 2000% more in DOP token rewards!
At the top-right of your dashboard, under Invite & Earn, you can see how many people have joined through your referral link (starting from the 4th person) and completed the testnet, and also the percentage of the bonus rewards you’re entitled to.
If you want, you can use the navigation bar options on the upper left side of the screen to encrypt, send, and decrypt tokens again. However, these actions will not be counted towards any additional rewards.
If you enjoyed this article, please read my previous articles:
- 5 Altcoins That Will At Least 50x in 2024
- Don't miss this opportunity! SOUL Drop by CARV! - Detailed Explanation!!!
- Mail Zero - Airdrop Confirmed + zkSYNC airdrop (Join simultaneously at once) - Step by Step
- Why Nexa Matters?
- What is Bitcoin Cash (BCH)?
I give the tips you send as scholarships to poor but successful students in my country. Stay with love
BTC : 3Pha7QFppT4Ec4R7RkgjaLgTPizb9YrZEj
ETH/BNB/OP/ARB/LINEA/opBNB/AVAX/Polgon/Kroma/Metis Network/zkSync Era/Scroll: 0x71a571962597c1872B2FdB16cd605aB5a313B81c
SOLANA : 8gSWz2zCGSWVhfPZ8fz7oRm6zrobEmKGrynXCwj188Sn
ATOM : cosmos1fw9esjhsa4hzttl0tnq9hv0l6wffjt2effcx87