Bitcoin Staking Guide for Babylon Testnet

The aim of this guide is to prepare you to participate in the staking process on the Babylon platform. The BTC staking web application currently supports Chrome on desktop platforms, so we are going to assume this setup for the rest of the guide. To start staking Bitcoin on Babylon Testnet, you’ll need to set up an OKX Wallet to store your Signet Bitcoin and a Keplr Wallet to store your Babylon Testnet Tokens (tBBN). Let’s get started!
Setting up the wallets
Keplr Wallet
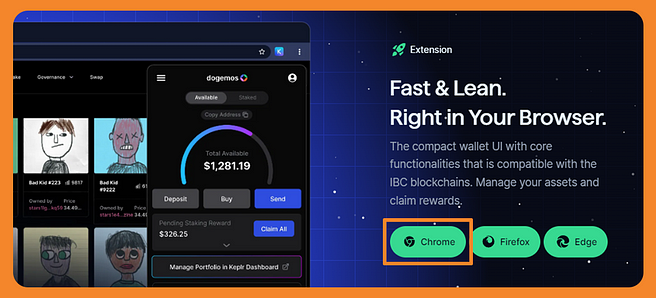
- Download and Install Keplr Wallet: Visit the Keplr website and install the Keplr Chrome extension.
 2. Create or Import Wallet: Upon installation, you can either create a new wallet, import an existing one, or connect a hardware wallet of your choice.
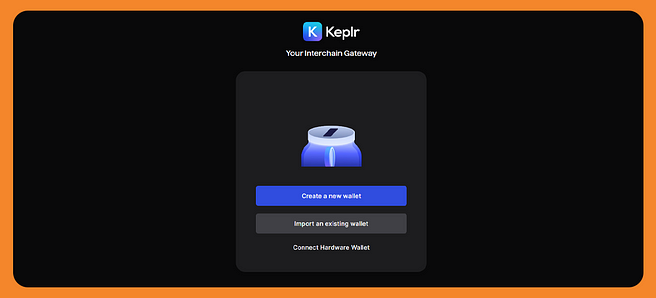 3. Add Babylon Testnet Chain to Keplr: Once you have set up your wallet, navigate to chains.keplr.app, search for Babylon Testnet, and add it to your Keplr wallet.
 4. Manage Chain Visibility: Ensure Babylon Testnet is visible in your Keplr wallet by adjusting chain visibility settings.
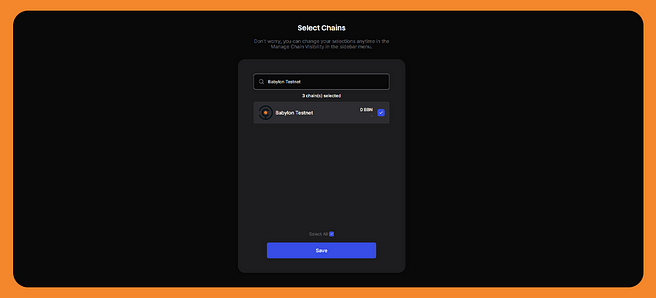
- To do this, click on the Keplr wallet extension on your Chrome browser, and click on the burger menu on the top left corner of the wallet.
- On the Select Chains window, enable visibility for Babylon Testnet, and click Save.
- Confirm that Babylon Testnet Chain (BBN) appears in your wallet.
 5. Acquire Babylon Testnet Tokens: Copy your Babylon Testnet wallet address and go to the Babylon Discord server to get tBBN tokens.
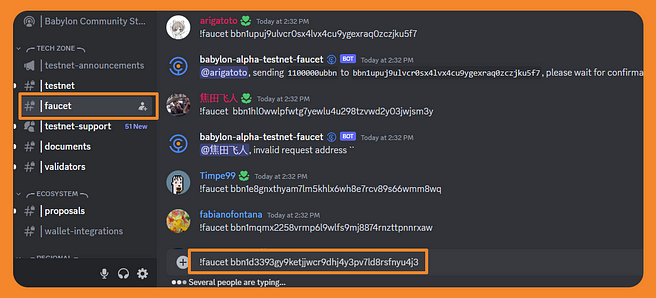
- Join the discord server, and head over to get-a-role channel.
- You will be prompted to select a role. Select the Tech role as this gives you access to the required channel to acquire tBBN tokens.

- Go to the faucet channel, send the following message:
- !faucet <Your Babylon Testnet Address>
- The Babylon Testnet tokens will appear in your Keplr wallet after some time.
OKX Wallet
- Set up OKX Wallet: Download the OKX wallet extension from the official website. We support all OKX wallet versions from 2.83.0 onwards.
2. Create or Import Wallet: Upon installation, you can either create a new wallet, import an existing one, or connect a hardware wallet of your choice.
3. Add Signet BTC Token to your OKX Wallet: Once you set up your wallet, open it, scroll to the bottom of the cryptocurrencies list and click on Manage Crypto. Look up Signet BTC, and add it to your wallet.
4. Confirm Address Type: Bitcoin staking on Babylon Testnet is compatible with both Taproot and Native Segwit formats. Click on Signet BTC in your OKX Wallet, and confirm you’re using Taproot or Native Segwit address.
5. Get Signet Faucet Tokens:
- Copy your Taproot or Native Segwit address and go to the Babylon Discord server.
- Join the server and get verified.
- Navigate to the #faucet-signet-btc channel, type in !faucet <your sBTC address> and hit enter.
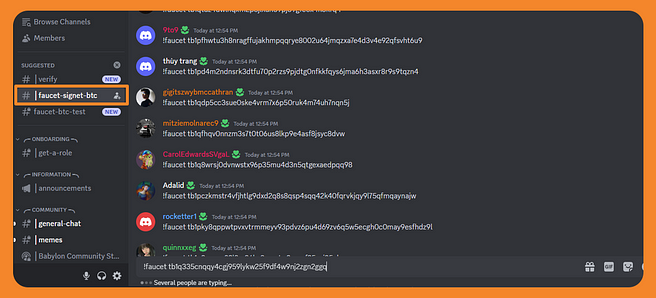
- Please note that the signet faucet employs spam protection, and you can only request Signet BTC once per address.
The amount of Signet BTC tokens you requested will reflect in your OKX Wallet after the transaction is processed. Please note that this process will take as much time as it takes to process the transaction.
Staking Bitcoin
Now that you have both, Signet BTC and tBBN tokens, let’s look at how you can start staking bitcoin on Babylon Testnet:
- Navigate to https://btcstaking.babylonchain.io/
2. Connect your OKX & Keplr wallets. If the pop-ups don’t appear, try disabling your ad blocker as it may be blocking these pop-ups from appearing.
3. Select a PoS chain to stake with. (Currently only Babylon is supported and is selected by default).
4. Select a finality provider of your choice from the list.
5. Enter the amount of Signet BTC you want to stake and the amount of days you want to stake for. This is the amount of Signet BTC that will be locked in a trustless and self-custodial Bitcoin Script for a predetermined amount of days.
Note: The amount of days that you input is an approximation of how long your stake will be active and depends on Bitcoin block times.6. Accept the terms and click on Preview.
Once you click Preview, you will be shown a snapshot of the transactions that you’ll need to confirm before your stake is finalised. A series of pop-ups will appear as follows:
- Create a staking transaction for Signet Bitcoin — This is a transaction that locks the Bitcoin you decided to stake in the trustless and self-custodial Bitcoin staking script.
- Create a staking covenant and unbonding transaction — The staking covenant transaction is a pre-signed transaction that you need to submit in order for Babylon to perform covenant emulation. See more details about covenant emulation at: https://github.com/babylonchain/covenant-emulator
- Babylon facilitates on-demand unbonding if you want to unlock your Bitcoin before the staking term ends. This is made possible through a pre-signed unbonding transaction.
- Create an unbonding covenant transaction — Similar to the staking covenant transaction in step 2, the unbonding covenant transaction is a pre-signed transaction that you need to submit in order for covenant emulation to be performed on your unbonding transaction. Babylon needs this as the unbonding transaction is subject to an unbonding period in which your Bitcoin is still slashable in the case of offence.
- Link your Babylon and Bitcoin accounts for reward — Finally, you need to mutually sign your Babylon and Bitcoin accounts to prove ownership. This is used by Babylon to verify to which account your Bitcoin Staking rewards will be credited.
Click on Submit and confirm the transactions to successfully stake your bitcoins. A transaction of the staking request will be created once you approve all 5 pop-ups. After that, your stake will be in a pending state until it receives 7 Bitcoin block confirmations. Once this happens, the status will change to Active.
And that’s it!
You have now successfully staked your bitcoins on the Babylon Testnet!
Happy Staking!
Unbonding & Withdrawing Your Staked Bitcoin
If, at any point in time, you want to unbond and withdraw your stake, you can do so on-demand in two easy steps:
- Unbond your Stake: Navigate to the Staking History section on btcstaking.babylonchain.io.
- Click Unbond for the stake you want to withdraw. Confirm the transaction on the OKX Wallet pop-up that appears.
This will send an additional transaction to the Bitcoin network with the aim to unlock your Bitcoin at an earlier time than originally committed. Once this transaction enters the Bitcoin ledger, you enter into the Unbonding Period which lasts for ~16 hours.
3. After the unbonding period is over, a “Withdraw” button will appear next to your stake.4. Once you click on the Withdraw button, a new pop-up will appear asking you to sign the Withdrawal transaction. This is a transaction that retrieves the unlocked Bitcoin and makes them readily available for spending.
Another thing to note is that “Withdraw” button can appear if a staking transaction naturally expires (i.e. the originally committed timelock has expired). The functionality of this “Withdraw” is exactly the same as the withdrawal described above, but without the on-demand unbonding process.
Claiming Your Rewards
- You can claim your rewards at any time by clicking on the Claim all button on the staking dashboard.
2. A pop-up will appear as you click on the Claim all button — approve the transaction to claim your BBN tokens.
Your BBN rewards will appear in your Keplr wallet shortly thereafter.
for more info & Credit to:-https://medium.com/babylonchain-io/bitcoin-staking-guide-for-babylon-testnet-7c0fe4fffa95