Convolutional Neural Networks: A Comprehensive Guide

Table of contents
- What are Convolutional Neural Networks?
- Convolutional layers
- Channels
- Stride
- Padding
- Pooling Layers
- Flattening layers
- Activation functions in CNNs
Convolutional Neural Networks, commonly referred to as CNNs are a specialized type of neural network designed to process and classify images.
If you are new to this field you might be thinking how is it possible to classify an image?
Well… images are also numbers!
Digital images are essentially grids of tiny units called pixels. Each pixel represents the smallest unit of an image and holds information about the color and intensity at that particular point.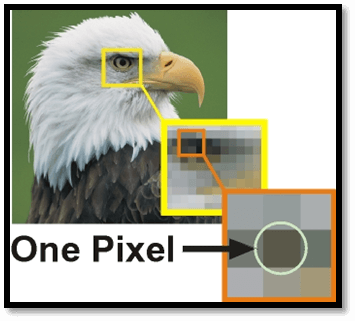
Typically, each pixel is composed of three values corresponding to the red, green, and blue (RGB) color channels. These values determine the color and intensity of that pixel.
You can use the following tool to understand better how the RGB vector is formed:
In contrast, in a grayscale image, each pixel carries a single value that represents the intensity of light at that point.
Usually ranging from black (0) to white (255).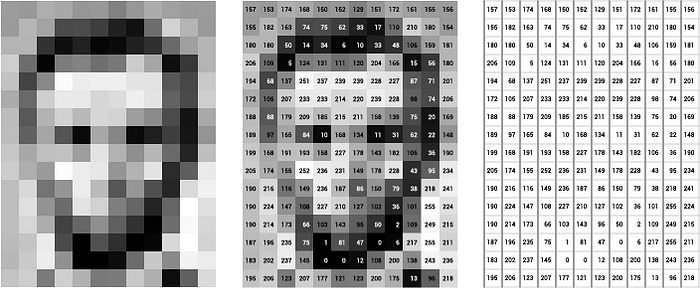
How do CNNs work?
To understand how a CNN functions let´s recap some of the basic concepts about Neural Networks.
(If you are reading this post I am assuming that you are familiar with basic neural networks. If that´s not the case I strongly recommend you to read this article).
1.- Neurons: The most basic unit in a neural network. They are composed of a sum of linear functions multiplied by a non-linear function known as the activation function.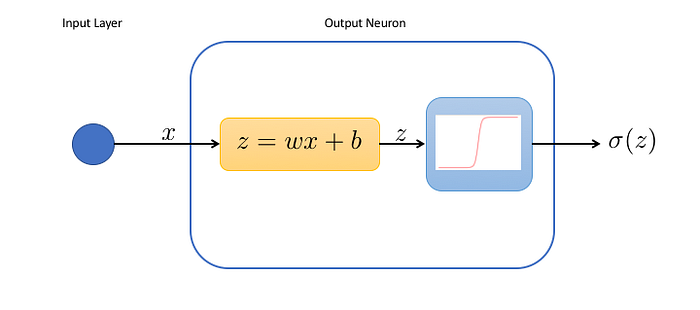
2.- Input layer: Each neuron in the input layer corresponds to one of the input features.
For instance, in an image classification task where the input is a 28 x 28-pixel image, the input layer would have 784 neurons (one for each pixel).
3.- Hidden Layer: The layers between the input and the output layer. Each neuron in this layer is summed by the result of the neurons in the previous layers and multiplied by a non-linear function.
4.- Output Layer: The number of neurons in the output layer corresponds to the number of output classes (In case we are facing a regression problem the output layer will only have one neuron).
For example, in a classification task with digits from 0 to 9, the output layer would have 10 neurons.
Once a prediction is made, a loss is calculated and the network enters a self-improvement iterative process through which the weights are adjusted with backpropagation to reduce this error.
Now we are ready to understand convolutional neural networks!
The first question we should ask ourselves:
- What makes a CNN different from a basic neural network?
Convolutional layers
They are the fundamental building blocks of CNNs. These layers perform a critical mathematical operation known as convolution.
This process entails the application of specialized filters known as kernels, that traverse through the input image to learn complex visual patterns.
Kernels
They are essentially small matrices of numbers. These filters move across the image performing element-wise multiplication with the part of the image they cover, extracting features such as edges, textures, and shapes.
In the figure above, visualize the input as an image transformed into pixels.
We multiply each term of the image by a 3 × 3 matrix (this shape can vary) and pass it into an output matrix.
There are various methods to decide the digits inside the kernel. This will depend on the effect you want to achieve such as detecting edges, blurring, sharpening…
But what are we doing exactly?
Let´s take a deeper look at it.
Convolution Operation
The convolution operation involves multiplying the kernel values by the original pixel values of the image and then summing up the results.
This is a basic example with a 2 × 2 kernel:
We start in the left corner of the input:
- (0 × 0) + (1 × 1) + (3 × 2) + (4 × 3) = 19
Then we slice one pixel to the right and perform the same operation:
- (1 × 0) + (2 × 1) + (2 × 4) + (5 × 3 ) = 25
After we completed the first row we move one pixel down and start again from the left:
- (3 × 0) + (4 × 1) + (6 × 2) + (7 × 3) = 37
Finally, we again slice one pixel to the right:
- (4 × 0) + (5 × 1) + (7 × 2) + (8 × 3) = 43
The output matrix of this process is known as the Feature map.
..........
Perfect, now we understand how this operation works! But…
Why is it so useful? We are just multiplying and adding pixels, how can we extract image features doing this?
For now, I won´t be diving deeper into the convolution operation because I don´t consider it to be pivotal for understanding Conv. nets in the beginning.
However, if you are very curious I will leave you what I believe to be the best public answer to that question:
That´s it, you´ve understood the most fundamental concept behind CNNs, Convolutional Layers!
At this point, you may be having a bunch of doubts (at least I had them).
I mean, we understand how a convolution works, but:
- Kernels always traverse through the image matrix one pixel at a time?
- What happens with the pixels in the corners, we are only passing over them one time, what if they have an important feature?
- And what about RGB images? We stated that they are represented in 3 dimensions, how does the kernel traverse over them?
These are a lot of questions but don´t worry, all of them have an easy answer.
We’ll start by understanding three essential components inside convolutional layers:
1.- Channels
As I explained before, digital images are often composed of three channels (RGB) which are represented in three different matrices.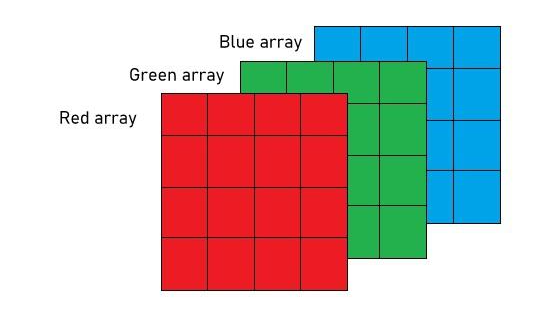
For an RGB image, there are typically separate kernels for each color channel because different features might be more visible or relevant in one channel compared to the others.
- Depth of the layer
The ‘depth’ of a layer refers to the number of kernels it contains. Each filter produces a separate feature map, and the collection of these feature maps forms the complete output of the layer.
The output normally has multiple channels, where each channel is a feature map corresponding to a particular kernel.
In the case of RGB, we typically use one channel for each of the 3 matrices, but we can add as many as we want.
For example, let´s say that you have a gray-scale image of a cat, you could create a channel specialized in detecting the ears and another in the mouth.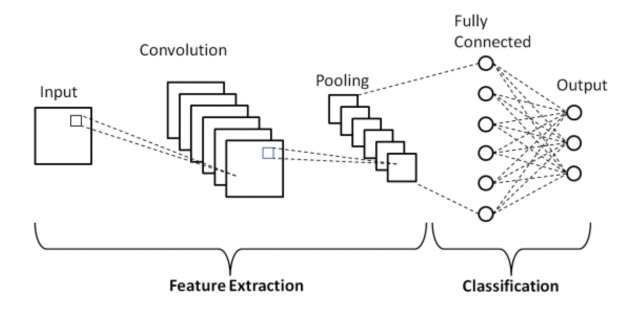
This image illustrates the concept quite well, think of each layer in the convolution as a feature map with a different kernel (don´t worry about the pooling part for now, we`ll break it down in a minute).
☣️ BE CAREFUL with misunderstanding the channels in the convolution layer with the color channels in the image. That was a representative example to understand the concept but you can add as many channels as you want.
Each channel will detect a different feature in the image based on the values you assign to its kernel.
2.- Stride
We have discussed that in a convolution a kernel moves through the pixels of an image, but we haven´t talked about the different ways in which it can do it.
Stride refers to the number of pixels by which a kernel moves across the input image.
The example we saw before had a stride of 1, but this can change.
Let´s see a visual representation:
- Stride = 1

- Stride = 2
 A stride of 2 not only changes the way the convolution iterates over the input size but also the output by making it smaller (2 × 2).
Taking this into account we can conclude that:
A larger stride will produce smaller output dimensions (as it covers the input image faster), whereas a smaller stride results in a larger output dimension.
But why would we want to change the stride?
Increasing the stride will allow the filter to cover a larger area of the input image, which can be useful for capturing more global features.
In contrast, lowering the stride will capture finer and more local details.
In addition, increasing the stride will control overfitting and reduce computational efficiency as it will reduce the spatial dimensions of the feature map.
3.- Padding
Padding refers to the addition of extra pixels around the edge of the input image.
When you focus on the pixels in the image’s edges, you’ll notice that we traverse them fewer times compared to those positioned in the center.
The purpose of padding is to adjust the spatial size of the output of a convolutional operation and to preserve spatial information at the borders.
Let´s see another example with the CNN explainer
- Padding = 0 (focus on the edges and count how many times the kernel is passing through them)
 Bibliography
- Polo Club of Data Science. (2020). CNN Explainer.
- IBM. (2020). Convolutional Neural Networks.
- Saha, S. (2018). A Comprehensive Guide to Convolutional Neural Networks — the ELI5 way. Towards Data Science.
- Cireșan, D. C. (2016). Convolutional Neural Networks for Visual Recognition. Springer International Publishing.
- DeepLearning.TV. (2019). Convolutional Neural Networks (CNNs) explained. [Video]. YouTube.
Thanks for reading! If you like the article make sure to clap (up to 50!) and follow me on Medium to stay updated with my new articles.
Also, make sure to follow my new publication!